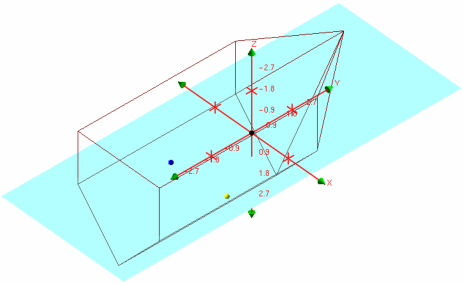
The 3D display shows a wire outline of the vessel and the locations of its reference point (RP) and its sensors.
Vessel tabs
The tabs at the top of the 3D display show the file name of each vessel file that is open in Vessel Editor. There are two ways to change which vessel file is shown:
• Click on the tab of the desired vessel, or;
• Select the vessel or one of its components in the Vessels window.
Time menu
The drop-down menu in the upper left of the 3D display shows all of the unique time stamps in the vessel file and its components. You can select a time stamp to view the outline of the configuration at that point in time.
View buttons
The view buttons at the top right of the 3D Display immediately move the wire outline of the vessel to a pre-set orientation. The following buttons are available:
Button
Name
Description
Corner View
Views the vessel from 45° above, behind, and to the left.
Right View
Views the vessel from the right.
Front View
Views the vessel from the front.
Top View
Views the vessel from above, with its bow pointing upwards.
Wire outline
The main screen of the 3D display shows the vessel and its sensors:
• Wire outline: The shape of the vessel, as defined in either the Vessel Shape dialogue (see Create Vessel Shape Outline) or in the Properties window of the bathymetry sensor (see Bathymetry Sensor).
• Origin compass: The axes of the vessel coordinate system, centred on the reference point, also known as the RP (see Vessel Coordinate System).
• Sensor dots: The positions of the various sensors installed on the vessel. The colour of the sensors matches their colours in the tree in the Vessel window.
• Waterline plane: The plane of the waterline relative to vessel’s RP (see Waterline Height).
Rotating the model
There are several ways to rotate the model in addition to the View buttons listed above:
• To tilt the X-Y plane:
• Click and drag one of the Z arrowheads, or;
• Hold down <Ctrl> and click and drag anywhere in the 3D Display.
• To rotate the model around the Z axis:
• Click and drag one of the X or Y arrowheads, or;
• Hold down <Shift> and click and drag anywhere in the 3D Display.
• To rotate the model to one of the main axes, double-click on one of the green arrowheads. The model automatically rotates so that it is being viewed from that arrowhead.
Zooming in and out of the model
There are two ways to zoom in and out of the model:
• Hover the cursor over the 3D display and spin the mouse scroll wheel.
• Hold down <Ctrl> and right-click and drag the mouse up or down anywhere in the 3D display.