Menu | Database > Add Surface to Database > [available database] |
Tool |
|
Pop-up | Add Surface to Database > [available database] |
The Add Surface to Database tool is used to load individual surfaces into a database.
Before you can add a surface you must have a connection to a database in BDB Server (see Connect to a Database) and you must have the appropriate permissions. For a table of the permissions associated with each of the default user roles see "User Roles" in the CARIS Bathy DataBASE Server Reference Guide.
If you need to add multiple surfaces to a database, you may want to use the batch loading tool instead of adding the surfaces one at a time (see Bathy DataBASE Server Loader).
Because this operation will add bathymetry to a database, and this cannot be undone via the Undo command, the application will not allow this command to be run if there are any previous unsaved changes. If there are any unsaved changes, a message will be displayed prompting you to save your changes before continuing.
To add a surface to a database:
1. Connect to a database.
The following surface formats are supported in a database:
• Bathymetry Attributed Grids (BAG)
• CARIS Hydrographic Navigation Surfaces (HNS)
• CARIS IGA Surfaces (IGA)
• CARIS Spatial Archives (CSAR)
• ESRI ASCII Grids (ASC)
• ESRI Binary Grids (ADF)
• ESRI Floating Point Grids (FLT)
• GeoTIFF Surfaces (TIFF, TIF)
• USGS ASCII Grids (DEM)
In order to add a surface using this tool, it must be open in BASE Editor. You can add surfaces opened from a local file, or surfaces from another database that have been opened locally. For information on opening a database surface locally, see Open Surfaces from Database.
2. Select the parent layer of the surface that you want to add to the database.
3. Select the Add Surface to Database command.
Menu | Database > Add Surface to Database > [available database] |
Tool |
|
Pop-up | Add Surface to Database > [available database] |
A sub-menu is displayed listing the databases to which you are currently connected. 
4. Select the database to which you want the surface added.
The process of adding the surface first creates a surfac object in the database, then loads bathymetry into that object from the source surface. This process may take a few moments. To create the surfac object, you must define attribute values for the object.
The Add Surface to Database dialog box is displayed.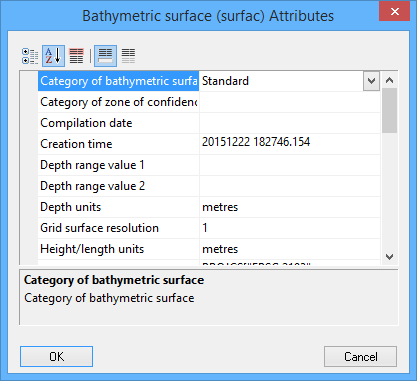
Some attributes are populated by the application during object creation.
The read-only attributes are shaded in grey and are automatically populated by the system. These values cannot be changed using any of the attribute population methods. |
XML Attribute Files
If the surface being added has been previously exported from a database, an object.xml file should have been created containing the metadata of the surface. Metadata files are named according to the name of the surface for which they were created (SurfaceName.object.xml). This file allows for the easy transfer of data between databases. If the application finds an XML metadata file in the same location as the surface, attributes for the new surface will automatically be populated with the values that are equivalent to the attributes available in the metadata file.
Attribute Plug-ins
Alternatively, attribute values can also be retrieved using a plug-in that reads metadata from an external source. Any registered plug-in that retrieves attribute data can be used, but for convenience, a Simple Attribute Plugin can be downloaded from the CARIS Online Customer Services Web site and installed on your machine. This plug-in retrieves attribute values from prepared comma-separated value (.csv) files.
To use this option:
• The .csv file must be in the same directory and have the same file name as the surface.
• Your catalogue must be updated with the appropriate information for each attribute you want populated using the plug-in.
If you have a plugin set up, the load process will automatically use it to populate the attribute values. See Using an Attribute Plugin for information on updating your catalogue for the plug-in and Importing with an Attribute Plugin for information on .csv files.
Attribute Style Sheets
Surface attributes can also be populated automatically by a style sheet loaded in the database. A style sheet maps CSAR metadata to the attributes of the surface. A default style sheet, available in either XML, XSL, or XSLT format, is provided for the CSAR format, but additional style sheets can be created for other formats, such as BAG file metadata. Using the Bathy DataBASE Administration Tools, these files can be downloaded from the Server, customized, and uploaded back to the server. The attribute values defined in these sheets will automatically be applied to any surface added to the database containing the style sheet. Attribute values in this file will overwrite values populated through a metadata object.xml file or an attribute plugin. For more information on this, see the Attribute Mapping topic in the CARIS Bathy DataBASE Server Reference Guide.
Manual Attribute Population
The most basic option for defining the surface attributes is to enter them manually in the dialog box. Values defined in the dialog box will overwrite all other population methods. The attributes can also be defined manually in the Attributes window after the surface has been added to the database.
Please note that if you experience an application failure while editing a database feature, your change is lost and that feature remains locked for 6 minutes after restarting the application. Edits can include changing the physical geometry of the surfac object or changing the attribute values of the surface. If you try to edit the feature while it is locked, an error message will be displayed stating that the feature cannot be edited. After the 6 minutes, the application will determine that the resource is no longer being used and it will release the feature for editing. |
5. Populate the attributes for the surface using one of the methods described.
6. Click OK.
If all mandatory attributes are defined, the surfac object is created and the CSAR file is loaded into the database. A message indicating the start and end time is displayed in the Output window.
If a surface cannot be loaded for any reason, the load process will fail. In this situation, the surfac object that was created will be removed from the database.
If the original data was in a format other than CSAR, the original file can be saved as an attachment to the output surface. See Attachments for more information on attachments. To always have non-CSAR data automatically added as an attachment, enable the Automatic Attachment of Dataset option in the Coverages category of Options. When you access the surface from the database, it will be opened in CSAR format.
Online and Offline Data
The surface can be saved as online data or offline data. Online data is accessible to anyone with access to the database. Offline data is only accessible to the person who created the surface and to users with Administrator privileges.See Set Offline for more information.
To set the state of a surface:
1. Select the surfac object in the Display window.
2. In the Attributes window, select the Object State (objst8) attribute.
3. Select a value from the list.
Menu | File > Save |
Tool |
|
4. To commit the change to the database, select the Save command.

