![]() CARIS HPD Paper Chart Editor
CARIS HPD Paper Chart Editor
![]() CARIS HPD Product Editor
CARIS HPD Product Editor
![]() CARIS HPD Source Editor
CARIS HPD Source Editor
The Attributes dialog box is used by most commands that create features. You are prompted for an object acronym (see Object Acronyms}. Each object acronym has a set of attributes, some mandatory, some optional, that you can define.
Related commands:
• • • • • • | • • • • • |
Interface: Attributes
Column | Description |
|---|---|
Attribute name or acronym | The attribute name, acronym, or both. Set this in the Options dialog box. |
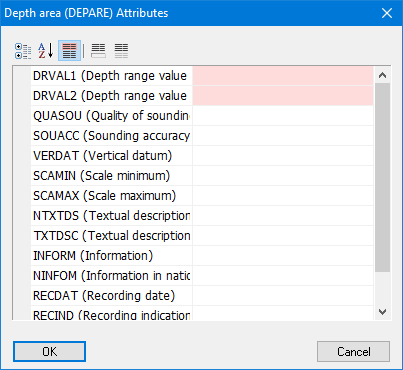
Attribute value | The value assigned to the attribute. If the cell is blank, no value is assigned. If the value is red, it is mandatory but has not been defined. If it is green, it is mandatory but has been defined. If it is yellow, it depends on the value of another attribute. You can display the value as a name or a number. Set this in the Options dialog box. |
The toolbar at the top of the dialog box changes the way attributes are displayed:
Tool | Description |
|---|---|
| Sort attributes by category. |
| Sort attributes in alphabetical order. |
| Always display mandatory attributes first, regardless of sort method. |
| On: Display a description of the selected attribute at the bottom of the dialog box.
Off: Do not display a description. |
| On: Display only attributes with defined values. Off: Display all attributes. |
Interface: Properties

Column | Description |
|---|---|
Category | The type of property. Most property types have a General category but other categories differ. |
Property | The name of the property. |
Value | The value of the property, if any. Values that are greyed-out are read-only; you cannot change them. |
Procedure
Values are assigned to the attributes and properties in a variety of ways, depending on the value type. This table describes the different methods of assigning values:
Type of data | Procedure |
|---|---|
Text data | 1. Select the attribute. 2. Click in the value box. 3. Type the required text. If the text is too long to fit in the value box, you can do the following: 1. Click browse ( A text editor dialog box is displayed.
The name of the dialog box will change based on the attribute or property. 2. Type the text and click OK. |
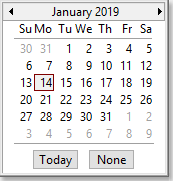
Date attributes. Used for dates that cannot have | 1. Select the attribute. 2. Click the down arrow ( The calendar is displayed.
3. Scroll to the month and year using the arrows at the top. 4. Select the date. |
Date attributes. Used for permanent dates that can be | 1. Select the attribute. 2. Click browse ( The Create Date Attribute dialog box is displayed.
3. Select one of the following options: • Formatted Date: Define the actual date. The current date is displayed. Change the Year, Month, and Day options using the arrow buttons. The formatted date is displayed in the box. A date can be Year, Year-Month, or Year-Month-Day. • Unknown: The date is unknown. • Undefined: The date is not defined. 4. Click OK. You are returned to the Attributes dialog box. |
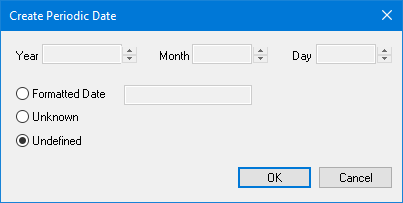
Periodic date Used for dates for features that are active on a seasonal basis. For example, a buoy that is in place only during the summer. Dates can be | 1. Select the attribute. 2. Click browse ( The Create Periodic Date dialog box is displayed.
3. Select one of the following options: • Formatted Date: Define the actual date. Change the Year, Month, and Day options using the arrow buttons or type directly in the box. The formatted date is displayed in the Formatted Date box. Periodic dates can be Year-Month-Day, Year-Month, or Month-Day. • Unknown: The date is unknown. • Undefined: The date is not defined. 4. Click OK. You are returned to the Attributes dialog box. |
A list of values. Used for attributes that require a single value from a list of possible values. | 1. Select the attribute. 2. Click the down arrow ( A list is displayed.
3. Select the value from the list. |
A list of values. Used for attributes that can have multiple values from a list of possible values. | Possible values are listed on the left. Selected values are listed on the right. 1. Select the attribute or property. 2. Click browse ( A list is displayed.
3. [Optional] Use the Search field to filter the list of values. Only values that contain the text you type will be displayed. 4. Select a value from the left list. 5. Click the right-arrow button. The value is moved to the right list. To remove a value from the right list: 1. Select the value. 2. Click the right-arrow button. To reorder the selected values: 1. Select a value. 2. Click the up and down arrows to move the value. Click Clear to clear the list. Click OK to return to the dialog box. |
A file such as a text or multimedia file. | 1. Select the attribute or property. 2. Click browse ( A File Open dialog box is displayed. 3. Select the file from whatever location you have stored it. 4. Click Open. This file is copied to the ExternalFiles folder. The location is defined by the External Files variable in the Environment tab of the Options dialog box. If the attribute value is changed, the file is not removed from the ExternalFiles folder. HPD references the file in this folder when a product is created. The file name is added to the Attributes dialog box. |
One or more external files. | 1. Select the attribute. 2. Click browse ( The Manage External Files dialog box is displayed.
3. Select a file using the Files option. 4. Click Add. The file is listed in the box on the left. 5. Repeat to select any other necessary files. 6. Click on a file in the list. A preview is displayed in the box on the right. You can also: • Click Remove to remove the selected file from the list. • Click Open to display the file in your system default viewer for that file type. 7. Click OK. You are returned to the Attributes dialog box. |
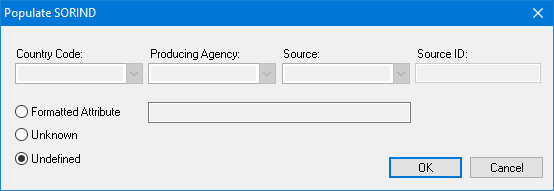
Attributes that can have an unknown or undefined value. | 1. Select the attribute. 2. Click browse ( The Populate dialog box is displayed.
3. Select one of the following options: • Formatted Attribute: Define the actual attribute. Change the options across the top. The formatted information is displayed. • Unknown: The value is unknown. • Undefined: The value is not defined. Options will vary based on the attribute being defined. 4. Click OK. |
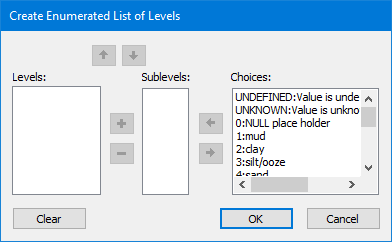
Enumerated attributes where the values can be ranked in order. Examples are the NATSUR and NATQUA attributes. Attribute values can be on an equal level or in a hierarchy. Values on an equal level are separated by a comma. A surface that contains both mud (1) and shells (17) is shown as | 1. Select the attribute. 2. Click browse ( The Create Enumerated List of Levels dialog box is displayed.
To position two or more values on the same level: 1. Select each value in the Choices list. 2. Click the left-arrow button. The values are moved to the Sublevels list. 3. Click +. All values are moved to Levels list. 4. Click Done. To create a hierarchy, 1. Select a value in the Choices list. 2. Click the left-arrow button. The values are moved to the Sublevels list. 3. Select that value and click +. The selected value is moved to the Levels list. 4. Repeat for each value in the list. 5. Click Done. To move a value from Levels list back to Choices: 1. Select the value. 2. Click - to move it to the Sublevels list. 3. Click the right-arrow button to move it to the Choices list. To move values up or down in the Sublevels or Levels lists, select the value and click the up- or down-arrow buttons. Click Reset to move all values back to Choices. |


 )
)
 )
)
 )
)

 )
)
 )
) )
)
 )
)
 )
)