The Layers window lists the display layers and groups currently available for the data open in the application. These layers control which data is visible (drawn) in the Display window(s), and displays layers added from the Project window. See Interaction with Layers Window.
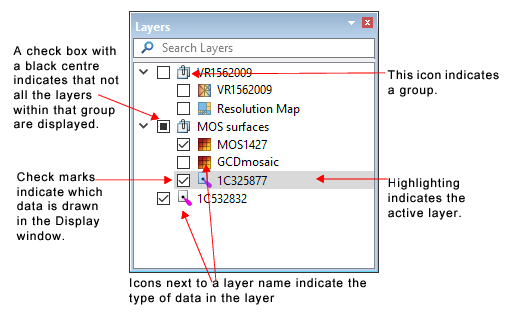
A check mark in the box beside a layer name indicates that the layer is to be drawn in the Display window, although it may be hidden or partially hidden under other data in the window. If the check box is empty, the layer is available, but not visible in the Display window.
The order of data layers is not rigidly fixed. This enables them to be re-organized into custom groupings, and to change the order in which they are drawn.
Use the Layers window to:
• determine what data is displayed, by activating the check box for a layer to include it in the Display window.
• define the order in which data is displayed. (See Draw Order.)
• organize data into groups, for example, to set common display properties for all the items in a group. As a container, a group layer itself is not drawn in the Display window, but layers in the group will be drawn. See Group / New Group.
• customize the display of layers by setting properties for a selected layer or layers using options in the Properties window. (See Properties Window.)
• rename layers to be more relevant to the work being done, using the Rename command on the right-click menu.
• locate specific layers in a large dataset or multi-layer grouping by using the Search Layers function. (See Search Layers.)
Draw Order
Draw Order sets how the layers of data are displayed in the Display window.
By default the data layer at the top of the list is drawn first, the next layer is drawn on top of it and each following layer on top of the previous layer, with the final layer in the list being drawn as the top layer in the Display window. This is called Top to bottom order.
This default setting can be reversed by selecting the Bottom to top option from the Layer Draw Order option in the Tools > Options dialog box. This changes the order of layers in the list so that the top layer in the list will be drawn last, and appear on top of all other layers in the Display window. Any new layer opened will appear at the top of the list, and be drawn in the Display window on top of the other layers.
The draw order of an individual layer can be changed by dragging the layer to a new position in the Layers list.
Search Layers
This field can be used to find a specific layer in the open layers. This filter is activated when text is typed in the Search Layers field. The Layers window will display the layer (or layers) that match the text, and highlight the matching text.
• If the filtered layer is in a group, the layer and the group it belongs to are displayed.
• If the filter matches a group, then all the layers in the group and the group layer itself are displayed.
Clear the search field by clicking in the right of the field.
Layers window commands
Right-clicking on a data layer will display a pop-up menu with a variety of commands. The list of commands varies depending on the type of data selected or the level of the layer in the list.
As well, other commands are displayed when you right-click in the empty part of the Layers window.
These commands are described below.
Command
Description
Add Layer(s)
Layers can be added to the Layers window using the Add Layer(s) command on the right-click menu in both the Layers window and the Project window.
Versions of the Add Layer command vary depending on the type of data you are adding. See Add Layer(s) for information on the variations of this command.
Dissolve Group
Move all layers and groups out of the currently selected group. All layers/groups will remain visible in the Layers window, but will be moved up one level in the Layers window.
• If the layers/group are within another group, the selected group will be removed and the layers will be moved into the parent group.
• If there is only a single group, the group will be removed and the layers will be moved directly into the Layers window.
The layers/group retain their draw order when they are moved.
Duplicate
Layers can be added using the Duplicate function, which automatically creates a duplicate of a selected layer or group, and displays it as a new layer called “Copy of ‘selected layer name’”. The duplicated layer contains all the properties of the original layer. A duplicated layer, like other layers, can be renamed and have its portrayal re-defined in the Properties window..
Go To Source
This command automatically highlights in the Project window the source of the layer that is selected in the Layers window.
1. Select the layer so that it is highlighted.
2. Right-click on the selected layer.
3. Select Go to Source.
The source is highlighted in the Project window.
Group / New Group
When this command is applied to a selected layer it creates will create a new layer (called “New Group”) with the selected layer below it. Other layers can be added to this group by dragging them onto the “parent” layer of the group.
An empty group can be created using the New Group command on the right-click menu.
Dragging a group to a new position in the Layers list will change the draw order of its grouped layers relative to other layers.
3. Click outside the layer to close the edit field.
Remove Layer
Remove a layer from the list in the Layers window. The layer will no longer be viewed in the Display window.
If the layer is associated with source data in the Project window, removing the layer from the layer window does not remove the source from the Project window.
Remove Group
Remove a group and its grouped layers from the Layers window. The group and its layers are no longer shown in the Display window.
Set (Unset) as Snap/Grab Target
Designate the selected layer as the target layer containing the vertices to which you will snap when selecting data. If layer is already set, the command will remove the layer as a target. Set As Snap/Grab Target.
Show All / Hide All
Show or hide all layers and groups present in the Layers window.
• When Show All is selected, the check box for every layer and every group is activated and the data for each layer is added to the Display window.
• When Hide All is selected, the check is removed from the check box of every layer and every group and all data is removed from the Display window.
These commands are useful when there are several layers or groups present in the Layers window, but only certain layers need to be displayed for each task.
Ungroup
Move a layer or group outside of its current group. The layer/group will remain visible in the Layers window, but will be moved up one level in the layers window.
• If the layer/group is within another group, the layer/group will be moved into the parent group.
• If there is only a single group, the layers are moved into the Layers window and the group is removed.
The ungrouped items are automatically added to the top of the draw order. Depending on the Layer Draw Order setting in Tools > Options, this can be either the top or the bottom of the layers list.
Use Coordinate Reference System
Apply the coordinate reference system of the selected layer to the data in the Display window.
Zoom to Source
Redraws the data in the Display window to show the full extent of the selected data source.
1. Right-click on the layer in the Layers window.
2. Select the Zoom to Source command.
The desired data is displayed centred in the Display window.
Depending on what modules are enabled and the type of data that is open, other commands are also available on the right‑click menu, for example:
Extract (Coverage)
Digitize a line around a portion of a raster surface or point cloud to create a new surface with the selected attributes. Extracting can also be done by applying a feature layer containing coverage features for the desired area(s).
Filter (Coverage)
Create a new coverage containing nodes from a raster surface or point cloud that meet the criteria of a user-specified filter.
Regenerate
Regenerates all critical soundings.
Update
Launches the Update HIPS Critical Soundings dialog box.
Set Navigation Source
Launched the Set Navigation Source dialog box.
If a digitizing command is selected from the pop-up menu, a check mark will be displayed beside the command to indicate the active command. The check mark will be removed when the command is no longer active.
 in the right of the field.