The Colour Range Editor is used to create and edit colour range files.
Colour range files assign colours to attribute value ranges in the current dataset. By default, colour range (.crf) files are stored in C:\ProgramData\CARIS\<application>\<version>\Colour.
Two colour range files are provided with Teledyne CARIS applications for use with raster data. You can edit these files or create your own.
You access the Colour Range Editor using properties that differ according to the type of data you are viewing.
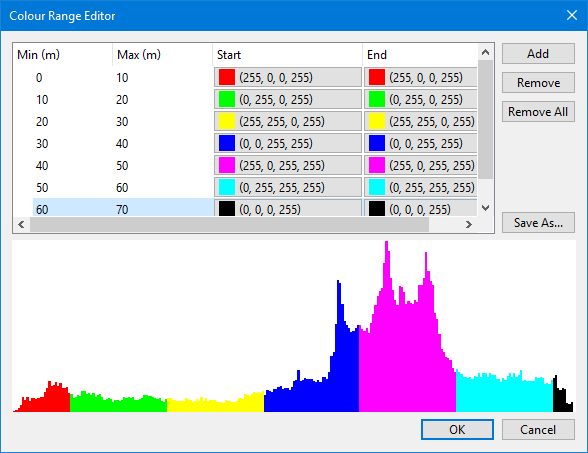
When a colour range file is open, a table of depth values and colour values is displayed. If the selected layer contains raster data, a histogram is also displayed.
If the file is new, the colour table and the histogram, if there is one, display no colour values.
This is the Colour Range Editor for raster data.
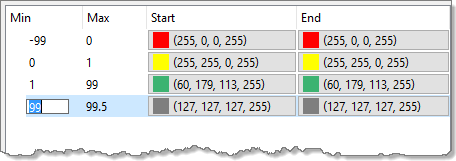
This is the Colour Range Editor for vector data.

Procedure: Open the Colour Range Editor for Raster Data
1. Select a raster data layer in the Layers window.
2. Select the Colour By property in the Properties window and choose the attribute to colour the data by.
The display will be coloured according to the values of the selected attribute in the data source.
The Colour Map property contains a list of colour maps and colour ranges that can be applied to the selected layer, plus commands that let you create and edit colour ranges.
To create a new colour range:
3. From the Colour Map list, select <New Colour Range>.
The Colour Range Editor is displayed with no colour ranges defined.
To edit an existing colour range:
4. Apply a colour range file from the list.
Colour range files have the word Range in brackets.
5. Expand the list a second time and choose <Edit>.
The Colour Range Editor is displayed. It contains a histogram and a table of the colour values in the selected colour range file.
See Procedure: Edit a Colour Range File to continue.
Procedure: Open the Colour Range Editor for Vector Data
1. Select a vector data layer in the Layers window.
2. In the Properties window, select the Colour Range property under either Soundings or Contours.
3. Do one of the following:
• Select <New...> to create a new colour range file.
• Select <Browse...> to select an existing colour range file then select <Edit>.
The Colour Range Editor is displayed.
See Procedure: Edit a Colour Range File to continue.
Procedure: Edit a Colour Range File
Add a colour as follows:
1. Click Add.
A new row is added to the table of colour range values.
First define the minimum and maximum values of the depth range.
2. Double-click in the Min column and type a value.
This is the starting value of the range.
3. Press <Tab> or double-click in the Max column and type the maximum value of the range.
Now define the colour for this depth range. You can make all depths in the range the same colour or define a range of colours.
4. Click the Start column.
The Select Colour dialog box is displayed.
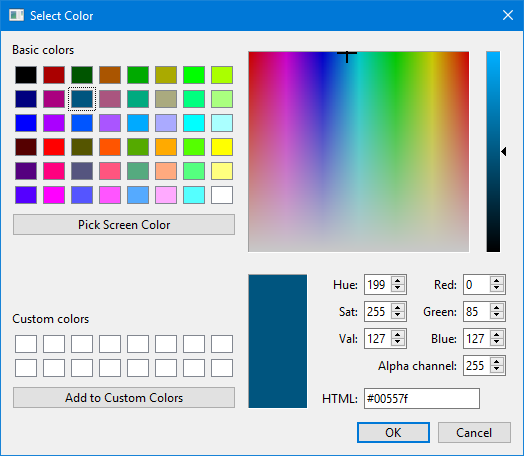
5. Select a colour and click OK.
You are returned to the Colour Range Editor. The selected colour is displayed in the table as a colour box followed by the RGBA values of the colour.
Now select an end colour.
6. Click the End column.
7. Select a colour in the Select Colour dialog box.
If you want all pixels, soundings, or contours in the depth range to be the same colour, select the same colour as the start colour. If you want a range of colours, select a different colour. Colours in the data will be spread evenly between the start and end colours.
8. Click OK.
You are returned to the Colour Range Editor.
If you are using raster data, the colours in the histogram will change to match the colours you have selected.
9. Repeat steps 1 through 8 until all necessary depth and colour ranges have been added.
To remove a range from the table:
1. Select the range
2. Click Remove.
To remove all ranges from the table and start over:
1. Click Remove All.
The list of ranges is empty.
2. Reassign colour ranges and save the changes.
To save the colour range file:
1. Click OK.
If the file is new, you are prompted for a file name. If the file has been saved previously, the new version is saved and you are returned to the Properties window.
To save the colour range file under a new name:
1. Click Save As.
2. Type a name for the file and click OK.
You are returned to the Properties window.