![]() CARIS HPD Paper Chart Editor
CARIS HPD Paper Chart Editor
![]() CARIS Paper Chart Composer
CARIS Paper Chart Composer
Menu | File > New > Panel |
Tool |
|
Pop-up | New > Panel (Layers window) |
Add a panel to a chart. The chart can be either a database or a standalone chart.
This command is the second step of a three-part process for creating charts and panels. See the graphic below for an overview of the chart creation process.

A panel has a defined extent. These extents can be digitized from an HPD workspace or external file. Make sure that a workspace or external file is open in Source View.
Each panel also has a defined scale, coordinate system and location on the sheet.
SCAMIN filters can be applied to panels in multi-panel database charts to restrict the features that are included in a paper chart product in the database.
Make sure that both ends at the bottom edge of the panel are on the same latitude. This is necessary, especially for non-Mercator projections, to correctly apply border styles. |
Rotated panels cannot be properly exported to GeoTIFF format. A rotated panel will be exported as a non-registered TIFF. |
Related commands:
• • | • • |
Interface

Attribute | Acronym | To add a value... |
|---|---|---|
Mandatory | ||
Panel Name | PANNAM | 1. Click the button to display a text editor dialog box. 2. Type or edit the value and click OK. |
Panel Number | PANNUM | 1. Type a value. |
Panel Position | PANPOS | 1. Type values using a comma to separate X and Y values. For example, |
Scale | PSCALE | 1. Type or edit the value. |
Coordinate Reference System | PRJCTN | 1. Click the button to display the Select Coordinate Reference System dialog box. 2. Select a Coordinate Reference System and click OK. |
Panel Catalog | PROFILE | 1. Select a catalogue from the list. |
Optional | ||
Graticule Interval (minutes) | GRTINT | 1. Type a value in the field. |
Panel Order | PANORD | |
Fractional Display | frcdsp | Display soundings with fractions rather than decimal points. 1. Enable the check box. |
Type of Panel | PANTYP | 1. Select a value from the list. |
Panel Title | PANTIT | Type a value in the field. |
Projection Name | PRONAM | |
Shift N/S | SHFTNS | |
Shift E/W | SHFTEW | |
Parameters Used | PARUSD | |
Source Horizontal Datum Name | SRCHDT | |
Source Horizontal Datum Parameters | SRCHDP | |
Depth Units | DEPUNT | |
Depth Datum | DEPDAT | |
Height Units | HGHTUN | |
Height Datum | HGHTDA | |
Border Type | BDRTYP | |
Symbol Library Used | SYMLIB | |
Sounding Feature Code | sdgfc | 1. Click Browse on the right side of the field. The Symbolization Browser is displayed. 2. Select a sounding feature code using any of the following methods: • Select a code from the list. • Type the code in the Keyword Filter. 3. Click OK. The sounding feature code is listed in the field. |
Sounding Size in Millimetres | sdgsz | Type a value in the field. |
Presentation Identifier | presid | Select a portrayal from the list. |
Annotation Identifier | annoid | Select an annotation file from the list. |
Sounding Rounding | sndrnd | Select a sounding rounding rule from the list. |
SCAMIN Filter | SCAFTR | Type a value in the field. |
Intended Usage | USGNAM | 1. Click Browse on the right side of the field. The dialog box showing source usages is displayed. 2. To add a usage, select the usage and click the right-arrow button. 3. To remove a usage, select the usage and click the left-arrow button. 4. Click OK to assign a usage to USGNAM, or click Clear to remove all usages from USGNAM. |
Procedure
1. Select the Source View or Sheet View tab.
2. In the Layers window, select the Sheet layer.
3. Select the New Panel command.
4. Set the panel attributes and click OK.
• [Optional] To restrict the features included in the panel by their minimum scale, apply the desired value to the SCAMIN Filter (SCAFTR). Any source objects which do not match the SCAMIN filter are excluded from the panel.
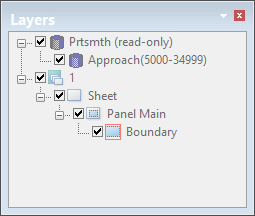
New panel layers are added in the Layers window.
The panel is in digitizing mode for defining panel extents.
The default mode is Rectangle (2 points). To select another mode, right-click the mouse and select a mode from Edit Line in the pop-up menu.
5. Select a digitizing method (see Digitizing Options).
6. Digitize the panel extent.
When digitizing is complete, features can later be imported into the panel. See Create Panel Data from Source or Create Panel Data from External File.
