When contouring by range, you can use the entire range, or you can specify a range of values for which to create contours. You can have contours created at regular intervals or you can load a file of predefined levels to have contours created at specific values. The units for the range settings are set in Tools > Options > Display Units.
Range values follow the “positive down” convention for depths. |
Interface
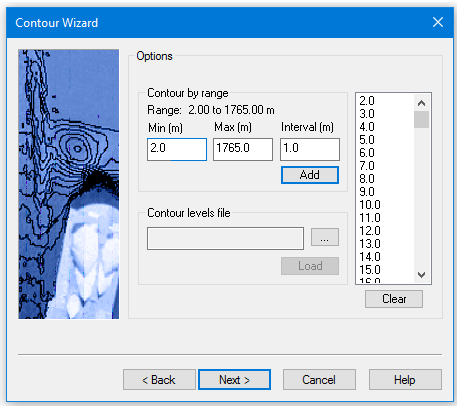
The contouring range and intervals are set in the second step of the Contour Wizard.
Contour by range
The Range field provides the range of elevation values present in the source.
The Min. and Max. fields can be used to set a specific minimum and maximum values for the contouring range.
The Interval is the elevation difference between each contour in the range of values.
8. Click Next.
Contour Using an Existing File
A contour levels file is a text file that contains a list of predefined levels at which to create contours, as in the following example.
13.00 |
13.10 |
13.20 |
13.30 |
13.40 |
13.50 |
13.60 |
13.70 |
13.80 |
13.90 |
14.00 |
14.10 |
14.20 |
14.30 |
14.40 |
14.50 |
14.60 |
14.70 |
14.80 |
14.90 |
15.00 |
15.10 |
Pop-Up menu on contour levels list
Once the contour levels list is visible, a pop-up menu is available for the list. The following commands are provided:
• Insert: Display the Add Contour Level dialog box to manually add a specific contour level to the list. This option is useful if a contour is needed at a specific level, but the level was not generated automatically.
• Delete: Remove the currently selected level from the list. To delete multiple levels, press and hold <Ctrl> while selecting the levels and then select this command.
• Save: Save the current contour levels list to a text file for future use with the Contour levels file field. Specify a name and location for the file in the Save As dialog box that is displayed.
• Clear: Remove all current levels from the list. This functionality is also available through the Clear button.
Procedure: Contour by Range
1. In the Min field, type the minimum value to include in the range.
2. In the Max field, type the maximum value to include in the range.
3. Type an Interval (m) value.
4. Click Add to generate the contour levels for the specified range and interval.
The list box at the right will be populated with the contour levels. This list can be edited by right-clicking on the list and selecting a command. See Pop-Up menu on contour levels list.
5. Click Next to set Output options.
Procedure: Contour Using an Existing File
1. Click Browse (...) to select a contour levels file.
2. Click Load to apply the contour levels from the file.
The list box at the right will be populated with the contour levels. This list can be edited by right-clicking on the list and selecting a command. See Pop-Up menu on contour levels list.
3. Click Next to set Output options.