Menu | File > Import > Sensor Data |
Tool |
|
CARIS Batch | Import Tide To HIPS |
Menu | File > Import > Sensor Data |
Tool |
|
CARIS Batch | Import Tide To HIPS |
Use the File > Import Sensor Data command to convert various types of raw or unprocessed sensor data into HIPS and SIPS format.
There are more than forty sonar and lidar formats that can be imported into HIPS format. Each format has its own dialog box with default importer settings, which can also be edited.
Certain data can also be imported using the File > Open command or by dragging certain types of data directly into HIPS and SIPS. See: Procedure: Adjust default settings.
Interface
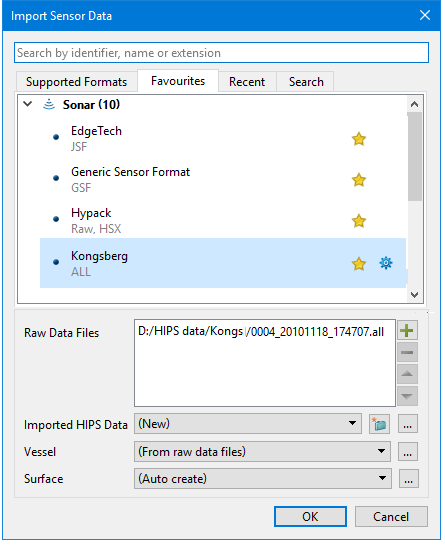
Data is imported using the Import Sensor Data dialog box.
Options
Field | Description |
|---|---|
Search | Type in the Search box to find a format by name (for example: Bathyswath), identifier (such as: Raw, Intermediate, Processed) or extension (such as SXI). The results will be displayed in the Search Results tab. |
Lists of import formats | Tabbed pages list the formats that can be imported. • The Supported Formats page contains a complete list of formats that can be imported. • The Favourites page is a user-created list. • The Recent page lists displays formates opened recently. To set options for a specific data format, click the gear |
Raw Data Files | 1. Click the 2. Click the button again to add another file. If more than one data file is listed, the Remove 3. Click this button to remove an item from the list of selected files. |
Imported HIPS Data | This field sets the location of the data to be imported by creating or opening a *.hips file. If the field is set to (New) a *.hips file will automatically be created. 1. Click 2. Click the Browse The name of the HIPS file is displayed. |
Vessel | Sets the path to the vessel file (*.hvf) containing sensor location information. If not set, processes will use the sensor location information stored in the raw data. A vessel file is no longer required for import, but can be later assigned to the data. 1. Choose the “From raw data files” option to include the vessel configuration from the raw data during the import. 2. If the offsets are not available, but required for properly processing the data, you can create a HIPS Vessel File (HVF) after importing and use it from that point on. |
Surface | The default setting for the Surface option is Auto Create, which will automatically apply Georeference Bathymetry and create either a regular gridded or a variable surface. You can also: 1. Select None from the list to turn off the automatic creation of a surface. 2. Click the Browse button |
Procedure: Import Sensor Data
To import data using default settings:
1. Select the Import Sensor Data command to open the Import Sensor Data dialog box. (See Interface.)
2. Click on the data format you want to import from the Supported, Favourites or Recent list.
3. Click the  button to the right of the Raw Data Files field to select a file from the Open dialog box.
4. In the Imported HIPS Data field, create a new HIPS file or browse to select an existing one.
5. Accept the “From raw data files” default setting option to include the vessel configuration from the raw data during the import, or browse to import a specific vessel file.
6. Accept the Auto create option in the Surface creation option.
7. Click OK to import your data
To import using settings specific to a certain format:
1. Select the Import Sensor Data command to open the Import Sensor Data dialog box. (See Interface.)
2. Click the blue gear  button to view the options for a specific importer.
This opens the Import Options dialog box containing the options specific to the data format you are importing.
Note: Hover your mouse over an option name to read a short description of its function. |
3. Set import options. See Import Options for Specific Data Formats.
The settings you enter here are saved to be applied the next time you import data with this format.
4. Click OK to exit the Import Options dialog box.
5. Click the button to the right of the Raw Data Files field to select a file from the Open dialog box.
6. In the Imported HIPS Data field, create a new HIPS file or browse to select an existing one.
7. Accept the “From raw data files” default setting option to include the vessel configuration from the raw data during the import, or browse to import a specific vessel file.
8. Accept the Auto create option in the Surface creation option.
9. Click OK to import your data.
Data folder locations
Data imported into HIPS using any of the import methods will be saved using the following folder structure:
:
Folder | Folder content |
|---|---|
HIPS data folder | The main data folder containing the *.hips file and all the track line folders, index files and automatic surface data. |
HIPS file | The *.hips file will be created in and have the same name as the HIPS data folder (e.g., |
HIPS Track Line folder and Index files | Individual track line folders and index files will be created in a TrackLines_< HIPS Filename> folder, inside the HIPS data folder, instead of being included directly in the HIPS data folder, e.g. " |
Products folder | Any surfaces that are automatically created during import will now be stored in a Products_<HIPS Filename> folder that will also be created inside the HIPS data folder, e.g. " |

 is enabled.
  to open the New HIPS File dialog box to create and set the location of the new HIPS file, or
  button to browse and select an existing HIPS file.