Menu | File > Export > Coverages > Points |
Export the values from HIPS project data to a point cloud in LAS format. HIPS data must be run through Georeference Bathymetry before it can be exported.
Interface
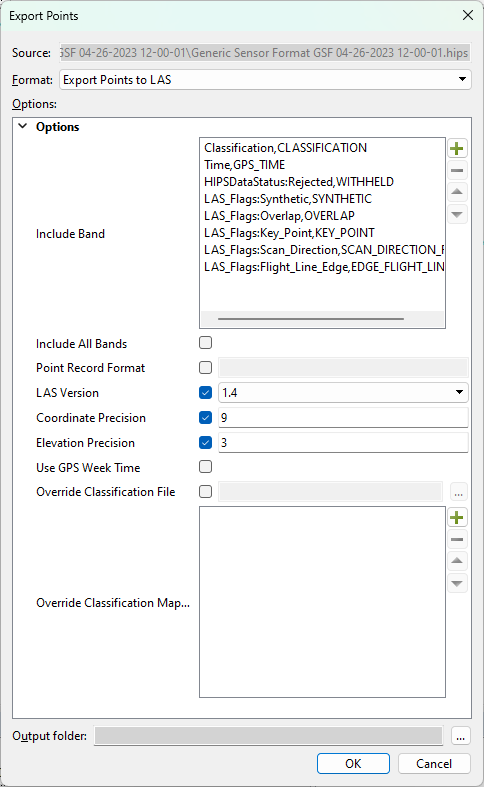
The Export Points to LAS command displays these options in the Export Points dialog box.
Hover the cursor over a field name to see a short description of the field function in a screen tip.
Option | Description |
|---|---|
Source | This field displays name and location of the selected HIPS project. This setting cannot be changed. |
Format | The output format (LAS point cloud). |
Include Band | Used to map the attribute bands of the surface to relevant attributes in the LAS output file. Note the following: • The Depth band will always be exported to the Z attribute in the LAS file even if it is not explicitly mapped. • If no band is mapped to the WITHHELD attribute in the LAS file then the WITHHELD attribute will not be set. This means that all of the points in the LAS file will be available for processing. The following output attributes are available (OVERLAP and NEAR_INFRARED are only available in LAS format 1.4): • CLASSIFICATION: The “class” attributes of a point. If a point has never been classified, this byte must be set to zero. By default, this process uses the standard classifications defined in the LAS format, but the classifications can be customized using the Override Classification File or Override Classification Mapping options below. • COLOUR or COLOR: The red, green, and blue image channel values associated with the point. • EDGE_FLIGHT_LINE: If set to 1, this point is at the edge of the flight line (that is, it was the last point on its scan line before the scanner changed direction). • GPS_TIME: A double floating-point time tag value that indicates when the point was acquired. This uses either the GPS Week Time format or the Adjusted Standard GPS Time format, depending on whether the Use GPS Week Time checkbox is selected below. • INTENSITY: The intensity value is the integer representation of the pulse return magnitude. • KEY_POINT: If set, this point is considered to be a model key-point and thus generally should not be withheld in a thinning algorithm. • NEAR_INFRARED: The near infrared channel associated with the point. • NUMBER_RETURNS: The total number of returns for a given pulse. • OVERLAP: If set, this point is within the overlap region of two or more swaths or takes. • POINT_SOURCE_ID: Indicates the file from which this point originated. LAS files exported from CARIS BASE Editor will always have their point source ID set to zero. • RETURN_NUMBER: The pulse return for a given output pulse. • SCANNER_CHANNEL: Indicates the channel (scanner head) of a multi-channel system. Channel 0 is used for single scanner systems. Up to four channels are supported (0–3). • SCAN_ANGLE: A signed short that represents the rotational position of the emitted laser pulse with respect to the vertical of the coordinate system of the data. Down in the data coordinate system is the 0.0 position. Each increment represents 0.006 degrees. Counter-clockwise rotation, as viewed from the rear of the sensor, facing in the along-track (positive trajectory) direction, is positive. • SCAN_DIRECTION_FLAG: The direction at which the scanner mirror was travelling at the time of the output pulse. A bit value of 1 is a positive scan direction, and a bit value of 0 is a negative scan direction. • SYNTHETIC: If set, then this point was created by a technique other than lidar collection, such as by digitizing a photogrammetric stereo model or by traversing a waveform. • USER_DATA: This field may be used at the user's discretion. • WITHHELD: If set, this point should not be included in processing (synonymous with Deleted). • ELEVATION: The Z value of the points. |
Point Record Format | Select the check box and type the number of the point record format to use. |
LAS Version | Enter the LAS version number to be using in the output. |
Coordinate Precision | Enter the decimal precision of the coordinates used in the output. |
Elevation Precision | Enter the decimal precision of the elevation values used in the output. |
Use GPS Week Time | Select this option to store times in the LAS file using the GPS Week Time format. If this is not selected, the times are stored using the Adjusted Standard GPS Time format instead. By default, this option is not selected, so the times are stored using the Adjusted Standard GPS Time format. |
Override Classification File | The path to a file with classification identifiers and names. This option is used to export LAS data using a custom set of classifications rather than the default classifications defined in the specifications for the LAS version. The classification file must be in a text file format, such as TXT or CSV, and contain two columns, one for the classification ID number and one for the name of the classification. The two columns must be separated by a comma, or one or more spaces. If the data being imported contains an ID that is not present in the mapping file, the default classification for the LAS version will be used for that ID. Two mappings cannot be specified for the same classification ID number. If an override classification file and override classification mappings are both specified, only the mappings are applied. |
Override Classification Mapping | Maps a classification number in the LAS file to a custom name. • Number — The classification number that is to have its meaning overridden. • Name — The custom name to associate with the classification number. This option is used to export LAS data using a custom set of classifications rather than the default classifications defined in the specifications for the given version of the LAS format. Two mappings cannot be specified for the same classification number. If both an override classification file and override classification mappings are specified, only the mappings are applied. |
Output filename | The name and location for the output LAS file. 1. Click the browse button (...) to specify a name and location. |
Procedure: Export to LAS
1. Select the parent layer of the coverage to export.
2. Select the File > Export > Coverages > Points command.
The Export Points dialog box is displayed.
3. Select LAS for the output Format.
The Include Band option can be used to map the attribute bands of the coverage to relevant attributes in the LAS output file. If this option is not used, only the Depth and Status bands will be exported to the LAS file.
4. Click the plus button ( ) for the Include Band option.
The Add Value dialog box is displayed.
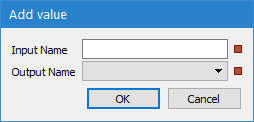
The Input Name field is used to identify the input attribute band that you want to map. This field must be populated manually. Names are case-sensitive and must be entered exactly as they appear in the source. If you need to revert to the default mappings, see Default band mappings.
5. Type the name of the input band that you want to map.
6. Select the LAS attribute to which you want to map the attribute band values in the Output.
7. Click OK to return to the Export Points dialog box.
8. Repeat steps 4 to 7 for each attribute band you want mapped to the output file.
9. Define any other necessary Options.
10. Specify a name and location for the Output filename.
11. Click OK.
The data is exported to a new LAS file.
Default band mappings
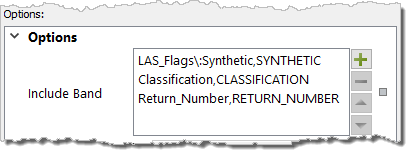
The default band mappings in the Include Band field are shown below.
Classification,CLASSIFICATION
Time,GPS_TIME
HIPSDataStatus:Rejected,WITHHELD
LAS_Flags:Synthetic,SYNTHETIC
LAS_Flags:Overlap,OVERLAP
LAS_Flags:Key_Point,KEY_POINT
LAS_Flags:Scan_Direction,SCAN_DIRECTION_FLAG
LAS_Flags:Flight_Line_Edge,EDGE_FLIGHT_LINE