Menu | Tools > Editors > Side Scan > Contacts > Add Point Contact > Add Line Contact |
Tool |
|
Menu | Tools > Editors > Side Scan > Contacts > Add Point Contact > Add Line Contact |
Tool |
|
A contact is the representation of an object or feature on the sea bottom (for example, a wreck, or a pipeline) that is visible in the sonar data. Contacts are created using the Add Point Contact or Add Line Contact commands.
In HIPS and SIPS, you can place individual contacts directly in the waterfall view. A contact record is created for each contact, and each contact has a unique identifying number. This information is stored in the *.hips file. This and other related information can be viewed and edited in the Attributes window.
Contact images are automatically created and maintained in the *.hips file, and can be viewed in the Image Preview window.
You can reposition both line and point contacts and update the data associated with a contact.
Once created, the contact type cannot be changed. For example, a point contact created as an underwater rock cannot be changed to a pile. Instead, remove the contact and create a new one with the correct type set in the Properties. |
Contact information can be exported.
Related commands:
See also:
Interface
Characteristics of each contact are set in the Properties window.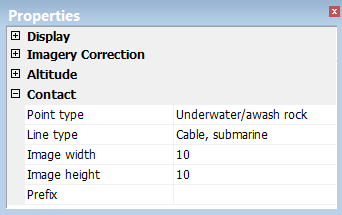
Default contact properties are set in the in the appropriate fields in the Properties window.
Contact Property | Description |
|---|---|
Point Type | Click in the field and select a type, for example, wreck or pile, from the drop-down list. These types are defined in the HIPS Catalogue Editor, and stored in the HIPS and SIPS Features catalogue. |
Line Type | Click in the field and select a type (for example, a cable or a pipeline) from the drop-down list. These types are also defined in the HIPS Catalogue Editor, and stored in the HIPS and SIPS Features catalogue. |
Image Width | Type a value for the width of the contact image in pixels. This determines a dimension of the image in the Image Preview and well as in exported images of the contact |
Image Height | Type the height for the contact image in pixels. This determines a dimension of the image in the Image Preview and well as in exported images of the contact |
Prefix | An optional prefix, taken from the line number, can be automatically be added the contact name on export. |
Procedure: Add Point Contact
Point type contacts can be created for objects such as rocks, underwater posts or piles, as well as wrecks.
1. Set the Side Scan View / waterfall view to Processed.
2. Select the Add Point Contact tool.
3. Click in the waterfall view where you want to place the contact.
A contact marker is placed in the Side Scan Editor at the point where you clicked. The type of contact is indicated by the symbol displayed. The contact is identified with the name of the Current User and a four-digit number (starting at 0001). 
A bounding box is displayed around the contact. This box always snaps to the contact so that the contact point is in the middle of the box. The bounding box represents the image area of the contact.
4. Save data.
5. Open the Image Preview window.
6. Select the new point contact.
The image of the contact is displayed in the Image Preview window, as in the screen capture below. In the background of this screen-shot, the contact is visible in the waterfall view and the selected part of the line can be seen in the Display window.

You can adjust the size of the image using the Image Width and Image Length attributes.
Procedure: Add Line Contact
Line contacts can be created for continuous objects such as pipelines or underwater cables.
1. Select the Add Line Contact command.
Menu | Tools > Editors > Side Scan > Contacts > Add Line Contact |
Tool |
|
2. Click the point in the waterfall view where you want to insert the contact.
3. Click another section of the view.
The two points are joined by a line.
4. Continue adding line segments as needed to represent the contact.
5. If needed, select Edit Line> Remove last to delete the line segment just created.
6. To finish the line, right-click the mouse and select Edit Line> End from the pop-up menu.
The contact lines are drawn in the Side Scan View. Each line is identified with a number, and each type of line is drawn in a different style.
The contact is identified with the name of the currently logged in user, plus a four-digit number (starting at 0001).
Procedure: Add multiple contacts
Use the Repeat New Feature tool to add any number of contacts with the same type and attributes, without having to set properties for each one separately.
To add multiple similar contacts:
1. Select the Repeat New Feature command.
Menu | Tools > Editors > Side Scan > Contacts > Repeat New Feature |
Tool |
|
2. Use the Add Point Contact tool to place the contacts, one after the other, into the Side Scan View.
The Repeat New Feature button will remain depressed while you add contacts. To change to a different type of contact or to change contact data, deactivate the Repeat New Feature button.


