Publishing allows the most up-to-date representation of coverage data in a database to be automatically uploaded to a Bathy Data Service in CARIS Cloud. Coverage data is uploaded to the service as bathymetry data associated to existing gridded cells in the service.
The configuration for this ability is accessed through the Publish property in the Database Properties table for a database that has been started in the Administration Tools.
Whenever coverage data is added to the BDB Server database, the extents of the data is used to determine which cell(s) need to be updated in the data service and those cells are flagged as out of date.
At the time of publishing, all coverage data in the BDB Server database associated with any of the specified features to monitor is considered for creating the new representation of the coverage data to replace the data in each of the outdated cells. For each cell, any new or existing data within the boundary is run through the Server Combine to Raster process to convert the data to the CRS and units of the data service, and the combined raster is uploaded to the cell. Conflict resolution rules specified in the Rules File setting are applied during the combine to determine the winning nodes that will contribute to the resulting coverage.
Note that only cells that are fully or partially covered by new coverage data are updated. If new coverage data is uploaded to a BDB Server database feature to replace coverage data that had a larger extent than the new data, only the cells within the extents of the new coverage will be affected, data in cells outside of the new coverage boundary will not be updated even if they were part of the original coverage boundary.
The combined coverage is saved only in the data service, not in the BDB Server database, unless the Feature Type (History) setting has been specified. This setting is explained in more detail below.
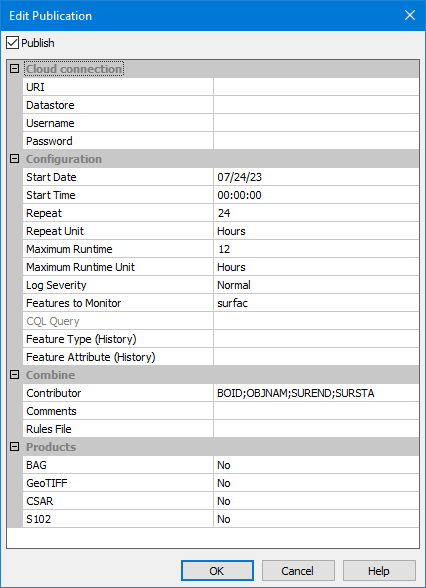
1. In the table, click the Browse button (...) for the property to launch the Edit Publication dialog box.
The table below describes the publish settings that are provided in the dialog box.
Setting | Description |
|---|---|
Publish | Click to enable publishing for the database after all configuration settings have been defined. Publishing should only be enabled after all the configuration settings have been completed. |
Cloud Connection | |
URI | The base URI of the cloud service, for example, https://ca.teledyne.caris.cloud. |
Datastore | The tenant in the cloud service to which the data will be published. Only users in this tenant will have access to the published data. |
Username | The username of the account that will be used to connect to the cloud service to publish the data. This must be a user account that has been assigned the Ingestion Manager role. |
Password | The password for the account that will be used to connect to the cloud service to publish the data. Note: If editing an existing configuration where the password has been previously specified, this field will remain blank for security purposes. The password only needs to be re-entered if the password for the account has changed or a different account is to be used. |
Configuration | |
Start Date / Start Time | The scheduled time at which data will be published to the data service. If the date/time is in the future, data in the database will not be published until that date and time have been reached. If the date/time has already passed, the setting can be used as a reference along with the Repeat settings to calculate when the next publish will happen. 1. Select each element in the date and/or time. 2. Use the arrow buttons to adjust the value of each element. |
Repeat | The frequency at which the publication job is run according to the Repeat Unit setting. For example, if the value for this setting is specified as 12 and the Repeat Unit is Hours, data will be published every 12 hours relative to the Start Date and Start Time settings. |
Repeat Unit | The unit for defining the Repeat interval for the publication job. The options include Minutes, Hours and Days. |
Maximum Runtime | The maximum time a publication job can run. If all data is not uploaded in the time span specified, any remaining data will be published at the next run of the job according to the Repeat settings. For example, if the runtime is set to 8 Hours and the Start Time is set to 12:00:00 AM, the database will stop publishing at 8:00:00 AM, regardless if there are additional datasets still to publish. If a dataset is in the process of being uploaded when the time limit runs out, the upload will be allowed to complete. |
Maximum Runtime Unit | The unit for defining the Maximum Runtime for a publication job. The options include Minutes, Hours and Days. |
Log Severity | The level of detail included in log files created by the publication job, with Debug being the most detailed and Critical the least detailed. |
Features to Monitor | The feature type(s) to monitor for when checking for new or changed data to be published. Data added to the database that is associated to other feature types will not be included in publications. For example, if this is set to surfac, then any coverage data added to other feature types like survey will not be considered. A CQL filter can be specified using attribute values for the feature types to further filter the data in the database that is selected for raster cell creation by the publication job. If no query is specified, all new coverages associated with all specified feature types to be monitored will result in the associated cells in the Bathy Data Service being updated. 1. Click the Browse button (...) to launch the Filter dialog box. See for information on using this dialog box. 2. Expand the Feature Types drop-down list and click the check box of each feature type to be included in monitoring for new data in the database. 3. [Optional] Define a filter for the data selection using attributes values. 4. Click OK. |
CQL Query | The query filter created for selecting data to be published to the data service if a filter was defined using the Browse button (...) in Features to Monitor. This field is read-only. |
Feature Type (History) | The type of feature that will be created in the BDB Server database when a new combined coverage is published to a cell in the data service. Whenever publication is started, the BDB Server database is searched for an existing feature object of the type specified here that has the same boundary name as the data service cell that is being processed. The boundary name is the Name of the Boundary assigned to the cell in the data service, as specified in the Feature Attribute (History) field. • If no such feature exists, a new feature is created in the BDB Server database, the combined coverage is saved to the database and assigned to the feature object, and the coverage data is uploaded to the Bathy Data Service. • If a history feature is found with the same boundary name, the coverage associated with the existing object is compared to the new coverage. This comparison looks for differences in the actual data or a change in an attribute value specified in the Combine: Rule File setting that could affect the winning coverage during conflict resolution: • If there are no relevant differences between the two coverages, the new combine is discarded. No new feature is created in the BDB Server database and no data is replaced in the data service. • If differences are found, a new feature is created in the BDB Server database, the combined coverage is saved to the database and assigned to the feature object, and the coverage data is uploaded to the Bathy Data Service. If this setting is not specified, all additions to the BDB Server database that meet the Configuration criteria will result in new deconflicted representations being created for each affected cell. This data will be published to the data service, replacing any existing data for the cell(s), and the combined raster(s) will not be saved in the BDB Server database. |
Feature Attribute (History) | The feature attribute that will be populated with the name of the boundary from the cell in the data service when new cells are generated from a publication job. |
Combine | |
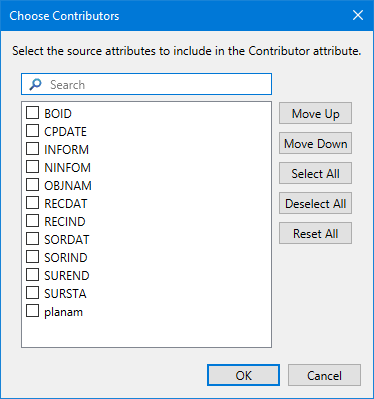
Contributor | The information value that will be used to identify contributor datasets when creating a new cell by combining coverages during a publication. 1. Click the Browse button (...) to launch the Choose Contributors dialog box. 2. Click the check box of each value to be used as an identifier. 3. [Optional] Use the Move Up/Move Down buttons to change the order of the selected objects to control the order in which they will be populated in the metadata for the resulting cell. 4. Click OK. |
Comments | Add a textual description to be included in the metadata of combined coverages in cells generated by the publication job. |
Rules File | The .crfx rule file that will be used for conflict resolution when combining coverages during publication. This file contains rules that will determine which coverage data will be used when there is a conflict between the two datasets, such as different values at the data same location. Rule files are created using the Rule Wizard in BASE Editor. Refer to the BASE Editor help for information on rule files. 1. Click the Browse button (...) to launch the Open CRFX File dialog box and select the relevant rule file. 2. Click Open. |
Products | |
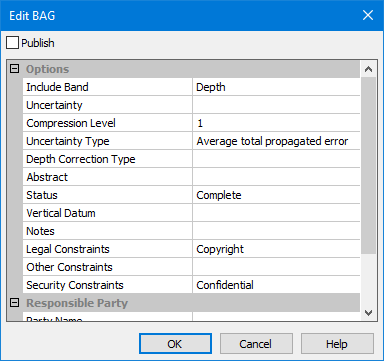
BAG | Enable this option to have BAG products generated by the cloud service when a publication job is run for a cell. The browse button (...) in the field launches the Edit BAG dialog box, which is used to enable the option and define settings for the product creation.
Each product format has a different set of options. The options for the BAG format are: • Publish: Click to populate the check box and enable the BAG format as a product output type for the service. When enabled, the option will display as Yes in the Edit Publication dialog box. • Options: • Include Band: The band in the source data that contains elevation values to be included in the resulting products. • Uncertainty: The band in the source data that contains uncertainty values to be included in the resulting products. • Compression Level: The level of compression to be applied to the output data. The valid range is 0 to 9, 0 being “not compressed”, 9 “highly compressed”. • Uncertainty Type: The type of uncertainty data that will be output in the BAG metadata profile. • Abstract: A textual description of the output BAG file, as per ISO 19115. • Status: The status to assign to the output data, as per ISO 19115. • Vertical Datum: The vertical datum to apply to the output data. • Notes: Textual notes about the output data. • Legal Constraints: Legal constraints for the output data. • Other Constraints: Other constraints for the output data beyond what is available in the Legal Constraints option. If using this option, Legal Constraints should be set to "Other restrictions". • Security Constraints: Security constraints for the output data. • Responsible Party: Descriptive identifying information for the responsible party for the data - name, position, organization and role of the user. 1. Click the browse button (...) to launch the Edit BAG dialog box. 2. Click the Publish check box at the top of the dialog box to have products created in this format. 3. Define any necessary settings. 4. Click OK. |
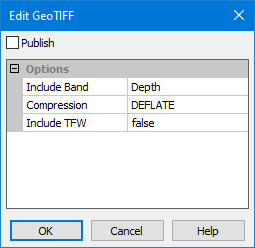
GeoTIFF | Enable this option to have GeoTIFF products generated by the cloud service when a publication job is run for a cell. The browse button (...) in the field launches the Edit GeoTIFF dialog box, which is used to enable the option and define settings for the product creation.
Each product format has a different set of options. The options for the GeoTIFF format are: • Publish: Click to populate the check box and enable the BAG format as a product output type for the service. When enabled, the option will display as Yes in the Edit Publication dialog box. • Include Band: The band in the source data that contains elevation values to be included in the resulting products. • Compression: The type of compression to be applied to output GeoTIFF products. • Include TFW: Enable this option to have georeferencing information written to a TFW file during export. 1. Click the browse button (...) to launch the Edit GeoTIFF dialog box. 2. Click the Publish check box at the top of the dialog box to have products created in this format. 3. Define any necessary settings. 4. Click OK. |
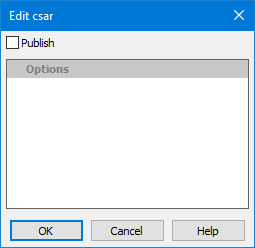
CSAR | Enable this option to have CSAR products generated by the cloud service when a publication job is run for a cell. This product format has no additional options.
1. Click the browse button (...) to launch the Edit GeoTIFF dialog box. 2. Click the Publish check box at the top of the dialog box to have products created in this format. 3. Click OK. |
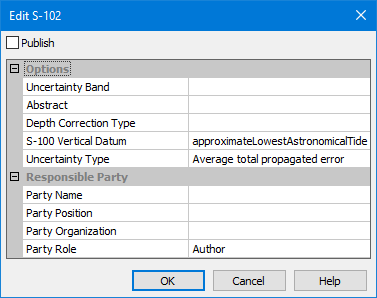
S102 | Enable this option to have S-102 products generated by the cloud service when a publication job is run for a cell. The browse button (...) in the field launches the Edit S-102 dialog box, which is used to enable the option and define settings for the product creation.
Each product format has a different set of options. The options for the S‑102 format are: • Options: • Uncertainty Band: The band in the source data that contains uncertainty values to be included in the resulting products. • Abstract: A textual description of the output product, as per ISO 19115. • Depth Correction Type: Select the type of corrections to apply to depth values in the resulting products. • S-100 Vertical Datum: The vertical datum of the raster source data. • Uncertainty Type: The type of uncertainty data stored in the input band to be included in the S-102 metadata. • Responsible Party: Descriptive identifying information for the responsible party for the data - name, position, organization and role of the user. 1. Click the browse button (...) to launch the Edit S-102 dialog box. 2. Click the Publish check box at the top of the dialog box to have products created in this format. 3. Define any necessary settings. 4. Click OK. |
2. Define the publication configuration settings.
3. Click the Publish check box at the top of the dialog box to enable publishing for the database.
4. Click OK.
The Publish property displays a value of Yes when it has been configured and enabled.