![]() CARIS HPD Paper Chart Editor
CARIS HPD Paper Chart Editor
![]() CARIS HPD Product Editor
CARIS HPD Product Editor
![]() CARIS HPD Source Editor
CARIS HPD Source Editor
![]() CARIS S-57 Composer
CARIS S-57 Composer
![]() CARIS Paper Chart Composer
CARIS Paper Chart Composer
Menu | Edit > Edit Mode |
Tool |
|
Key | <Ctrl+E> |
This command lets you edit existing features.
Point features, soundings, and line vertices can be moved. Lines, including area borders, and text can be edited in a variety of ways.
You can only edit features, or the portion of features, within the project boundaries.
Related commands:
• • • • • • | • • • • • • |
Procedure: General
1. Select the Edit Mode command.
2. Select a feature.
The vertices of the feature are displayed. A point feature or sounding has one vertex, lines have at least two vertices.
Simple editing involves moving the vertices. When a vertex is selected, it turns red. You can select one or many vertices.
3. Select the necessary vertices.
4. Edit the feature.
Finish editing as follows:
5. Select the Edit Mode command again.
The changes are applied to the feature.
To view the changes, select the Refresh command.
To commit the changes, select the Save All Layers command.
Procedure: Lines
1. Select the line.
2. Select one or more vertices.
3. Right-click and select a command from the Edit Lines pop-up menu:
Command | See |
|---|---|
Merge | |
Split | |
Delete | |
Filter | |
Smooth | |
Redigitize | |
Trim/Extend |
Procedure: Text Format
You can change the format of all or part of the text using the Text toolbar or the pop-up menu.
1. Double-click on the text feature.
A yellow text box is displayed.

A text cursor is displayed at the point where you clicked.
2. Select the characters you want to reformat.
This can be part or all of the text. You can select text using the following methods:
• Mouse: Press and hold the mouse button and drag. Or you can double-click on the text. This will select the current word plus the following space.
• Keyboard: Use the right and left arrow keys to move through the text, then use <Shift+left-arrow> or <Shift+right-arrow> to select it.
The characters you select are highlighted.
3. Select the appropriate settings from the toolbar or the pop-up menu.
The part of the text that is highlighted is changed.
Procedure: Text content
To edit the text content:
1. Double-click on the text feature or right-click and select Edit Label Text from the pop-up menu
A yellow text box is displayed.
2. Move the text cursor to the location to be edited.
You can move the text cursor by clicking at the new location or by using the arrow keys. You can select text by dragging the text cursor or by using <Shift+arrow>.
3. Delete the old text if necessary.
Use <Backspace> or <Delete> to delete text.
4. Type to insert the new text.
5. Press <Enter>.
The new text is displayed.
Procedure: Text line
You can edit the line that defines the shape of the text. This cannot be done while you are modifying the text string. If the yellow text edit box is visible, click outside it. You will see the text baseline and the points (vertices) that define it.
To add a vertex:
1. Position the mouse pointer on the line, at the position of the new vertex.
2. Press and hold <Ctrl>.
The mouse pointer changes ( ).
).
3. Click.
The vertex is added.
To move one or more vertices:
1. Click on a single vertex or use Shift+click or Ctrl+click to select multiple vertices.
2. Drag the vertex or group of vertices to a new location.
Other text editing tools
This table describes other ways you can change the text:
To... | Do this... |
|---|---|
Make text point-justified. | Change curved text to point-justified. A point-justified text feature is defined by a single point. Pop-up: Text Editing > Make Point Justified Label Toolbar: <none> |
Make text curved. | Curved text is defined by two or more points. Pop-up: Text Editing > Make Curved Label Toolbar: <none> The text is redrawn with two points, one at the beginning and one at the end. You can add vertices then move them to change the shape of the curve. |
Make the text irregular | Irregular text has a vertex at every character. This lets you move each character individually to fit the curve to irregular shapes.
Pop-up: Text Editing > Make Irregular Label Toolbar: <none> The length of the line is changed to the length of the text. |
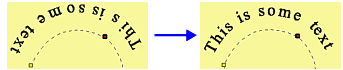
Flip the text | Curved text only. Flip the text so that it is upside-down in relation to its previous orientation.
Pop-up: Text Editing > Flip Toolbar: <none> |
Left align text | Align the text to the left end of the defining line.
Pop-up: Text Editing > Left Toolbar: |
Centre text | Centre the text on the defining line.
Pop-up: Text Editing > Centre Toolbar: |
Right align text | Align the text to the right end of the defining line.
Pop-up: Text Editing > Right Toolbar: |
Stretch text | Curved text only. Justify text to fit the full length of the defining line by adding spaces between both words and characters
Pop-up: Text Editing > Stretched Toolbar: |
Space text | Curved text only. Justify text to fit the full length of the defining line by adding spaces between words only.
Pop-up: Text Editing > Spaced Toolbar: <none> |
Baseline | Place the baseline of the text against the defining line. A baseline is an imaginary line upon which most letters “sit”.
Pop-up: Text Editing > Baseline Toolbar: <none> |
Font Upper | Move the text down so that the defining line is at the top. This places the line slightly above the upper edge of the selected font.
Pop-up: Text Editing > Font Upper Toolbar: <none> Font Upper will take into consideration any vertical space built into the font. The tops of the letters may not touch the line. |
Font Lower | Move the text up so that the descenders sit on the line.
Pop-up: Text Editing > Font Lower Toolbar: <none> Font Lower will take into consideration any vertical space built into the font. The bottoms of the descenders may not touch the line. |
Above | Move the text down so that the top of the upper case letters is against the defining line.
Pop-up: Text Editing > Above Toolbar: <none> Above does not take into consideration any vertical space built into the font. The tops of the letters will always touch the line. |
Below | Move the text up so that the descenders sit on the line.
Pop-up: Text Editing > Below Toolbar: <none> Below does not take into consideration any vertical space built into the font. The bottoms of the descenders will always touch the line. |
Centre | Centre the text vertically on the line.
Pop-up: Text Editing > Centre Toolbar: <none> |
Cut | Remove part or all of the text contents and put it in the clipboard. 1. Double-click on the text feature or select Edit Label Text from the pop-up menu. 2. Select one or more characters. 3. Select the Cut command. Pop-up: Text Editing > Cut Toolbar: <none> Key: <Ctrl+x> |
Copy | Copy part or all of the text contents to the clipboard. 1. Double-click on the text feature or select Edit Label Text from the pop-up menu. 2. Select one or more characters. 3. Select the Copy command. Pop-up: Text Editing > Copy Toolbar: <none> Key: <Ctrl+c> |
Paste | Paste the contents of the clipboard into the text string. 1. Double-click on the text feature or select Edit Label Text from the pop-up menu. 2. Click at the position where you want to paste the text. 3. Select the Paste command. Pop-up: Text Editing > Paste Toolbar: <none> Key: <Ctrl+v> |
Delete | Delete part or all of the text contents but do not place in the clipboard.. 1. Double-click on the text feature or select Edit Label Text from the pop-up menu. 2. Select one or more characters. 3. Select the Delete command. Pop-up: Text Editing > Delete Toolbar: <none> Key: <Delete> |
Move text | 1. Drag the text to a new location. |
Rotate text | 1. [Optional] Select a vertex. 2. Position the mouse pointer over the text. 3. Press and hold <Shift>. The mouse pointer changes ( 4. Drag the mouse pointer. The text is rotated around the selected vertex. If no vertex is selected, the text is rotated around the first point. |
Modify the curved line | 1. Click and drag individual vertices to adjust the shape of the line. |


 ).
).