![]() CARIS HPD Product Editor
CARIS HPD Product Editor
Menu | File > New > HPD Product > S-57 |
Create a tiled raster product based on one or more user-defined data cover areas.
This command creates the tile definitions. When you export the tiled raster product, each tile is written to an output file (TIFF, PNG or JPEG) in the export folder. These images can be opened as backdrop images.
See also Tiled Raster Products in the HPD® User Guide.
Related commands:
• • • | • • |
Interface
Option | Description |
|---|---|
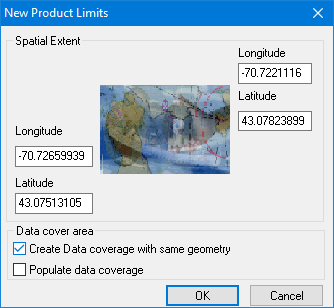
Spatial Extent | The spatial extent is taken by default from the geographic area visible in the Display window. You can change this if necessary by editing the Latitude and Longitude fields. |
Data cover area | Select the method of defining the data cover area. Create data coverage with same geometry: • On: Create a data cover area that is the same as the spatial extent. Only tiles that touch or are within the data coverage area will be generated. • Off: No data cover area will be created You must define the product data cover area or areas manually after the attributes are defined. Populate data coverage: • On: The tile definitions are created automatically after the attributes are defined. • Off: No tile definitions are created. You must create them manually. You can select one or both methods, or neither. |
Attributes are:
Attribute Name | Acronym | Description |
|---|---|---|
Background Colour | $colbk | The background colour for the raster images. The default (blank) uses Alpha (transparent) or white, if the file format does not have an alpha channel. If you require a different colour for the background, you can use one of the colour tokens from the palette that is assigned to the selected portrayal (presid). Type the colour token name in the text box. Optional. |
Compilation Scale of data | COMPSC | The scale at which the data was originally compiled. This influences the output size of text and symbols in the output tiles. Type a scale denominator in the box. Mandatory. |
Coordinate Reference System | CRS | The coordinate reference system for the output images. Click browse (...) and select a coordinate reference system from the Select Coordinate Reference System dialog box. Mandatory. |
Dots Per Inch | DPI | The dots per inch (DPI) of the output images. Type a value. Mandatory. |
Edition | EDITION | The edition of the product. Type a number or accept the default. Mandatory. |
Export Folder | EXPFLD | The folder where all of the images in the tiled raster product are created. Type a path or click browse (...) to display a Find Folder dialog box. Mandatory. |
Fractional Display | frcdsp | True: Soundings are displayed with fractions instead of decimal points. False: Soundings are displayed with decimal points. Mandatory. Default is |
Name | NAME | A name for the product. The name is case-sensitive. Type the name in the box. Mandatory. |
Presentation Identifier | presid | The ID of the portrayal used for symbolization. Select from the list. Mandatory. |
Product Edition Number | EDINUM | Type a value or accept the default (1). Optional. |
Product Group | PRODGRP | The product group for the images. Mandatory. Default is |
Product Update Number | UPDNUM | The number of the current update of the product. Type the number in the box. Optional. Default is |
Sounding Feature Code | sdgfc | The feature code used for soundings in the source data. Type a feature code. Optional. |
Sounding Rounding | SNDRND | The rounding method used for sounding values. Select from the list. Optional. The default is |
Sounding Size in Millimetres | sdgsz | The size of the soundings in millimetres. Mandatory. Default is |
Tile Anti-Aliasing | $tlali | True: The output images will have anti-aliasing applied. False: The output images will not have anti-aliasing applied. Optional. Default is true. |
Tile Buffer | $tlbuf | A buffer around a tile. This helps to ensure that features that cross the tile but whose origin is outside the boundary make it into the image. Type a value in metres. Mandatory. |
Tile Format | $tlfmt | The format of the output images. This includes file types and compression, if any. Select from the list. Mandatory. |
Tile Origin X | $tlorx | A reference point used as the tile origin. This allows precise positioning of tiles so that they can align with other products. If you create multiple products with the same origin values and whose tile sizes are exact multiples, the tiles in both products will fit neatly together. No tiles are necessarily drawn at this point because tiles that do not cross the data cover area or areas are not created. For example, if you set the start point for the tiles outside the area of interest (if you use a national grid system, for example), the tiles will only be generated where they happen to touch the data cover areas. Type a value in the field. Mandatory. |
Tile Origin Y | $tlory | A reference point used as the tile origin. This allows precise positioning of tiles so that they can align with other products. If you create multiple products with the same origin values and whose tile sizes are exact multiples, the tiles in both products will fit neatly together. No tiles are necessarily drawn at this point because tiles that do not cross the data cover area or areas are not created. For example, if you set the start point for the tiles outside the area of interest (if you use a national grid system, for example), the tiles will only be generated where they happen to touch the data cover areas. Type a value in the field. Mandatory. |
Tile Size X | $tlszx | The size of each tile. Type a value in metres in the field. Mandatory. |
Tile Size Y | $tlszy | The size of each tile. Type a value in metres in the field. Mandatory. |
Update Number | VERSION | The update version number. Optional.Default is 0. |
Usage Name | USGNAM | The usage that contains the data from which the tiles will be created. The order in which you select the usages has no effect on the rendering of the exported tiles. The order in which the usages are applied is the default order used when loading the same usages in Product Editor. Click browse (...) and select one or more usages from the list. Mandatory. |
Procedure
First, open an HPD workspace or project.
1. Select the Open Workspace command or the Open Project command.
The appropriate dialog box is displayed.
2. Select a workspace or project.
3. Set the Product Type to Tiled Raster Product.
4. Select one or more usages.
5. Click OK.
The workspace or project is opened.
6. Zoom into the area where you want to create the product.
The product will use the extents of the Display window.
7. Make the layer containing the data active.
8. Select the Create Tiled Raster Product command.
9. If prompted, select a project.
10. Click OK.
The New Product Limits dialog box is displayed.
11. If necessary, modify the Spatial Extent values.
12. Set the Data cover area options.
13. Click OK.
The Tiled Raster Product Attributes dialog box is displayed.
Mandatory attributes without default values are shaded in red. Mandatory attributes with default values are shaded in green.
14. Enter values for the mandatory attributes.
15. Enter values for other attributes as required.
16. Click OK.
If you selected both data coverage options on the New Product Limits dialog box, the data cover area and the tile definitions are created immediately and displayed in the Layout layer in the Layers window. The data cover area will be the same as the Display window extents.
If you selected only Create data coverage with same geometry, only the data cover area is created and displayed in the Layout layer.
If you did not select either data coverage option, the Layout layer is empty. You must define the data cover area and add the product data manually.
See Create Data Cover Areas and Create Product Data for details.