Menu | Tools > Editors > Subset |
Tool |
|
Menu | Tools > Editors > Subset |
Tool |
|
The Subset Editor is a tool for viewing and editing georeferenced sounding data.
With Subset Editor you can:
• view a subset of data in a three-dimensional mode so features such as depressions and rises are visible
• view a slice of data within the selected subset in a scaled view
• rotate data to view it from different angles
• view coverages as reference sources
• find and designate soundings
• flag soundings to the status of:
• rejected
• accepted
• designated
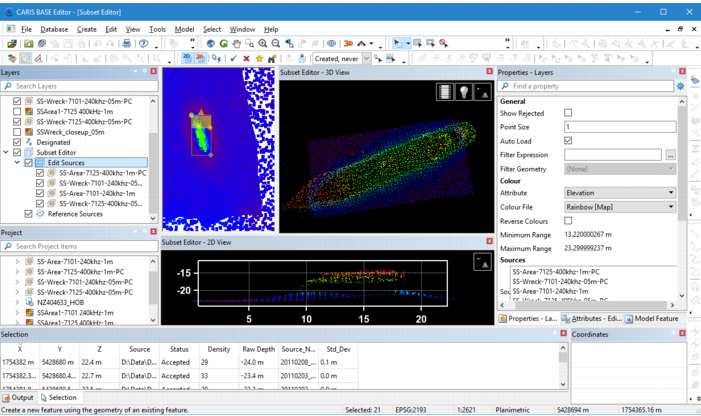
The Subset Editor interface contains the following components:
• Subset Editor - 3D View window: A three-dimensional view of all soundings in the subset area.
• Subset Editor - 2D View window: A profile view of all soundings within the subset slice of the subset area.
• Subset Editor toolbar: The tools used in the Subset Editor.
See Subset Editor Interface for more information on each of the components.
Load a Subset
To load a subset in the Subset Editor:
1. Open at least one point cloud data source.
2. Select the Subset Editor command.
The Subset Editor view windows and toolbar are added to the interface. The subset area now needs to be defined to populate the view windows. There are two available modes for defining the subset area:
• Drag: Use a click-and-drag motion to draw a bounding box around the relevant area in the source data. Note the change in the cursor when this mode is selected.
• Click Within: Define the subset area using the geometry of an existing polygon selected from the snap/grab target layer. When this mode is enabled, polygons in the view are shaded in grey as the cursor is moved over each polygon. Click to select the relevant polygon when it is shaded in the display. Note the change in the cursor when this mode is selected. A subset bounding box will be created automatically around the selected polygon. The polygon will act as a filter for the points displayed in the Subset View windows. This filter is controlled through the Filter Geometry property. See Subset Layer Properties for more information.
3. Right-click in the Display window to select the Mode to use for defining the subset area.
4. Define the subset area using the method appropriate for the selected mode.
Data is loaded to the Subset Editor View windows for the primary elevation band of each point cloud opened and turned on in the Layers window. This data can be filtered using the properties for the Edit Sources layer if desired. See Subset Layer Properties for more information on filtering.
The size of the subset is determined by the bounding box. The subset slice box (yellow area within the bounding box) determines the area that is displayed in the Subset Editor - 2D View. As the bounding box area is changed, a new subset is generated and the displays in the 2D and 3D Views are refreshed.
Below is an example of the subset bounding box.

The bounding box and the 2D slice can be resized if needed. The bounding box can also be rotated. If a geometry has been applied using the Click Within mode, the filter will be retained as long as the subset box exists. Creating a new subset box will clear the geometry filter.
To resize the subset area:
1. Position the cursor over a corner-grip of either the subset bounding box or the subset slice box.
2. Press and hold the mouse button and drag the grip.
The box is resized as the grip moves.
You can also move the 2D subset slice up or down inside the bounding box by pressing the arrow keys on the keyboard.
To rotate the subset area:
1. Press and hold the <Ctrl> key.
2. Position the cursor over any of the grips on the bounding box. Note the change to the cursor.
3. Press and hold the mouse button, and then drag to rotate the bounding box to the desired angle.
Lock the Subset
Once the desired subset is loaded, the Lock option can be used to lock the subset area, ensuring that you do not accidentally resize or move the subset. A new subset cannot be created while the lock is active.
1. Select the Lock command.
Tools |
|
The subset area is now locked into place and cannot be adjusted until the lock is removed.

