Menu | Tools > Surfaces > Interpolate > Entire Dataset |
Tool |
|
Pop-up | surface > Interpolate (Layers window) |
Menu | Tools > Surfaces > Interpolate > Entire Dataset |
Tool |
|
Pop-up | surface > Interpolate (Layers window) |
Interpolation fills empty nodes in a grid using values from surrounding populated nodes.
The Interpolate Entire Dataset command attempts to fill all holes in a selected surface. The process begins by classifying all nodes in the surface as data, holes, or no-data (areas beyond the surface data but within the extents of the surface). The classifications are used to determine the locations of holes that need to be interpolated. A new “Holidays” layer is added to the surface to contain the classification information. The name of this layer will differ depending on the attribute layer selected for interpolation.
If the surface being interpolated already contains a Holidays layer, the existing layer will be used and will be updated to reflect the newly interpolated nodes. |
The application then analyzes the populated nodes surrounding holes to determine if there are enough neighbouring values to interpolate values for the holes based on user-specified criteria. If sufficient data is present, the process runs as a single iteration, filling all holes. Holes are filled as much as possible from the outer edge to the centre, given the populated data and specified criteria.
Large holes may be only partially filled as there may not be sufficient neighbouring data to completely fill a hole. The command can be run multiple times, however, to continue to fill holes using a single iteration each time. Each successive run will use the interpolated values from the previous run as populated neighbouring nodes.
The original surface is not affected by this command. A copy of the selected surface is created and the interpolation is performed on that data.
Related commands:
• Interpolate Surface By Range
• Interpolate Surface By Pointing
Interface
The Interpolate Surface command uses the following dialog box.
Option | Description |
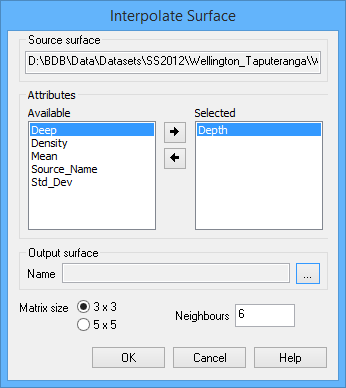
Source surface | The Source surface is defined by the surface that was selected at the time the command was initiated. This field cannot be changed. |
Attributes | The attribute bands to be copied to the interpolated surface. The Available list contains all attributes present in the source surface that are available for inclusion in the output surface. The Selected list contains all attributes that have been selected for inclusion in the output surface. The primary elevation band is selected by default and cannot be removed as it is the only band that is interpolated. All other attributes in the Selected list will be included in the output surface, but they will not be interpolated. To select attribute bands: 1. Select an attribute band in the Available list. 2. Click the right-arrow button to move the attribute to the Selected list. |
Output surface | The name and location for the resulting surface. 1. Click browse (...) to open a Save As dialog box. 2. Enter a name and select a location for the output surface. |
Matrix size | The number of nodes surrounding a hole that will be analyzed for populated values. The options are 3x3 or 5x5, meaning the application will analyze a square area around each pixel of the hole that is either 3 pixels high and 3 pixels wide, or 5 pixels high and 5 pixels wide. |
Neighbours | The number of pixels within the matrix area that must contain data in order for the hole to be interpolated. For example, if you select the 3x3 matrix size option and enter a neighbours value of 6, that area must have at least 6 populated data nodes in order for a pixel in the hole to be interpolated. If there are not enough populated nodes present in the matrix area, it is possible that only some pixels in the hole will be interpolated or the hole will be skipped entirely by the process. |
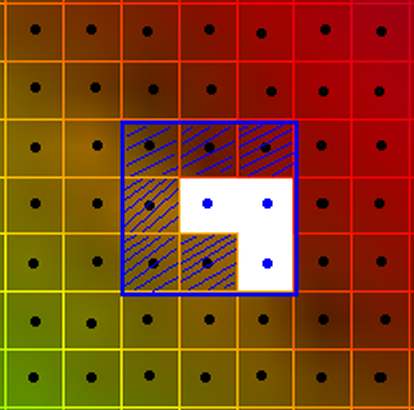
In the image below, the blue square represents a 3x3 matrix area. Each dot within the square is a node. Of those nodes, only the 6 shaded nodes contain data.
If the Neighbours field is defined as 6 or less, this would be sufficient to interpolate the pixel at the centre of the square. If the square were shifted to centre on each pixel in the hole, you can see the entire hole could be interpolated using the specified criteria.
Procedure
1. In the Layers window, select the root layer of the surface to be interpolated.
2. Select the Interpolate Entire Dataset command.
The Interpolate Surface dialog box is displayed.
3. Select attributes in the Available list and click the right-arrow button to move them into the Selected list.
4. Define a name and location for the Output surface.
5. Select a Matrix size option.
6. Type a value in the Neighbours field.
7. Click OK.
A copy of the original surface is created with the specified attributes and properties from the source surface. The areas in the primary elevation band that contained holes are now flagged as Interpolated. If you view the Holidays layer, it will have been updated to show that the holes are now classified as data. The copied surface will also contain an Interpolated layer that can be used with filtering tools to filter out interpolated data when performing other tasks (for example, extracting a surface), if desired.
