Menu | File > New > Project |
Tool |
|
Menu | File > New > Project |
Tool |
|
Projects in HIPS and SIPS are organized into the following hierarchy within a HIPS repository:
Project / Vessel / Day / Line
For more information on project structure, see PVDL Structure.
The new project creation process generates a HIPS Project File (*.hips). Existing projects that were saved as *.hpf files, are converted to *.hips when you first open them in HIPS and SIPS.
Vessel and /Day layers can be added to an existing project. Day and Line layers can be renamed, taken out of the active project or deleted outright.
All projects must contain a vessel file. See Create a New HVF.
You can be connected to more than one project repository at one time, using the commands from the right-click menu in either the New Project or Open Project dialog box.
Projects created earlier than HIPS 9.0 were saved as *. |
Procedure: Step 1
1. Ensure that a vessel file has been created for this project.
2. Select the New Project command to open the New Project wizard.
If you have not defined a repository for your project data, you will be prompted to do so.
The first of the dialog boxes in the New Project wizard is displayed.
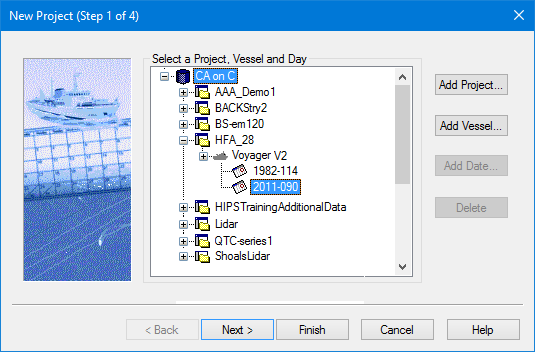
3. Select an existing data folder and expand the tree to add a vessel, and day as required.
4. To create a new project folder, click Add Project.
The New Project Name dialog box is displayed.
5. Type a name for the new project.
6. Click OK.
A new Project folder is created and displayed in the dialog box in the selected data folder.
To create a new project in another project repository:
1. Right-click in the data tree area of the New Project dialog box.
2. Select Connect To… from the pop-up menu.
3. Name the new project folder and use Browse to set the path to the new data directory.
4. Click OK.
Add a new Vessel folder
The Vessel folder contains the folders for each survey day of the project.
5. Select a project folder so it is highlighted.
6. Click Add Vessel.
The Available Vessels dialog box is displayed.
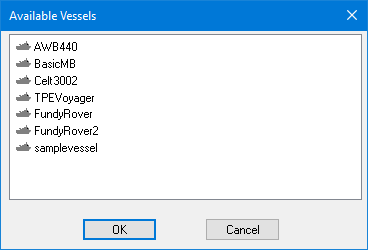
7. Select a vessel file from the list.
8. Click OK.
The Vessel folder is created and added to the new Project folder.
Add a new Day folder
The Day folder contains track line data. For most formats the date is typically recorded with the raw data. If not, give the Day folder the date that the survey lines were recorded.
Day folders are shown in Julian Day format, for example, April 24, 2009 is shown as 2009-114.
To add a Day folder to a Vessel folder:
9. Select the Vessel folder.
10. Click Add Date.
The Add Date dialog box displays the current date in month- day- year format, and the Julian date equivalent.
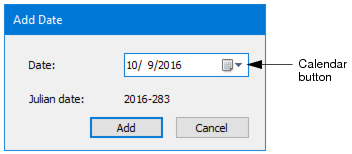
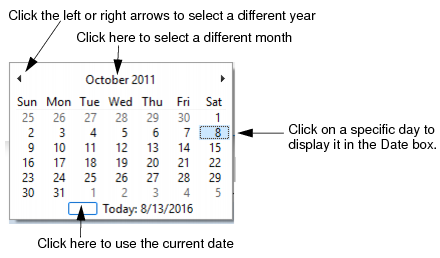
11. Change the date by clicking the calendar button in the Date field to open an interactive calendar.
12. Click add to add the date to the project tree.
13. Click Next to go to Step 2.
Add to an existing project
You can add new Vessel and Day folders to an existing project instead of creating a new project.
1. Select the existing project from the list in the dialog box.
2. Add vessel and day folders as needed.
If you select an existing HIPS file (*.hips), and add a new vessel or day, the Finish button is displayed at this point. The original project parameters will be applied (set when the HIPS file was first created). |
Delete empty folders
You can also delete an empty Day or Vessel folder by clicking Delete. Delete is disabled if a Vessel or Day folder already has data converted into it.
 on Standard toolbar