When an existing colour range file is open in the Editor, a histogram and a table of colour values are displayed. When creating a new colour range, the histogram and colour table are empty (no colour values displayed).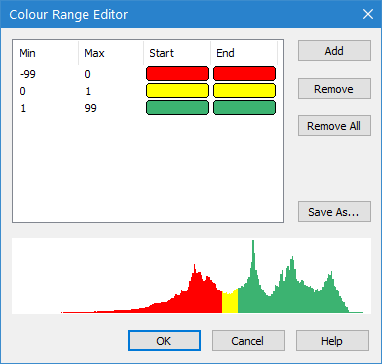
The Colour Range Editor is used to create and edit colour range files. The Editor is accessible from the Colour File property list when a data layer is selected in the Layers window.
Colour range files assign colours to attribute value ranges in the current dataset. By default, colour range (.crf) files are stored in the following directory:
C:\ProgramData\CARIS\<application>\<version>\Colour
Two colour range files are provided with Teledyne CARIS applications. You can edit these files or create your own as needed.
When an existing colour range file is open in the Editor, a histogram and a table of colour values are displayed. When creating a new colour range, the histogram and colour table are empty (no colour values displayed).
The histogram is not displayed if viewing a colour range file for vector data. It is only provided for raster data. |
Procedure
To access the Colour Range Editor via raster data, see Raster Data. To access the Colour Range Editor via vector data, see Vector Data.
Raster Data
1. Select a raster data layer in the Layers window.
2. Select the Colour By property in the Properties window and choose Colour File.
The Colour File property is populated with a list of options.
3. From the Colour File list, select New Colour Range to create a new colour file, or select the colour range file you want to edit, then expand the list a second time and choose Edit.
If you chose New Colour Range, the editor is launched and is ready to begin creating the colour range. If you chose to edit the selected colour range, the editor is populated with a histogram and a table of the colour values in the selected colour range file.
The histogram is not displayed if viewing a colour range file for vector data. It is only provided for raster data. |
The Editor provides the following options:
• Add a Colour: Add a custom colour to the colour list.
• Remove a Colour: Remove a colour from the list.
• Remove All Colours: Remove all colours from the list.
• Save As: Save a new or edited colour range file.
Vector Data
1. Select a vector data layer in the Layers window.
2. Expand the drop-down list for the Colour Range property in the Properties window and either:
• Select <New...> to create a new colour range file.
• Select <Browse...> to browse to the Colour directory in ProgramData and select an existing colour range file.
If you chose New, the editor is launched and is ready to begin creating the colour range. If you chose Browse, the selected file is shown in the field and applied to the data and an Edit field is added to the list of options for the Colour Range property. This option allows the selected colour range file to be edited.
3. [Optional] Select Edit from the Colour Range property.
The editor is opened, populated with a table of the colour values in the current colour range file.
The Editor provides the following options:
• Add a Colour: Add a custom colour to the colour list.
• Remove a Colour: Remove a colour from the list.
• Remove All Colours: Remove all colours from the list.
• Save As: Save a new or edited colour range file.
Add a Colour
To add a colour:
1. With a colour range file open, click Add.
The Add Range dialog box is displayed.
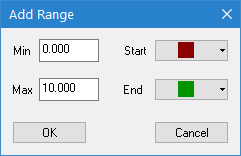
In this dialog box, you specify the minimum and maximum values of the range you want to add and define colours to represent that range.
2. Type a value in the Min field for the starting value of the range.
3. To select a Start colour, expand the drop-down list and select a colour from the list or choose Custom Colour and select a colour using the standard Windows colour palette.
4. Type a value in the Max field for the ending value of the range.
5. Select an End colour.
6. Click OK.
You are returned to the Colour Range Editor and the selected colour is displayed in the colours list.
7. Repeat steps 1 through 7 until all necessary ranges have been added.
8. To store the settings in a new colour range file, click Save As; to save the settings to the current (previously saved) file, click OK.
If you chose Save As, the Save As dialog box is displayed. Otherwise, the settings are saved to the current file.
9. Type a name for the new file.
All colour range files are saved to the default CRF file directory.
10. Click Save.
The colour range file is saved.
Remove a Colour
To remove a colour from the range file:
1. Select the colour from the list.
2. Click Remove.
The colour is removed from the list.
3. Save the changes.
Remove All Colours
To remove all colours from the list and start over:
1. Click Remove All.
The list of colours should now be completely empty.
2. Reassign colours as needed and save the changes.
Apply a Colour Range File
To apply a colour range file to your current data display:
1. Select Colour File from the Colour Type list in the Properties window.
2. Select the colour range file from the Colour File list.
3. Refresh the Display window.
The data should now be coloured according to the defined ranges.