Menu | Tools > Features > Quick Creator |
Tool |
|
Menu | Tools > Features > Quick Creator |
Tool |
|
The Quick Creator command allows users to go into quick creation mode to easily analyze a specific area of a dataset and, using the deepest or shoalest point in that area, either:
• perform a sounding selection,
• designate soundings, or
• create point features.
One possible use case for this tool is supplementing automated sounding selection results with additional sounding features in key areas.
Before you can designate soundings or create features, you must define the criteria that will be used for selecting source data. Source data is analyzed to determine which sounding will be used in the process. The criteria settings are defined in the Quick Creator dialog box.
Metadata is mapped from the attributes of the source data to S‑57 attributes via a translation file. The translation file has a BSST file extension and is in XML format.
The following is an example of a translation file where the value of SCAMIN is multiplied by 2.
<?xml version="1.0" encoding="UTF-8"?>
<Selected_Sounding_Conversion>
<Depth New_Acronym="SCAMIN">
<Conversion_Factor><value>*2</Conversion_Factor>
</Depth>
</Selected_Sounding_Conversion>
You can choose to use an existing translation file or create a new one. Once a file is selected, it can be edited through the Edit Translation File tool.
Related commands:
• Create Features from Selection
• Create Soundings Inside Contours
Interface
The Quick Creator command uses the following dialog box.
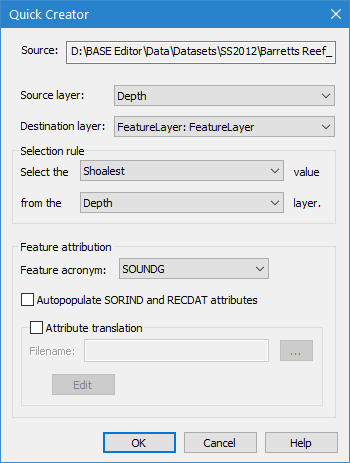
Option | Description |
Source | The Source is defined by the surface that was selected at the time the command was initiated. This field cannot be changed. |
Source layer | The attribute layer from which Z-values will be read for the designated soundings or new features. |
Destination layer | This field controls which function the Quick Creator will perform and where new features will be created. • If you choose a feature layer, new soundings or point features will be created on the selected layer. • If you choose a Designated layer of a surface, soundings from the source layer will be flagged as designated. The Designated layer of the current surface is selected by default. If the current surface does not have a Designated layer, but the Designated option is selected, the layer will be created in the surface when you click OK on the dialog box. |
Selection rule | The Selection rule fields define how soundings will be selected for the designation or creation when an area is analyzed. 1. In the first drop-down list, select Deepest or Shoalest to define whether the command should look for the deepest or the shoalest value in the selected area. 2. In the second drop-down list, select the layer of the surface from which data will be collected. Only layers of the selected surface are available. |
Feature acronym | The Feature attribution fields allow you to define the type of features to create and metadata values to assign to the features. If you do not wish to create features or populate attributes, these fields do not need to be populated and will be disabled if a Designated surface layer is selected as the Destination layer. The feature type of the new features is controlled by the Feature acronym field. The drop-down list for this field is populated according to the feature catalogue of the selected destination layer. The default selection will be the first sounding type feature in that catalogue. |
Autopopulate SORIND and RECDAT attributes | The source (SORIND) and date (RECDAT) attribute values for the new features are populated automatically if this option is enabled. |
Attribute translation | This option allows a translation file (.bsst) to be applied to the data to map attribute values. You can choose to use an existing translation file or create a new one. |
Filename | The BSST translation file to use for attribute mapping. An existing file can be used or a new file can be created. Click the browse button (...) to open or create a file. • If using an existing file, navigate to the file and select Open. • If creating a new file, navigate to the location in which to store the file, enter a name for the file in the File name field and click Open. |
Edit | Launch the Edit Translation File tool to edit the settings of the selected translation file. If a new file is being used, this tool is used to define the settings of the new file. See Edit Translation File for more details on this tool. |
Procedure
1. If performing a sounding selection or creating point features, open or create a feature layer.
2. In the Layers window, select the surface you want to use as the source data for the soundings.
3. Select the Quick Creator command.
The Quick Creator dialog box is displayed.
4. Select a Source layer.
5. Select a Destination layer.
6. Choose whether the command should look for the Deepest or the Shoalest value in the selected area.
7. Select the layer of the surface from which data will be collected.
8. Select the Feature acronym of the desired feature type.
9. [Optional] Click the check box to enable Autopopulate SORIND and RECDAT attributes.
10. [Optional] Click the check box to enable the Attribute translation option to apply a translation file.
11. Click the Filename browse (...) button.
12. Either navigate to an existing file, or enter a file name to create to a new file, and click Open.
13. Optional] Click Edit to launch the Edit Translation File tool to define or edit the settings of the translation. Click OK to return to the Quick Creator dialog box.
14. To begin creating features or designating soundings, click OK.
The dialog box closes and your cursor changes to a circle.

This shape represents the area that will be analyzed when you click to designate or create a feature. The deepest or shoalest value within the circle will be selected based on the settings chosen. The size of the cursor can be changed if you have a mouse with a wheel button.
15. [Optional] Press and hold <Ctrl> while scrolling the wheel button forward or backward to change the size of the cursor.
The circle will get bigger or smaller. As the size changes, the Pick Radius value will be displayed in the Status bar.

The points within the circle will be analyzed and the shoalest/deepest data value will either be flagged as designated or used to create the new feature on the feature layer.
The command remains enabled and the settings defined can be used repeatedly until the command is toggled off.
16. Continue clicking to designate additional soundings or create additional features.
17. When finished, select the command again to toggle it off.
If you chose a Designated layer as the destination, a Designated layer now exists in the surface layers if one did not exist before, and designated soundings are present on the layer. If you chose to create features, the feature layer is selected by default and features have been added to both the layer and the Display window.
