
The New Publication tool can be used to generate a shoal report once shoals have been detected. This report may be saved as a PDF, and contains information about a single, superselected shoal such as:
• Location coordinates
• Size
• Depth
• Reference feature
• Clearance
• Depth of associated template
The report may also provide an image of the single shoal as it was displayed in the Display window at the time the New Publication dialog box was opened. Any maps/data visible at the time will also be included in this image.
To publish a shoal, you must first have a shoal layer open, and a shoal superselected. If you do not have a shoal selected, the fields in the publication will not be populated with data. For more information on detecting shoals or opening an existing shoal map see Detect Shoals.
To publish a shoal report:
1. Detect shoals or open a shoal map.
2. In the Layers window, select the Shoals layer.
3. Superselect the shoal for which you want to publish a report.
4. Adjust the view in the Display window to ensure that the shoal and any other relevant data is displayed as you want it to appear in the report.
5. Select the New Publication command.
Menu | Tools > New Publication |
The New Publication dialog box is displayed.
The Template file field is used to select the template you want to use to populate the report. A default shoal publication template, shoal_publication_template.rpx, is provided with the application. This file is located at:
C:\ProgramData\CARIS\BASE Editor\<version>\SampleData\
6. To select a shoal template file, in Publication template, click Browse.
An Open dialog box is displayed.
7. Select a shoal template file and click Open.
The Open dialog box is closed; the New Publication dialog box is redisplayed with the selected shoals template file open.
The Publication objects section is populated with a list of the available objects from the selected shoal template. All objects for which information is found in the data will be selected by default. To not include some of the information in the report, click the check box to remove the check marks for the appropriate objects, or update your template to not contain a reference to the attributes.
8. Add or remove check marks for the available Publication objects.
As you select each publication object, you may notice fields in the different “objects” groups: Image, XML file, Text field, or Point, become enabled. These fields allow you to define settings for the currently selected publication object. For more information on the object properties fields, see the Tools Menu chapter in the CARIS BASE Editor Reference Guide.
Once you have the desired publication objects defined, you may generate the report.
9. To generate the publication, click Publish.
The Publish dialog box is displayed.
10. Define a name and location for the publication file, then click Save.
The PDF Export Settings dialog box is displayed.
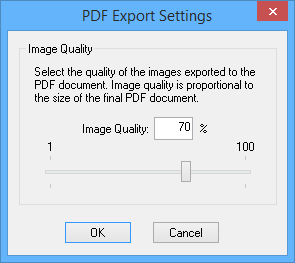
11. Use the slider bar to select the quality level to use for exporting the images in the publication—the higher the quality, the larger the file.
12. Click OK.
The publication is generated and stored as a PDF file in the specified location. When the file creation is complete the Associate Shoal to Publication dialog box is displayed.
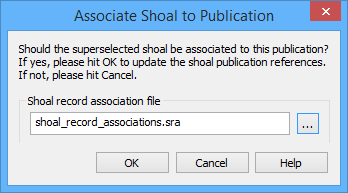
This dialog box allows you to associate the publication to the shoal for which it was created.
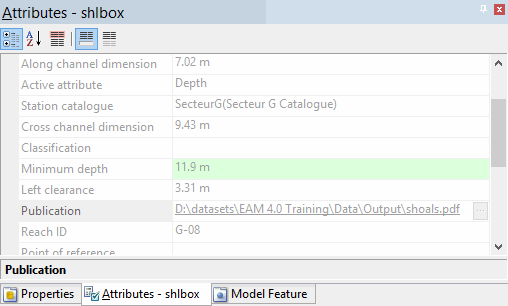
By doing this, the Publication attribute is populated with a direct link to the file.
13. Control + click this link to open the report from within BASE Editor.