![]() CARIS HPD Paper Chart Editor
CARIS HPD Paper Chart Editor
![]() CARIS HPD Product Editor
CARIS HPD Product Editor
![]() CARIS HPD Source Editor
CARIS HPD Source Editor
Menu | Create > New Feature > Marker |
Tool |
|
You can create a marker at a particular location or you can associate it with specific features.
Related commands:
• • • • • • • • • | • • • • • • • • |
Interface
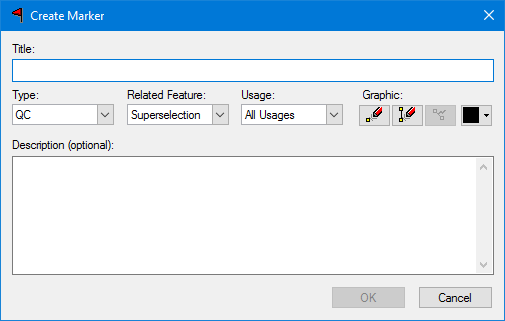
Option | Description |
|---|---|
Title | A title for the marker. Type in the box. |
Type | The type of marker. Choose from: • Error • QC • Notice • Survey • User |
Related Features | Select the feature or features that the marker will be related to. If you selected a single feature before using the command, choose from • Superselection • None If you selected two or more features, choose from: • Superselection • Selection • None If no features are selected, this option cannot be changed. It defaults to None. In this case, you must create a graphic. |
Usage | Select the usages that will display the maker. Select a single usage or all usages |
Graphic | Create a marker graphic. • A graphic is mandatory for a marker that is not related to a feature. • A graphic is optional for a marker that is related to a feature. To draw a line marker: 1. Click the Digitize Line tool ( This defaults to the Point to Point line type. 2. To change line type, right-click in the Display window and select Edit Line from the pop-up menu. 3. Digitize a line. 4. Do one of the following: • Press <Enter> or <End> to stop digitizing. • Press <Home> to close the line and stop digitizing. You are returned to the Create Marker dialog box. To change the colour of the line: 5. Click the colour tool and select a colour ( To draw a point marker: 1. Click the Digitize Point tool ( 2. Click at the location in the Display window. The marker is added and you are returned to the Create Marker dialog box. Use the Reset Graphic tool ( |
Description | Optional. A description of the marker. Type in the box. |
Procedure
1. To associate the marker with one or more features, select the features.
2. Select the Create Marker command.
The Create Marker dialog box is displayed.
To create a marker:
3. Type a Title for the marker.
4. Select a marker Type.
5. Select a Related Feature type.
6. Select a Usage.
7. [Optional] Digitize a marker graphic.
The dialog box is hidden and the graphic tool pointer is displayed.
8. Create the marker graphic.
You are returned to the Create Marker dialog box.
9. [Optional] Type a Description.
10. Click OK.
The marker is created and its information is added to the Markers window and the Marker Details window.

 ).
). ).
). ).
). ) to remove the graphic.