The following steps create an import criteria.
1. Click Add.
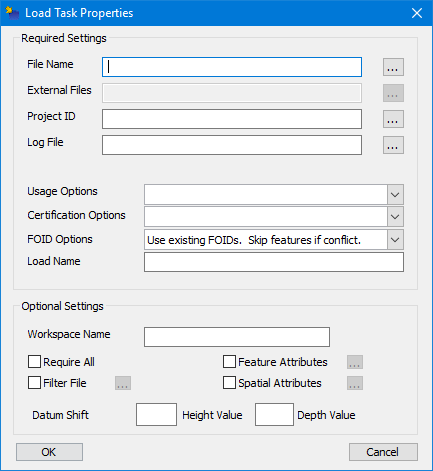
The Load Task Properties dialog box is displayed.
Settings | Description |
|---|---|
Required | |
File Name | File to be imported into the schema. Click Browse to select the file or type the path and name in the field. |
External Files | Folder containing files associated with the data you are importing (images, raster charts, and so on). Click Browse to select the folder or type the path and folder name in the field. |
Project ID | Project to be associated with the data-loading process. 1. Click Browse to open the Select Project dialog box. 2. Select a project. 3. Click OK. The project number is displayed in the field. You can also directly type the number. |
Log File | Path and name of the log file for the load process. Click Browse to select a path and name for the file; or, directly type the path and name in the field. |
Usage Options | Usage where features are to be loaded. Select a usage from the list. |
Certification Options | Certification status for the features being loaded. The Verified and Accepted options are visible only if you have a QA (Quality Assurance) role. Select a certification status from the list. |
FOID Options | Assign FOIDs to features. You can assign new FOIDs or use already assigned FOIDs. Choose from the list. |
Load Name | Name for the load script. The name is displayed in the HPD Data Loader. Type a name in the field. |
Optional | |
Workspace Name | Workspace name for the area that covers the loaded data. Type a name in the field. |
Require All | Cancel the load process if any of the features fail to load (duplicated identifier, unknown attributes, and so on). Select the check box. |
Filter File | Apply rules for importing features and attributes to the schema. The rules are contained in a CRFX (filter) file. 1. Select the Filter File check box. 2. Click Browse. The Open dialog box is displayed. 3. Select a CRFX file. 4. Click Open. |
Feature Attributes | Apply an attribute to all features. 1. Select the Feature Attributes check box. 2. Click Browse. The Global Feature Attributes dialog box is displayed. 3. Select an attribute acronym from Acronym list. 4. Select or type a value in the Value list. Click OK. |
Spatial Attributes | Apply a value for all POSACC and QUAPOS attributes imported into the workspace. 1. Select the Spatial Attributes check box. 2. Click Browse. The Global Spatial Attributes dialog box is displayed. 3. Select POSACC or QUAPOS from the Acronym list. 4. Type a value in the Value field. Click OK. |
Datum Shift: Height Value | Apply a height shift to the following height attributes: ELEVAT, HEIGHT, VERCCL, VERCLR, VERCOP, VERCSA. Positive values increase the height; negative values decrease the height. Type the value in the field. |
Datum Shift: Depth Value | Apply a depth shift to the soundings and the following depth attributes: DRVAL1, DRVAL2, VALDCO, VALSOU. Positive values increase the height; negative values decrease the height. Type a value in the field. |
2. Define any necessary options.
3. Click OK.