The properties for the Subset 2D View are shown when the 2D View node is selected in the Subset Control window.
The data in both the 2D and the 3D views in Subset Editor can be centred around a sounding.
1. Click on the sounding with the middle-mouse button to shift the subset so that the sounding is centred in the View window.
2. Return the data to the original direction and orientation using the Overview button on the Subset Control panel.
2D View Display Properties | Description | |
|---|---|---|
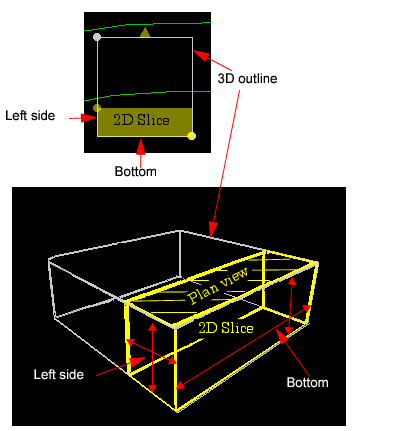
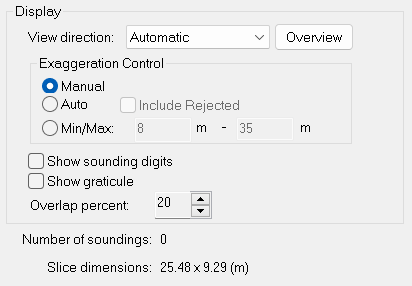
View direction | Sets the view perspective to: • Right: view data from the right side of the slice box • Top: view data from the upper side of the slice box • Left: view data from the left side of the slice box • Bottom: view data from the lower edge of the slice box • Plan: view data looking down into the box from above • Automatic: the perspective is determined by the dimensions of the 2D Slice Box. • If the height of the slice box is greater than the width, the view is automatically shown from the Left side. • If the width of the slice box is greater than the height, the view is automatically shown from the Bottom. | |
Overview | The data in both 2D and 3D view in Subset Editor can be centred a sounding. 1. Click on the sounding with the middle-mouse button to shift the subset so that the sounding is centred in the View window. Use the Overview button to return the data to the original view and orientation. | |
Exaggeration Control | Vertical exaggeration is the ratio of the vertical scale versus the horizontal scale. | |
Manual | Set vertical exaggeration with the scale in the 2D View. 1. Click and drag the slider on the scale to change the amount of exaggeration. 2. Click the arrows at the ends of the scale to increase or decrease the scale itself. | |
Auto | Sets the scale automatically by using all visible depths. | |
Include Rejected | When Auto Exaggeration mode is selected, the Include Rejected option is activated. This will automatically use rejected data to set a minimum and maximum sounding depth to display in the 2D View. | |
Min/Max | Manually set a minimum and maximum sounding depth to display in the 2D View. | |
Show sounding digits | Display sounding values in the 2DView.. | |
Show graticule | Display a grid with values representing distance and depth along the axes. These values are set according to the setting for View direction. • If the Right/Top/Left/Bottom options are selected, both the depth and distance are shown. • If the Plan option is selected, distance in both directions is displayed. | |
Overlap percent | Select a percentage by which the 2D Slice box will overlaps the previous area in the 2D View when the box is moved. (The higher the percentage is, the larger the amount of overlap and the greater the number of slice views within the subset.) | |
Number of soundings | The number of soundings in the 2D slice. | |
Slice dimensions | The dimensions of the slice (height x width) in the default units. | |
Change Display in 2D View
Use arrow keys to move the 2D slice up or down within the bounding box.
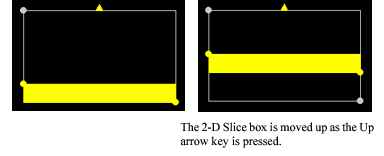
When the 2D slice bounding box is resized, the information in the window is refreshed with new data.