Menu | File > Export > Coverages > Points |
Export the values from a coverage to a point cloud in a user‑specified format. The source coverage can be a raster surface, point cloud or variable resolution surface.
Interface
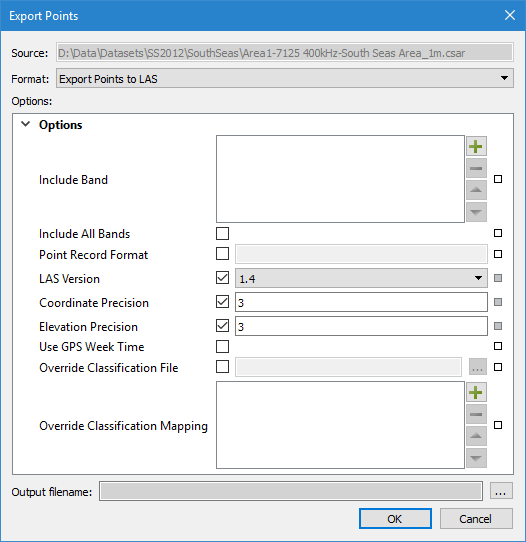
The Export Points command uses the following dialog box.
Option | Description |
|---|---|
Common Options | |
Source | The name and location of the input file. The Source is defined by the coverage that was selected at the time the command was initiated. This field cannot be changed. |
Format | The output format for the resulting point cloud file. The options include CSAR, FAU, GSF and LAS. |
Output filename | The name and location for the output point cloud file. 1. Click the browse button (...) to specify a name and location. |
Options | The options for the selected output format. The available options will differ based on the selection in the Format drop-down list. If you hover the mouse cursor over the name of an option, a brief description of the option is displayed in a tooltip. |
CSAR Options | |
Comments | Textual information to be included in the metadata of the output coverage. |
Include Band | The bands from the source coverage to include in the output. |
FAU Options | |
No options | |
GSF Options | |
Include Band | Map the bands of the source coverage to relevant fields in the GSF output file. The bands available for the output are defined by the GSF format. Some bands will be mapped directly, while some are recomputed during export. The buttons at the right side of the field are used to define the band mappings: • The plus button is used to add a mapping through an Add value dialog box. • The Input Name field is used to identify the input band that you want to map. The list is populated with all bands in the source data. • The Output Name field is used to identify the GSF field to which the input data will be mapped in the output. • The minus button is used to remove a mapping from the list if needed. • The up and down arrow buttons are used to change the order of the layers in the list. The mapped bands are listed in the field as they are added. The primary elevation band of the source is mapped to the DEPTH GSF field if no other mapping is provided for DEPTH. |
Beam Order Band | The input band containing the beam order information used to order the points per profile. It is recommended that one of the following bands be selected: Beam_Number, Beam Angle, or Across Track. If this option is not specified, x,y positions are used to order the points. This can result in calculated heading values being reversed (180 degrees off) for some swaths. Note: The band selected for this option is not included in the output unless it is also selected in the Include Band option. |
Time Band | The input band containing the values for the time each point was recorded during acquisition. |
LAS Options | |
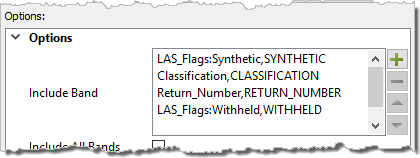
Include Band | Map the bands of the source coverage to relevant attributes in the LAS output file. This field can also be used to map status flags to relevant attributes of the resulting LAS file. For example, source points with a Rejected flag can be mapped to the LAS WITHHELD flag. If this option is not used, only the Depth and Status bands will be exported to the LAS file. The buttons at the right side of the field are used to define the band mappings: • The plus button is used to add a mapping through an Add value dialog box. • The Input Name field is used to identify the input band and status flag that you want to map. The list is populated with all bands and LAS flags present in the source file. Entries for flags are display as "band name:flag name". • The Output Name field is used to identify the LAS band to which the input data will be mapped in the output. • The minus button is used to remove a band from the list if needed. • The up and down arrow buttons are used to change the order of the layers in the list. The mapped bands are listed in the field as they are added. The Accepted status cannot be mapped through this option. Because this is the default state for points, it is not an actual flag to be mapped. |
Include All Bands | Include all input bands in the output. |
Point Record Format | A number specifying the point record format to use. The value must be one of 1 through 10. The point format that best suits the data will be will be selected by default if this option is not specified. |
LAS Version | The LAS version to output. Versions 1.0 to 1.4 are supported. |
Coordinate Precision | The decimal precision of the coordinates in the output. The default value is 3. |
Elevation Precision | The decimal precision of elevation values in the output. The default value is 3. |
Use GPS Week Time | Use GPS Week Time when storing time. If this option is not enabled, Adjusted Standard GPS Time is used. |
Override Classification File | Export the LAS data using a custom set of classifications defined in a classification file rather than using the default classifications defined in the specifications for the LAS version. A classification file must be in a text file format, such as TXT or CSV, and contain two columns, one for the classification ID number and one for the name of the classification. The two columns must be separated by a comma, or one or more spaces. If the data being exported contains an ID that is not present in the mapping file, the default classification for the LAS version will be used for that ID. If an override classification file and override classification mapping are both specified, only the mappings are applied. |
Override Classification Mapping | Export the LAS data using a custom set of user-defined classifications rather than using the default classifications defined in the specifications for the LAS version. With this method, individual classification mappings are defined manually using the same method as the Include Band option. Two mappings cannot be specified for the same classification ID number. |
Procedure: Export to CSAR or FAU
1. Select a coverage source in the Layers window.
2. Select the Export Points command.
The Export Points dialog box is displayed.
3. Select CSAR for the output Format.
4. Define any necessary Options.
5. Specify a name and location for the Output filename.
6. Click OK.
The data is exported to a new point cloud.
Procedure: Export to GSF or LAS
1. Select a coverage source in the Layers window.
2. Select the Export Points command.
The Export Points dialog box is displayed.
3. Select either LAS or GSF for the output Format.
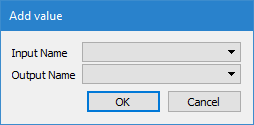
4. Click the plus button ( ) for the Include Band option.
The Add Value dialog box is displayed.
5. Select an option from each drop-down list and then click OK to return to the Export Points dialog box.
6. Repeat steps 4 and 5 for each band you want mapped to the output file.
The Include Band list will be populated with the selected mapping settings, an example of which is seen below.
7. Define any other necessary Options.
8. Specify a name and location for the Output filename.
9. Click OK.
The data is exported to a new file in the selected format.