Menu | Tools > Engineering Analysis > Shoals > Edit Record Association File |
Tool |
|
Menu | Tools > Engineering Analysis > Shoals > Edit Record Association File |
Tool |
|
The Edit Record Associations File command is used to edit the shoal record association (SRA) file that controls the interaction between EAM and the shoal database. This file must be set up appropriately to enable EAM to read data from and write data to the database. This file is selected during many shoal procedures, so it is possible to have multiple SRA files with settings relevant to different procedures. A sample SRA file, shoal_record_associations.sra, is provided with the EAM module and is found at:
C:\ProgramData\CARIS\<application>\<version>\SampleData\
You can make edits to this file, or you can save the file with a new file name and then make changes to that file.
To use the sample SRA, you must first install the sample data available from product pages on the CARIS Online Customer Services Web site under the products that provide EAM. You must be logged into the Customer Services Web site to access this page. If you do not have the sample data, an appropriate SRA must be setup to reference the shoal database that you intend to use.
Note that win32 applications can only access win32 ODBC data sources, and x64 applications can only access x64 data sources, so you must make sure that you register the data source appropriately. |
Related commands:
Interface
The Edit Record Association File command uses the following dialog box.
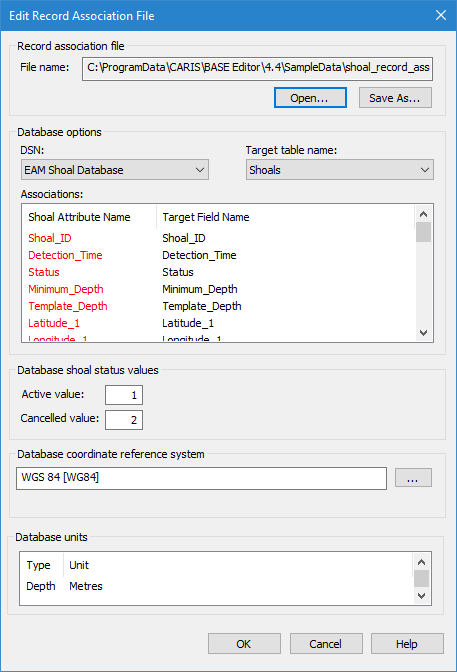
Option | Description |
|---|---|
Record association file name | The SRA file to be edited. The sample file is selected by default the first time the dialog box is opened. If you open another file, this file will be remembered the next time the dialog box is opened. You can choose to save the default file with a different file name as well, creating a new file. Edits can then be made to this file without altering the sample file. 1. Click Open to navigate to and select a different SRA file, or click Save As to save the file with a different name, creating a new file. |
DSN | The ODBC data source that will be used to register and work with shoal data. The DSN list is populated with any ODBC data sources that are available for the current user account. If you do not have an ODBC data source for shoal data, one should be created. This is done by creating a database (if one does not exist) and a DSN source using the ODBC Data Source Administrator. See the Windows® documentation for your operating system for more information on using this tool. When creating the database and data source, you must ensure that it will support the proper number of each data type, based on the mandatory Shoal Attributes. These attributes are displayed in red in the Shoal Attribute Name list. |
Target table name | The table in the database that defines how data values are associated with shoal attributes. The Shoals table from the sample data is selected by default when the EAM Shoal Database is selected for the DSN. If there are no tables in the list that meet your needs, a new table can be created using the <Add a table> option in the drop-down list. This adds a blank table to the list, which can be selected and a field associated to each attribute. |
Associations | The associations defined in the selected target table. If there are no associations defined, all fields will be set to <None>. Both columns are populated with the attributes that are available for shoals. The red items in the Shoal Attribute Name list are mandatory for all shoal objects and must be associated with a target field. The items in the Target Field Name column are enabled based on the currently selected shoal attribute; fields that are not in a format that is supported by the selected attribute will be disabled. If there are no appropriate target fields listed, a new field can also be created. 1. Select a Target Field Name using one of the following methods: • Select a field name from the list to associate it with the selected attribute. • Select the None option to associate no value to the selected attribute. • Select the Add a field option to launch the Create Field dialog box and create a new field to associate to the selected attribute.
2. Enter a name for the new field and click OK. The field is added to the list of targe field names and selected for the current shoal attribute. |
Active value | The number that will be used to represent a shoal with a status of active when registered to the database. This status is reported in the Attributes window as the Status (shlsta) attribute of a selected shoal box. |
Cancelled value | The number that will be used to represent a shoal with a status of cancelled when registered to the database. This status is reported in the Attributes window as the Status (shlsta) attribute of a selected shoal box. |
Database coordinate reference system | The database selected in the SRA file needs to have a coordinate reference system (CRS) assigned to it to ensure shoals are displayed in the correct location. 1. Click the browse button (...) to launch the Select Coordinate Reference System dialog box and select a CRS. See Coordinate Reference System Selection for information on this tool. |
Database units | The unit of measure to be used for the values of shoals. 1. Select an option from the Ground units list. 2. Select an option from the Depth units list. |
Procedure
1. Select the Edit Record Association File command.
2. Select an SRA file, if necessary.
3. Select an option from the DSN list.
4. Select a Target Table from the list.
5. Associate the Shoal Attribute Names with Target Field Names.
6. Enter values for the Database shoal status values.
7. Select a Database coordinate reference system.
8. Select the unit of measure for the Database units.
9. Click OK.
The shoal record associations file is updated. If you made changes to any associations without saving them, you will be prompted to save the changes.

