Menu | View > Zoom > In View > Zoom > Out |
Tool |
|
Key | <Ctrl+Up> <Ctrl+Down> |
Mouse | Scroll wheel |
In this exercise, you will move around in the 3D View and then record your movements and save the recording.
Before starting, display only the Surface1m_interp layer in the 3D window and set the vertical exaggeration to 10.
Menu | View > Zoom > In View > Zoom > Out |
Tool |
|
Key | <Ctrl+Up> <Ctrl+Down> |
Mouse | Scroll wheel |
First adjust the zoom level:
1. Use the scroll wheel or the Zoom In and Zoom Out commands until you are happy with the size of the surface.
Now navigate using the mouse. Note that the mouse buttons can behave differently depending on the Navigation Mode selected. The Navigation Mode is selected using the Navigation Mode drop-down list provided in the View toolbar.
2. Press and hold the left mouse button and move the mouse.
The display moves in the direction of the mouse pointer.
3. Press and hold the right mouse button and move the mouse up or down.
The display is panned in the direction of the mouse movement.
4. Press and hold both the left and right mouse buttons and move the mouse.
The display is zoomed and panned in the selected direction.
5. Move the mouse pointer over a point and double-click.
The display zooms in on the selected point.
Now rotate the display around a point.
6. Press and hold the middle mouse button.
The X, Y, and Z axes are displayed. These are centred on the point at which you clicked.
7. Move the mouse.
The display rotates around the centre point.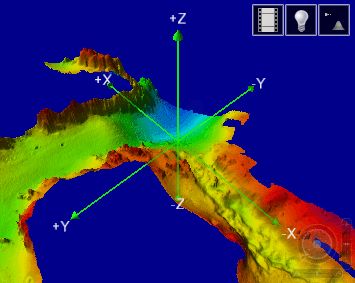
You can also move the display using the Controller panel: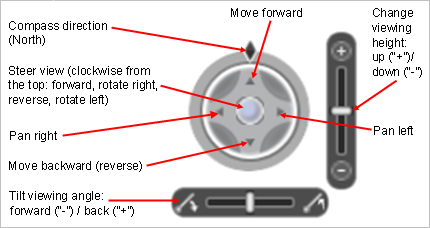
The Controller panel is not displayed by default; it must be turned on using the Controller Panel option in Tools > Options. This option can be found in the 3D section of the Display options category, or you can use the Filter field to search for the option.
Record
You can record your movements through the 3D View as follows:
1. Set the view of the terrain to the starting point you want.
Tool |
|
2. Click the Recording button to display the recording controls.
Menu | View > 3D Flight Path > Record |
Tool |
|
3. Click the Record button.
The button turns red to indicate that you are recording.
4. Use the navigation controls to fly through the scene.
5. Click the Record button a second time to stop recording.
The movements have been recorded.
To play the fly-through video:
Menu | View > 3D Flight Path > Play |
Tool |
|
1. Click the Play button.
The button turns green and the recording is played.
Export
Menu | View > 3D Flight Path > Export to Video |
Now export the recording to a video file:
1. Select the Export to Video command.
The Record Movie dialog box is displayed.
2. Choose Windows Media Video (.wmv) or Video for Windows (.avi) as the format of the video file.
3. If you select AVI format, disable Show Advanced Options.
4. Click Browse (...) to select a file name for the movie file.
5. Click Save to accept all other default settings.
Your fly-through recording is exported.
You can play this video file on any video or multimedia player that supports AVI or WMV format files.
See Export a Flight to Video in the CARIS Easy View Reference Guide for information on the more advanced video export settings.


