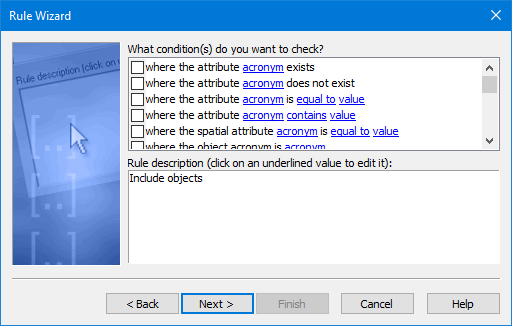
The list at the top contains the conditions that can be applied.
Different conditions are available depending on the module and task. The tables below list possible conditions and brief instructions on setting values for each condition.
Procedure
1. Select one or more conditions.
Selected conditions are displayed in the list at the bottom.

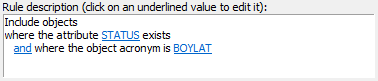
Certain terms in the conditions are hyperlinks. You use these links to define the specific acronym, feature type, or value that you want to match, or to change the conditional operator from “and” to “or”.
2. Click the links to set the conditions.
The selections are displayed.
3. Repeat as necessary.
4. Click Next.
Conditions Available in all Editors
Condition | Procedure |
|---|---|
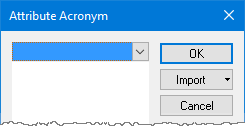
Where attribute acronym exists. Where attribute acronym does not exist. | 1. Click the attribute acronym link. The Attribute Acronym dialog box is displayed.
where length is shorter than value 2. Select an attribute acronym from the list. 3. Click OK. |
Where the attribute acronym is equal to value. Where the attribute acronym is not equal to value. Where the attribute acronym is less than value. Where the attribute acronym is less than or equal to value. Where the attribute acronym is greater than value. Where the attribute acronym is greater than or equal to value. | 1. Click the attribute acronym link. The Attribute Acronym dialog box is displayed.
2. Select an attribute acronym from the list. 3. Click OK. 4. Click the value link. The Attribute Value dialog box is displayed.
5. Select a value from the list. Values shown in the dialog box are determined by the selected attribute acronym. 6. Click OK. |
Where the attribute acronym contains value. Where the attribute acronym does not contain value. | 1. Click the acronym link. The Attribute Acronym dialog box is displayed.
2. Select an attribute acronym from the list. 3. Click OK. 4. Click the contains/does not contain link to toggle from one to the other. 5. Click the value link. The Attribute Value dialog box is displayed
6. Select a value from the list, or type to enter a value. Values shown in the dialog box are determined by the selected attribute acronym. 7. Click OK. |
Where the spatial attribute acronym is equal to value. Where the spatial attribute acronym is not equal to value. Where the spatial attribute acronym is less than value. Where the spatial attribute acronym is less than or equal to value. Where the spatial attribute acronym is greater than value. Where the spatial attribute acronym is greater than or equal to value. | 1. Click the acronym link. The Attribute Acronym dialog box is displayed.
2. Select an attribute acronym from the list. 3. Click OK. 4. Click the equal to link to select the appropriate operator. 5. Click the value link. The Attribute Value dialog box is displayed.
6. Enter a value in the text entry field. 7. Click OK. |
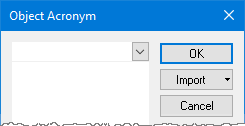
Where object acronym is acronym. Where object acronym is not acronym. | 1. Click the acronym link. The Object Acronym dialog box is displayed.
2. Select an object acronym from the list. 3. Click OK. |
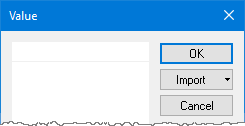
where length is longer than value where length is shorter than value | 1. Click the value link. The Value dialog box is displayed
2. Type a length value. 3. Click OK. |
Where the feature ID is value. | 1. Click the value link. The FOID dialog box is displayed.
2. Type a value in the field. 3. Click OK. |
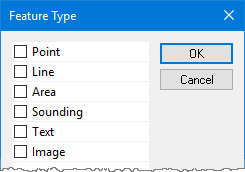
Where feature type is type. Where feature type is not type. | 1. Click the type link. The Feature Type dialog box is displayed.
2. Click a Feature Type check box so it is selected. 3. Click OK. |
Where feature category is type. Where feature category is not type. | 1. Click the type link. The Feature Category dialog box is displayed.
2. Click a Feature Category check box so it is selected. 3. Click OK. |
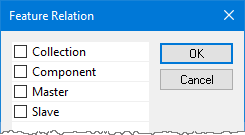
Where feature relation is relation. Where feature relation is not relation. | 1. Click the relation link. The Feature Relation dialog box is displayed.
2. Click a Feature Relation check box so it is selected. 3. Click OK. |
Where the area is smaller than value. Where the area is larger than value. | 1. Click the smaller than link to toggle between it and “larger than”. 2. Click the value link. The Value dialog box is displayed.
3. Type an area value. 4. Click OK. |
Where the width is thinner than value. Where the width is wider than value. | 1. Click the thinner than link to toggle between it and “wider than”. 2. Click the value link. The Value dialog box is displayed.
3. Type a width value. 4. Click OK. |
Where the perimeter is shorter than value. Where the perimeter is longer than value. | 1. Click the shorter than link to toggle between it and “longer than”. 2. Click the value link. The Value dialog box is displayed.
3. Type a perimeter value. 4. Click OK. |
Where the object is too small to enclose a sounding digit at a scale of value. | 1. Click the sounding digit link. The Sounding Digit dialog box is displayed.
2. Select a digit option. 3. Click OK. 4. Click the scale link. The Scale dialog box is displayed.
5. Type a scale value. 6. Click OK. |
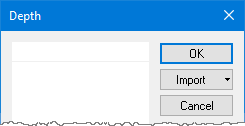
Where the depth is equal to value. Where the depth is not equal to value. Where the depth is less than value. Where the depth is less than or equal to value. Where the depth is greater than value. Where the depth is greater than or equal to value. | 1. Click the equal to link to toggle between the operators. 2. Click the value link. The Depth dialog box is displayed.
3. Enter a value in the text entry field. 4. Click OK. |
Conditions Available in HPD Source Editor, Product Editor and Paper Chart Editor when working with a database
.
Condition | Procedure |
|---|---|
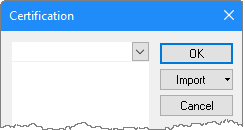
Where the attribute certification status is value. Where the attribute certification status is not value. Where the representation certification status is value. Where the representation certification status is not value. | 1. Click the value link. The certification dialog box is displayed.
where length is shorter than value 2. Select a certification status from the list. 3. Click OK. |
Where the feature has been added between time and time. Where the feature has been deleted between time and time. Where the feature has been modified between time and time. Where the feature has not been modified between time and time. | 1. Click the first time link. The Select Date & Time dialog box is displayed.
2. Select a date using the drop-down to show a calendar, and the time using the arrow buttons. 3. Click OK. 4. Click the second time link. The Select Date & Time dialog box is displayed. 5. Select a date using the drop-down to show a calendar, and the time using the arrow buttons. 6. Click OK. |
Where the latest version was modified by project name. Where the latest version was not modified by project name. Where the any version was modified by project name. Where the any version was not modified by project name. | 1. Click the name link. The Select Project dialog box is displayed.
2. Select a project 3. Click OK. |
Where one of its related markers attribute equals value. | 1. Click the attribute link. The Select Markers dialog box is displayed.
2. Use the first drop down to select the marker attribute. 3. Use the second drop down to select the type of match. 4. Use the third drop down to select the attribute value. 5. Use the Match pull down to select to Match All or Any. 6. Use Add to enter additional filters, and Remove to delete filters. 7. Click O.K. |
Conditions Available in HPD Source Editor when working with a database
Condition | Procedure |
|---|---|
Where features have been modified by the current isolated project. Where features have not been modified by the current isolated project. Where features have been added/ modified without conflict by the current isolated project. Where features have not been added/modified without conflict by the current isolated project. Where conflicts have been resolved by keeping all source changes for current isolated project. Excluding any changes where conflicts were resolved by keeping all source changes in current isolated project. Where conflicts have been resolved and any source changes were discarded for current isolated project Excluding any changes where conflicts have been resolved by discarding any source changes for current isolated project | There are no options to set. |
 where length is longer than value
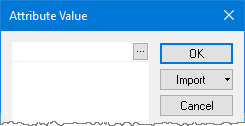


 where length is longer than value

