Feature Type | Tool | Menu |
|---|---|---|
Point |
| Create > New Feature > Point |
Line |
| Create > New Feature > Line |
Area |
| Create > New Feature > Area |
Sounding |
| Create > New Feature > Sounding |
Creating a feature using the create commands involves assigning an acronym and attribute values then creating the spatial representation. The procedure is basically the same for each feature type.
The create commands are:
Feature Type | Tool | Menu |
|---|---|---|
Point |
| Create > New Feature > Point |
Line |
| Create > New Feature > Line |
Area |
| Create > New Feature > Area |
Sounding |
| Create > New Feature > Sounding |
General procedure
The general procedure for creating features is:
1. Select one of the create commands.
The Select Object Acronym dialog box is displayed.
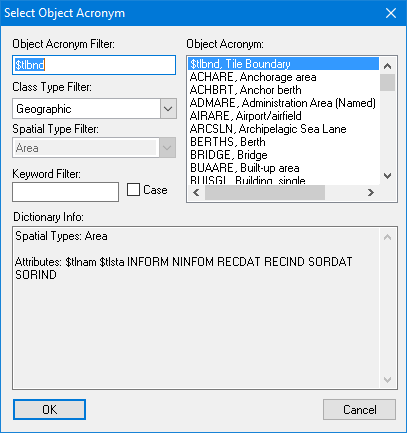
This displays acronyms that are appropriate for the type of feature being created.
2. Select an acronym.
3. Click OK.
You can define necessary attribute values now or define them later using Edit Mode. See Attributes window.
To digitize a point or a sounding:
1. Click at the position of the feature.
The line or area digitizing method defaults to point-to-point line. To use another method:
1. Right-click in the Display window and select Line Digitizer > <method> from the pop-up menu.
To digitize a line:
1. Click at the position of the nodes.
2. End or close the line.
Pop-up | Line Digitizer > End Line Line Digitizer > Close Line |
Key | <End> <Home> |
To digitize an area:
1. Click at the position of the nodes.
2. End the area.
Pop-up | Area Digitizer > Close Area |
Key | <End> |
For all features, you can enter the coordinates directly in the Coordinates window instead of by clicking. |
Tips
These tips can make digitizing simpler and more accurate:
• Learn the various digitizing cursors.
• Learn the keyboard shortcuts.
• Save your changes frequently.
• While digitizing:
• Press <Backspace> or select Line Digitizer > Remove Last from the pop-up menu to erase the most recently added vertex from a line or area.
• Use <Esc> to remove the entire new feature without cancelling the digitize command.
• Press <End> or select Line Digitizer > End Line from the pop-up menu when the new feature is complete.
• Accurately digitize features by snapping to existing vertices or nodes.
• Enter specific coordinates for vertices, distances, and so on.
• Use Undo to remove the last feature added.
Mouse Pointers
When you select a digitizing tool, the mouse pointer changes.
Pointer | Description |
|---|---|
| Select. This is the default mode. |
| Digitize arc. |
| Digitize circle. |
| Digitize curved line. |
| Digitize point-to-point line. |
| Digitize rectangle. |
| Digitize squared line. |
| Digitize point feature. |
| Digitize sounding. |
| Grab an existing edge or follow raster data. |
| Click within edges to digitize an area by reusing an existing area. |
Symbols
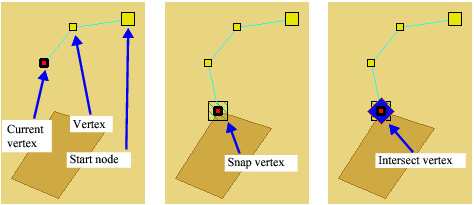
These symbols are displayed on the feature when you are digitizing a line or area:
• A large yellow marker to indicate the starting node.
• Small yellow markers to indicate vertices.
• A red square to indicate the vertex currently being added.
• Any of several snap or intersect markers around the current vertex if you snap the new line to or intersect it with an existing feature.
Shortcuts
These keyboard shortcuts can help in digitizing:
Key | Purpose | Mode |
|---|---|---|
<Backspace> | Remove the most recent vertex or the last edge grabbed. | Digitize |
<End> | Complete the digitizing of a line or area. | Digitize |
<Esc> | Discard the feature currently being added and restart from scratch. | Digitize |
<C> or <Home> | Close a line or area. | Digitize |
<I> | Intersect the new feature with an existing feature. The existing feature is cut at the snap point and the two features are joined. | Digitize |
<S> | Snap to an existing feature. If there are multiples vertices at the snap point, press <Space> until the vertex you want is selected. | Digitize |
<Space> | Cycle through snap vertices. | Edit |
Line Types
By default, most line create commands use the point-to-point line, but you can change to any of the other available line types using the pop-up menu:
Line Type | Pop-up menu item | Tool | Pointer |
|---|---|---|---|
Point to point |
|
| |
Square |
|
| |
Curve |
|
| |
| |||
— | |||
— | |||
| |||
Arc |
|
| |
— | |||
Circle |
|
| |
— | |||
Rectangle |
|
|
You change line types while digitizing by selecting a different type from the pop-up menu or toolbar. When you change line types, digitizing continues from the most recent end point.
Related commands
• • • • • • • • • | • • • • • • • • • |


