Menu | Tools > BDB Server Database > Extract Coverages |
The Extract Coverages command copies coverage data from user-defined sections of database objects to your local machine. The data to be extracted is defined by digitizing a line around the desired area. Coverage data will be extracted from all database objects that fall within the specified area. If a database object within the defined area does not have a coverage associated with it, that object is skipped during extraction. Also, if any of the data has a status of rejected, the rejected points will be skipped. The extraction process generates a .csar file for each coverage found as well as object.xml files for the metadata of each coverage.
The data to be extracted also depends on the layer selected in the Layers window. If a database group layer is selected, coverages for all database objects within the defined area are extracted from each layer within the group. If a database filter layer is selected, coverages are only extracted for the database objects within the defined area on that single layer.
The layers available in the database group are defined when the database connection is created, but additional filter layers can also be created to further refine the data to be extracted, if desired. See Filter for information on creating filtered layers.
If the defined area does not fully encompass a database object, only the data within the defined area will be extracted unless otherwise specified. |
Interface
The Extract Coverages command uses the following dialog box.
Option | Description |
|---|---|
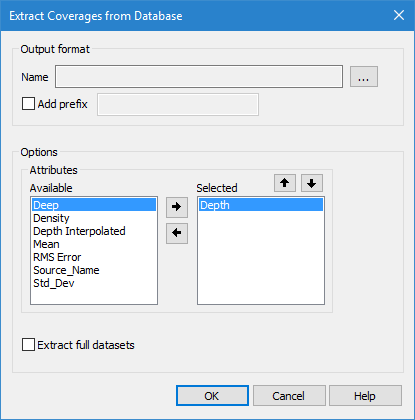
Output Name | The location in which to create the output files. The resulting CSAR and metadata files will be created with the same names as the coverages associated with the database objects from which they were extracted. 1. Click the browse button (...). 2. Navigate to and select the desired location. 3. Click OK. |
Add prefix | Add a prefix to file names during extraction to avoid accidentally over-writing existing files. |
Attributes | Select the attributes to include in the extracted coverages. The Available list includes all attributes present in the coverages associated with the database objects in the defined area. The Selected list includes all attributes that will be included in the extraction. The primary Z attribute is selected by default and cannot be removed. 1. Select an attribute in the Available list. 2. Click the Right-Arrow button to move the attribute to the Selected list. 3. Use the Up- and Down-Arrow buttons to change the order of the attributes in the list, if needed. Attributes can be removed from the Selected list if needed using the Left-Arrow button. |
Extract full datasets | Extract entire coverages rather than the data within the defined area if some coverages fall partly outside of the defined area. |
Procedure
1. In the Layers window, select the database group or filter layer containing the data you want to extract.
2. Select the Extract Coverages command.
The cursor changes to indicate that you are in digitize mode.
3. Digitize a line around the database objects to be included in the extraction.
4. Select an output folder for the files.
5. Select the attributes to include in the extracted coverages.
The primary Z layer (for example, Depth or Height) is required and cannot be removed from the Selected list. |
6. Define any other necessary options.
7. Click OK.
A set of files is created in the specified directory for each coverage associated with a database object within the defined area. The Output window displays a list of the coverages that were extracted, and the start and end times for the process.