Menu | Tools > Coverages > Modify > Suppress Points |
Pop-up | coverage > Tools > Suppress Points (Layers window) |
Process | Classify Points for Cartography |
The Suppress Points command is used to assign a classification value of Suppressed to points in a point cloud. Points with this classification are not included when selecting points for cartographic use. This command should be run prior to running the Select Points command to ensure that undesirable points are not classified as Selected.
This command provides four separate processes that can be used to suppress points for various different purposes. The four processes are explained below.
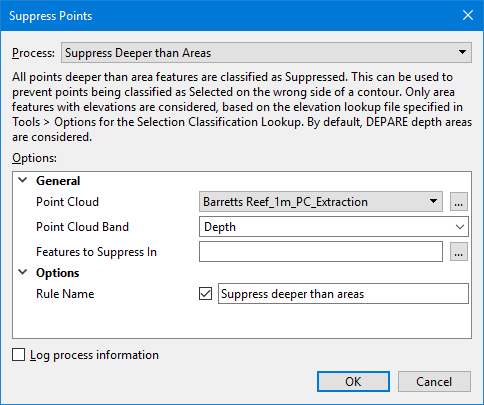
• Suppress Deeper than Areas: All points deeper than referenced area features are classified as Suppressed. Only area features with elevations are considered by the process, based on the elevation lookup file specified in the Selection Classification Lookup setting in Tools > Options > Files and Folders. By default, depth area (DEPARE) features are considered. This process can be used to prevent points from being classified as Selected on the wrong side of a contour.
• Suppress All within Areas: All points within referenced area features are classified as Suppressed. This process can prevent points from being classified as Selected if they overlap with area features included in a chart.
• Suppress near Features: All points are classified as Suppressed if they are within the specified buffer distance of any points, lines or areas in a referenced feature file. This process can be used to prevent points from being classified as Selected if they are too close to feature included in a chart.
• Suppress in or near Features: Points are classified as Suppressed if they are within or near features in a referenced feature file. This process can be used to prevent points from being classified as Selected if they are either too close to or overlapping features included in a chart.
Related commands:
Interface
The Suppress Points command uses the following dialog box.
Option | Description |
|---|---|
Common Options | |
Process | The suppression process to be run. The options displayed in the dialog box will change based on the process selected. 1. Select a process from the drop-down list. |
Point Cloud | The input point cloud containing the source points in CSAR format. When the process is run, Selection_State and Selection_Rule bands will be added to this point cloud. |
Point Cloud Band | The band within the input point cloud that contains the values to be used in calculations. |
Log process information | Create a log file containing the options specified when the process was run. The location of the log file is determined by the Logs setting in Tools > Options > Files and Folders. 1. Click the check box to enable the option. |
Suppress Deeper than Areas Options | |
Feature to Suppress In | The feature file(s) containing areas in which points are to be suppressed. Only areas with elevation attribution are used for suppression. Points with values deeper than these areas are suppressed. The drop-down list is populated with all feature files open in the application. 1. Select a feature file from the drop-down list or click the browse button (...) to launch the Open file dialog box. 2. Navigate to the relevant feature file. 3. Click Open. |
Rule Name | The rule name used when classifying points deeper than areas as suppressed. This name will be added as a classification value in the String Table dialog box when launched from the Selection_Rule band. 1. Click the check box to enable the option. 2. Type a name in the field. |
Suppress All within Areas Options | |
Feature to Suppress In | The feature file(s) containing areas in which points are to be suppressed. Points within all areas in the input features are suppressed. The drop-down list is populated with all feature files open in the application. 1. Select a feature file from the drop-down list or click the browse button (...) to launch the Open file dialog box. 2. Navigate to the relevant feature file. 3. Click Open. |
Rule Name | The rule name used when classifying points within areas as suppressed. This name will be added as a classification value in the String Table dialog box when launched from the Selection_Rule band. 1. Click the check box to enable the option. 2. Type a name in the field. |
Suppress near Features Options | |
Feature to Suppress Near | The feature file(s) containing areas in which points are to be suppressed. The features in the file(s) are point and line features that will be buffered to become areas and area features that will be buffered to be made larger. Points near these buffered areas are suppressed. The drop-down list is populated with all feature files open in the application. 1. Select a feature file from the drop-down list or click the browse button (...) to launch the Open file dialog box. 2. Navigate to the relevant feature file. 3. Click Open. |
Buffer Distance | The distance around features to be considered as part of the features. This distance is usually related to the scale of the chart for which the points are being classified. 1. Enter a value in the field and select a unit of measure. |
Map Scale for Buffer Distance | A number specifying the scaling to apply to the buffer distance. If the distance specified represents distance on the ground, then a scale of 1 is used. Otherwise, the map scale representing the distance must be specified. For example, a scale of 1000 would mean that the buffer distance represents a map at 1:1000 scale; the distance would then be a value like 10mm. 1. Enter a scale value in the field. |
Rule Name | The rule name used when classifying points near features as suppressed. This name will be added as a classification value in the String Table dialog box when launched from the Selection_Rule band. 1. Click the check box to enable the option. 2. Type a name in the field. |
Suppress in or near Features Options | |
Features to Suppress In/Near | The feature file(s) containing areas in which points are to be suppressed. The features in the file(s) are point and line features that can be buffered to become areas and area features that can be buffered to be made larger. If a suppression threshold is specified, only areas with elevation attribution are used for suppression, otherwise all areas are used. The drop-down list is populated with all feature files open in the application. 1. Select a feature file from the drop-down list or click the browse button (...) to launch the Open file dialog box. 2. Navigate to the relevant feature file. 3. Click Open. |
Apply Buffer to Features | Select whether or not a buffer should be applied to the reference features. If a buffer is applied, points near these features are suppressed. If no buffer is applied, points within all areas in the input features are suppressed. 1. Select an option from the drop-down list. |
Buffer Distance | If a buffer is being applied, the distance around features to be considered as part of the features. This distance is usually related to the scale of the chart for which the points are being classified. 1. Enter a value in the field and select a unit of measure. |
Suppression Threshold | The depth value at which points will be suppressed within the feature areas. If this option is not set, all points inside the features are suppressed. A threshold of 0 will suppress only points deeper than the features. A positive threshold value is used to suppress points that are at least that much deeper than the features. A negative threshold value is used to suppress all points deeper than the features and some points above the features. This criteria is applied based on the selected Z-axis convention, which defaults to down-is-positive. If using the up-is-positive convention, the suppression threshold is reversed. 1. Click the check box to enable the option. 2. Enter a threshold value in the Suppression Threshold field and select a unit of measure. 3. Select the Z-axis Convention to use for classification. |
Map Scale for Buffer Distance | A number specifying the scaling to apply to the buffer distance. If the distance specified represents distance on the ground, then a scale of 1 is used. Otherwise, the map scale representing the distance must be specified. For example, a scale of 1000 would mean that the buffer distance represents a map at 1:1000 scale; the distance would then be a value like 10mm. 1. Enter a scale value in the field. |
Rule Name for Suppression Near Features | The rule name used when classifying points near features as suppressed. This name will be added as a classification value in the String Table dialog box when launched from the Selection_Rule band. 1. Click the check box to enable the option. 2. Type a name in the field. |
Rule Name for Suppression Inside Areas | The rule name used when classifying points inside areas as suppressed. This name will be added as a classification value in the String Table dialog box when launched from the Selection_Rule band. 1. Click the check box to enable the option. 2. Type a name in the field. |
Procedure
1. Open the point cloud for which points are to be suppressed.
2. Open any feature files containing feature objects that will be used as elevation and boundary references.
3. Select the Suppress Points command.
The Suppress dialog box is displayed.
4. Select the relevant process from the Process drop-down list, keeping in mind that the processes should be run in the order that they are listed in the drop-down list.
5. Define all necessary options.
6. Click OK.
A Processing dialog box is displayed to show the progress.
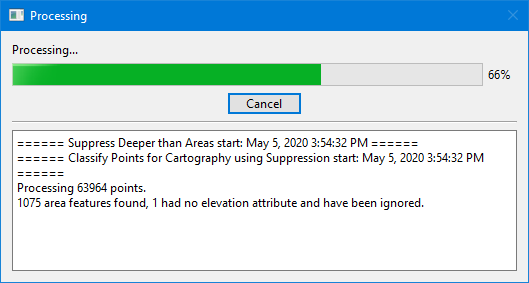
7. When processing reaches 100%, click Close to close the dialog box.
Selection_Rule and Selection_State bands should now be present in the point cloud, populated with the points that have been classified as Suppressed.