Menu | Tools > Engineering Analysis > Model > Classification Settings |
This tool generates an ordered list of classifications which can be assigned to the partitions of a template. This list is saved to a classification file, which is an XML format file. A classification file can be used to describe the associations for, or assessed condition of, a partition. For example, a shoal can be classified as being of low risk, moderate risk or severe risk. A sample file for shoal classifications can be found at:
C:\ProgramData\CARIS\<application>\<version>\SampleData\
shoal_classifications.xml
Classifications can be defined in several ways:
• new classifications can be added
• for any existing classification, the name, description, and severity can be changed
• an existing classification can be removed
Related commands:
Interface
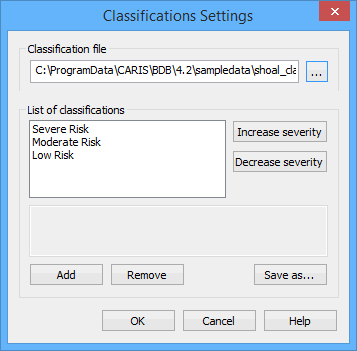
The Classification Settings command uses the following dialog box.
Option | Description |
|---|---|
Classification file | The classification file to be edited. Click the browse button (...) to navigate to and select the relevant file. |
List of classifications | The classifications defined in the selected classification file. |
Increase severity | Increase the severity of the selected classification. This moves the classification up one level in the list, with the most severe classification being at the top of the list. 1. Select a classification in the list. 2. Click Increase severity. |
Decrease severity | Decrease the severity of the selected classification. This moves the classification down one level in the list, with the least severe classification being at the bottom of the list. 1. Select a classification in the list. 2. Click Decrease severity. |
Add | Add a new classification to the list. 1. Click Add. A new "empty" classification is displayed in the list. 2. Click the classification name to make it editable. 3. Type a new name and then press <Enter>. 4. Click in the description box and type a description. The classification is created. 5. Adjust the severity if necessary. |
Remove | Remove the selected classification from the list. 1. Select a classification in the list. 2. Click Remove. |
Save as | Save the settings to a new classification file with a new name and/or location. 1. Click Save As. A standard Windows Save dialog box is displayed. 2. Define a name and location for the file. 3. Click Save. |
Procedure
1. Select the Classification Settings command.
The Classification Settings dialog box is displayed.
2. Open a Classification file.
3. Select a classification from the list.
4. Edit the name, description or severity of the classification as needed.
5. Add or Remove classifications as needed.
6. Click Save as to save the changes to a new file, or click OK to save the changes to the currently selected file and close the dialog box.