The Open Connection command provides a list of all predefined data source connections. The Add button in that dialog box launches a wizard that is used to create the predefined connections. Each of the steps in that wizard are explained below.
It is possible to define settings for more than one format; the values will be remembered when switching between formats, however only settings from the currently active format will be used when the connection is created. |
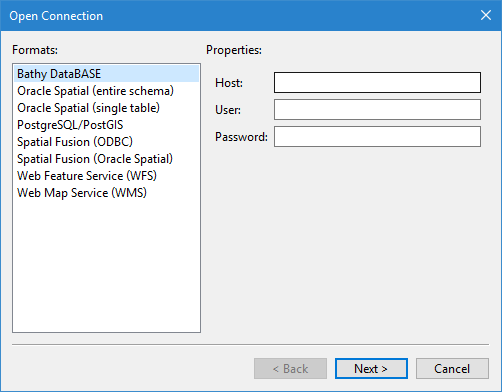
Add Connection: Step 1
In the first step of the Open Connection wizard, you select the format of the data source that you will be connecting to and provide the settings needed to connect to the source. The fields in the Properties list may differ for each format.
Option | Description |
|---|---|
Common Options | |
Formats | The type of server to which you are connecting. Once a format is selected, the fields in the Options panel change to provide settings relevant to the selected format. These options are used to define the connection settings. |
Bathy DataBASE Properties | |
Host | The name and location of the computer on which BDB Server is installed. |
User | The user name for the account being used to connect to the server. |
Password | The password for the account being used to connect to the server. |
Oracle Spatial (entire schema/single table) Properties | |
Servers | The Oracle servers that are setup on the computer being used. |
Host | The name and location of the computer on which the Oracle server is installed. |
Port | The port number being used to communicate with the server. |
Database Name | The name of the database on the server that you want to connect to. |
User | The user name for the account being used to connect to the server. |
Password | The password for the account being used to connect to the server. |
PostgreSQL/Post GIS Properties | |
Host | The name and location of the computer on which the PostgreSQL server is installed. |
Port | The port number being used to communicate with the server. |
User | The user name for the account being used to connect to the server. |
Password | The password for the account being used to connect to the server. |
Spatial Fusion (ODBC) Properties | |
Servers | The ODBC servers that are setup on the computer being used. |
User | The user name for the account being used to connect to the server. |
Password | The password for the account being used to connect to the server. |
Spatial Fusion (Oracle Spatial) Properties | |
Servers | The Spatial Fusion servers that are setup on the computer being used. |
Host | The name and location of the computer on which the Spatial Fusion server is installed. |
Port | The port number being used to communicate with the server. |
Database Name | The name of the database on the server that you want to connect to. |
User | The user name for the account being used to connect to the server. |
Password | The password for the account being used to connect to the server. |
Web Feature Service (WFS) Properties | |
URL | The URL address of the Web Feature Service (WFS) to which you want to connect. URLs entered here will be saved to the list for future use. When creating a connection, the URL can either be entered manually or selected from the drop-down list. If the Feature Editing module is enabled, the features available through a WFS can be selected and mapped to a feature layer. See Import Selected Objects for information on this process. |
User | The user name for the account being used to connect to a protected service. |
Password | The password for the account being used to connect to a protected service. |
Web Map Service (WMS) Properties | |
URL | The URL address of the Web Map Service (WMS) to which you want to connect. A WMS is an Open Web Service (OWS) that is a portrayal service for geospatial data. URLs entered here will be saved to the list for future use. When creating a connection, the URL can either be entered manually or selected from the drop-down list. Some services provide different sources in different versions. Teledyne CARIS applications support WMS 1.1.0 and 1.3.0. By default, data from a WMS connection is opened in the PNG format as a raster image. This image is created dynamically based on the current view and the coordinate reference system (CRS) of the active view, if this format and CRS are supported by the WMS server. Once the connection is established, both the format and the CRS of the image can be changed in the Properties window when the WMS layer is selected, if needed. Each time the view extents are adjusted for the WMS image, a new query is made to the WMS server to get an appropriate visualization of the data. Refer to Web Service HTTP URL for tips on entering a URL for a WMS. |
User | The user name for the account being used to connect to a protected service. |
Password | The password for the account being used to connect to a protected service. |
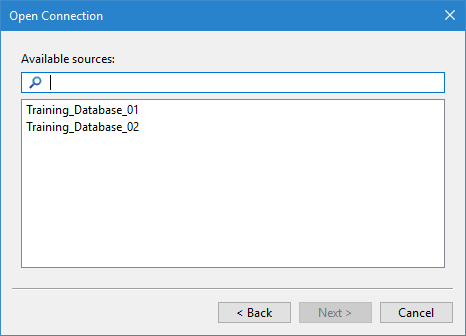
Add Connection: Step 2
In the second step of the Open Connection wizard, you select the data source on the server that you want associated with the connection. Whenever a connection is made using this connection file, it will connect to the selected data source.
Option | Description |
|---|---|
Available sources | All data sources, such as databases, found on the server that was selected in the previous step. 1. Select a source from the list. |
Search/filter | Use a search phrase or term to filter the Available sources list and more easily locate the desired data source. 1. Type a value and click the magnifying glass or press the <Enter> key. The list changes to display only sources that contain the search term in their name. 2. Select a source from the list. To clear the filter: 1. Delete the search term and press the <Enter> key. The list now shows all available sources. |
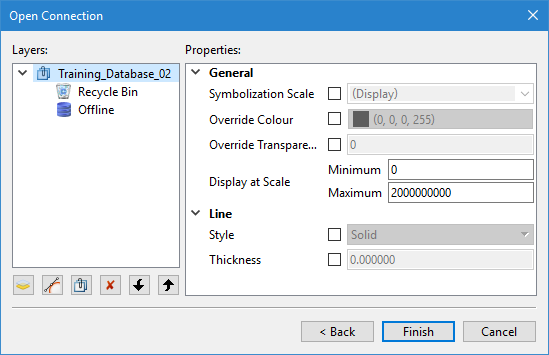
Add Connection: Step 3
In the third step of the Open Connection wizard, you define the layers that will be created in the application when the connection is open and any display properties that you want applied to the data display.
Option | Description |
|---|---|
Layers to create | The layers that will be opened in the Layers window when connected to a data source using this connection. Certain layers are added by default based on the selected data source and its format. |
Add Group
| Add a new layer group to the list. This group can be used to organize the layers that will be available with the connection. Layers can be added to the group by selecting them in the list and dragging them on top of the group layer. More than one group can be added. 1. Click the Add Group button. 2. Type a name for the group layer and press the <Enter> key. 3. Click layers and drag them into the group. |
Add Layer
| Add a single filtered layer to the list. Selecting this option will launch the Filter dialog box, which is used to define a filter expression. This expression is applied to the data in the selected data source and all data that meets the filter criteria will be available through this layer when using this connection. See Filter for more information on the Filter tool. The new layer will be created with the filter expression as the layer name, by default. 1. Click the Add Layer button. 2. Define the filter expression and click OK. 3. Type a new name for the layer if desired and press the <Enter> key. |
Add Layer Per Feature Type
| Automatically add a default set of layers to the connection based on the feature types defined in the data source. These layers are added as child layers under the group layer that represents the connection and are named according to the feature type that they represent. All feature objects created on these layers will be created with the acronym specific to the active layer. If any of the layers are not wanted, they can be removed individually. For example, if the data source contains definitions for LNDARE, DEPARE, COALNE, SLCONS and SEAARE, a layer will be added to the list for each of these feature types. The tasks that will be performed using this connection do not require the LNDARE layer, so that layer can be removed from the list. |
Remove Layer
| Remove the selected layer or group from the list. Once an item has been removed, the only way to get it back is to recreate it using the Add buttons. 1. Select a layer or group in the list. 2. Click the Remove Layer button. |
Move Down/Move Up
| Change the order of the layers in the list by moving a layer or group up or down one space at a time. This order will be saved to the connection file and applied when connected to a data source using this connection. 1. Select a layer in the list. 2. Click either the Move Down button or the Move Up button. The order of the layers can also be changed by selecting a layer and dragging it to the desired location in the list. |
Properties | Define the display properties that will be applied to the view when connected to a data source using this connection. These properties are also available in the Properties window once a connection is made in the Layers window and a connection layer is selected. Different property values can be selected for each layer. The properties provided will differ based on the type of connection being created. 1. Select a layer in the list. 2. Define any necessary display properties. |
Procedure
1. Select a data source format from the list.
2. Populate the options for the selected format and click Next.
3. Select the data source to which you want to connect and click Next.
4. Define the layers that will be created for the connection.
5. Define any display properties you want applied to the view when this connection is used.
6. Click Finish.
The new connection is added to the list in the Open Connections dialog box.
7. Type a name for the new connection and press the <Enter> key.
8. If you want to connect to the data source, select the new connection and click OK.
You are connected to the data source and the Layers window is populated with the layers defined for the connection.


