Menu | Tools > Coverages > Designated Soundings > Designate Superselection |
Menu | Tools > Coverages > Designated Soundings > Designat Selection |
The Designated Soundings tool allows you to locate and designate the shoalest sounding or node in a selected area. When selecting soundings to designate, you can select individual soundings, or a group of soundings; all items included in the selection will be flagged as Designated. The appropriate command must be used based on the number of soundings selected.
This command works like the Designate Node tool available through the Subset Editor, except that it is meant for 2D data selected in the Display window. This command is provided to ensure that the shoalest depths are maintained in charts and other standard hydrographic products. See Subset Editor for more information about designating nodes in the Subset Editor.
When designating soundings or nodes, it is possible to enter and save metadata for a selected point. In order to do this you must have the Prompt for designated attributes option enabled in Tools > Options before beginning the designating process.
Interface
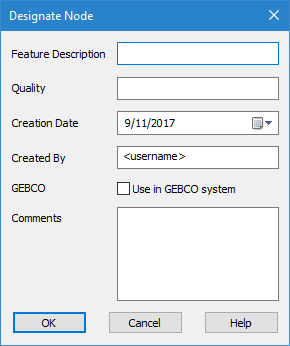
The Designate Soundings command uses the following dialog box if the Prompt for designated attributes option is enabled.
Option | Description |
|---|---|
Feature Description | A brief textual description for the selected sounding. |
Quality | A brief explanation as to the validity of the sounding and the security protections. |
Creation Date | The date the sounding was designated or last modified. This field is populated automatically, but can be changed if necessary. |
Created By | The user account name that was used to designate the sounding. This field is populated automatically, but can be changed if necessary. |
GEBCO | This option is used to identify data that uses the GEBCO (General Bathymetric Chart of the Oceans) system. |
Comments | Any additional comments about the data to provide useful information. |
Procedure
1. Select a source raster or point cloud in the Layers window.
2. Select one or more soundings in the Display window.
3. Depending on whether you selected a single sounding or a group of soundings, select the appropriate Designate command.
If the attributes option is enabled, the Designate Node dialog box is displayed and you must continue with the next step. If the attributes option is not enabled, the sounding is flagged as designated.
4. Complete any necessary fields in the Designate Node dialog box.
5. Click OK.
The selected sounding is flagged as designated and a Designated band is added to the data source. If a Designated band already exists, the designated sounding is saved to that band. Properties for this band can be defined in the Properties window.
A Designated band may also be created when a surface containing designated soundings is:
• upgraded from HNS format to CSAR format; or
• opened from a database.
A Designated band may also be created if you open a CSAR file containing designated soundings that was created with a version of BASE Editor earlier than 2.3. |