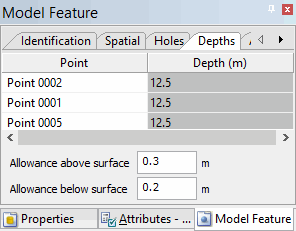
On the Depth tab of the Model Feature window, you can specify the depths for the points that make up the surface. You can expand the window vertically to view more of the points in the list at one time.
The names for this tab and the elevation column will change based on the Z-axis convention setting. "Depth" is used when the Z-axis convention is positive down, "Height" when the convention is positive up. |
For the surface to be complete, you must enter depth values for three points in the surface. Once you enter these three key depths, the depths of any remaining points are automatically calculated and displayed in the Depth column of the table. The key depths are displayed in grey. If there are fewer than three key depths, the value for the remaining points will be "Undefined". If the three key depths have the same value, then the surface is horizontal at that depth, so all remaining points will also have the same value.
Related commands:
• New Surface from Existing Points
Procedure
1. Select the desired surface in the Model window or superselect it in the Display window.
The selected surface is now the active reference model feature.
2. Select the Depth tab in the Model Feature window.
3. Click the row of a point in the Point column.
4. In the selected row, type the depth for the point.
5. Enter depths for any two other points.
6. [Optional] To set all points with the same depth value,
• Right-click the depth value you want to apply to the other points of the surface.
• From the pop-up menu, select the Make Horizontal command.
Only the key depths can be changed. Attempting to manually change a calculated depth will cause an error to be displayed. To set the depth on another point, first remove one of the key depths. |
The surface and all its parameters are now defined.
7. Refresh the Display window to view the new surface.