Menu | Edit > Collections |
You can edit existing collections.
A collection is a special S-57 object that contains information about relationships between objects. Collection objects can contain other collection objects. These objects do not have any spatial representation and they cannot be filtered or selected.
Related commands:
• Select Collections
Procedure
1. Select the Edit Collections command.
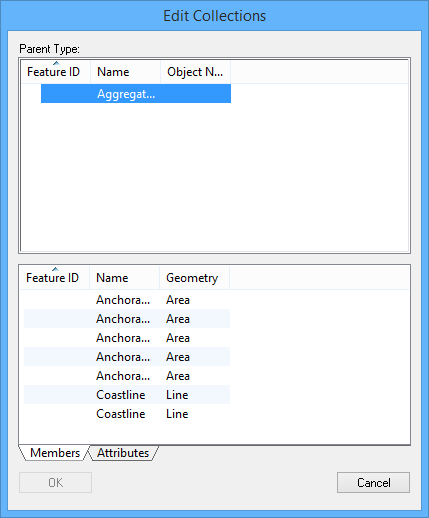
The Edit Collections dialog box is displayed.
The Parent Type list contains all of the collection objects in the project or workspace.
2. In the Parent Type table, select a collection object.
All features in the selected collection object are listed in the Members tab in the bottom list.
Attributes associated with the selected collection object are listed in the Attributes tab at the bottom of the dialog box.
3. Select the Attributes tab.
4. Modify the attributes as required.
5. Click OK.
The attributes for the selected object are updated.
Edit certification status
Change the attribute certification status of a collection object. Only features with a Verified status can appear in products. Also, collection objects have no spatial representations and do not have a Representation status.
1. Select the Edit Collections command.
The Edit Collections dialog box is displayed.
2. Right-click on a collection object in the Parent Type list and select one of the following from the pop-up menu:
• Submit Collection
• Accept Collection
• Verify Collection
• Reject Collection
3. Click OK.
Add features
Add superselected or selected features to an existing collection object.
1. Select features in the workspace.
2. Select the Edit Collections command.
The Edit Collections dialog box is displayed.
3. Right-click on a collection object in the Parent Type list and select one of the following from the pop-up menu:
• Add Selection to Collection
• Add Superselection to Collection
The selected features are added to the collection. Features that are already members of the collection will not be duplicated.
View the members of a collection on the Members tab at the bottom of the dialog box.
Add collection object
Add a collection object to another collection object as a member.
1. Select the Edit Collections command.
The Edit Collections dialog box is displayed.
2. Right-click on a collection object in Parent Type list and select Copy to the Collection Clipboard from the pop-up menu.
3. Right-click on another collection object in the list and select Paste From Collection Clipboard from the pop-up menu
4. Click OK.
Remove features
Remove individual features from a collection object.
A collection object is not a collection object if it contains only one member, therefore you cannot remove features if doing so would leave a single member.
Do not delete a collection object by removing all associated features, instead delete the entire collection object. |
1. Select the Edit Collections command.
The Edit Collections dialog box is displayed.
2. Select a collection object.
3. Select the Members tab.
The Members tab displays all the features that belong to the collection.
4. Right-click on a member and select Remove Member From Collection from the pop-up menu.
The member feature is removed from the collection and the Members tab is updated.
5. Click OK.
Delete
Remove a collection object.
1. Select the Edit Collections command.
The Edit Collections dialog box is displayed.
2. Right-click on a collection object and select Delete Collection from the pop-up menu.
An icon ( ![]() ) is displayed at the start of the row to indicate the object has been marked for deletion.
) is displayed at the start of the row to indicate the object has been marked for deletion.
You can later choose to undelete the object or verify the deletion.
3. Click OK.
Undelete
Undelete a collection object that is marked for deletion.
1. Select the Edit Collections command.
The Edit Collections dialog box is displayed.
2. Right-click on a deleted collection object and select Undelete Collection from the pop-up menu.
The icon (![]() ) is removed.
) is removed.
3. Click OK.
Verify deletion
Verify the deletion of a collection object that is currently marked for deletion.This change is permanent and cannot be undone.
1. Select the Edit Collections command.
The Edit Collections dialog box is displayed.
2. Right-click on a deleted collection object and select Verify Deletion from the pop-up menu.
You must have a Quality Assurance role to verify deletions. |
The collection object is removed from the dialog box and from the workspace.
3. Click OK.
Reject
Reject a collection object. This change is permanent and cannot be undone.
1. Select the Edit Collections command.
The Edit Collections dialog box is displayed.
2. Right-click a collection object and select Reject Collection from the pop-up menu.
The status of the collection is changed to Rejected.
3. Click OK.