Some sensor formats can be opened directly from raw files and can generate a HIPS data source and a surface without first checking source data such as vessel configuration, tide, svc or resolution etc. This enables users to quickly see an initial analysis of the data.
This functionality currently only applies to Kongsberg ALL, Hypack HSX, Kongsberg KMALL, Teledyne S7K, Teledyne PDS, Sonardyne SWF8 and Triton XTF formats. |
This data can be imported either by using the File >Open command to open selected data, or by selecting the sensor data in Windows and dragging it into the HIPS interface.
Both processes can be used to import multiple raw files at the same time. If more than one file type is imported, the data sources will be sorted based on the filename extension. This may change the order in which sources are opened.
Either command will automatically process the raw data using default settings to create a new HIPS data folder containing a HIPS file and line folders. As well, they can also include the automatic production of a regular gridded or a variable resolution surface, based on configured application defaults you have already set for the data being imported.
The default location for the output of this quick method is C:\Users\”username”\Documents\CARIS\HIPS and SIPS\’version’\’HIPS Data Source’.
Procedure: Adjust default settings
These commands automatically use default system settings. If the current settings are not desired, the first step before importing the data listed above is to set new application defaults.
To change default settings
1. Open the Tools > Options dialog box and scroll down to the Application Defaults list.
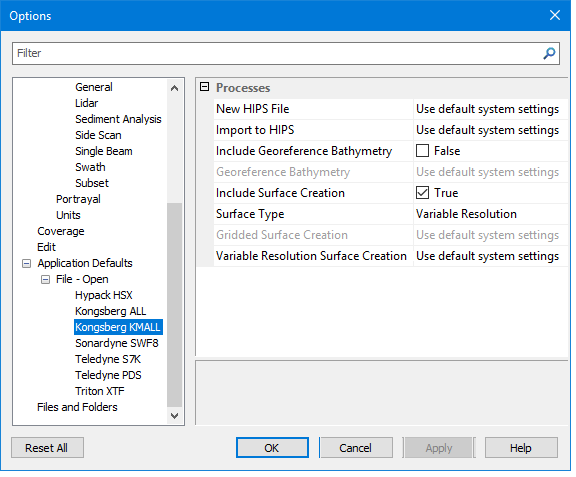
2. Under File - Open, select the data format you are importing, for example, Kongsberg KMALL.
This will display the processes related to the format type you are importing, as in the screen shot image below.
3. To change any of the fields marked “Use default system settings” select the field and click the browse button. For example:
• clicking the Browse button to right of the New HIPS File will open the New HIPS file dialog box.
• clicking Browse for Import to HIPS will open the Import Options dialog box for the import format you have selected.
4. Settings which are set to True can be set to False, and vice versa as appropriate.
5. A regular gridded surface can also be set to be automatically created.
• If you have a HIPS Professional licence, File > Open (drag and drop) will default to automatically create a variable resolution surface and can be changed to create a regular gridded surface.
6. Click Apply, then OK to exit the Options dialog box.
Procedure: File > Open (drag and drop)
To open raw data using File > Open:
1. Select File > Open > File..., and browse to the location of the data you want to import.
2. Select one or more lines of data to be imported.
3. Click Open.
To import data using drag and drop:
1. Use Windows Explorer to browse to the location of the data you want to import
2. Select the files to be imported.
3. Drag the selected data into the HIPS and SIPS application.
Either method will run the import process. The Project, Active Track Lines and Layers windows are updated to display the imported files. Details on the import is shown in the Output window, for example reporting whether Georeference Bathymetry was applied (if set to do so). If the option to create a surface was set it will be displayed in the main window.
Data Extent
As data is imported, the surface extents will expand to accommodate the new data.
As well, File > Open for ALL, HSX, KMALL and S7K data will automatically check for the area of the lines being added to a HIPS file and if this is outside the CRS area it will create a new HIPS file for that data.
PDS, SWF8 and XTF do not do this, so it will add files from different areas to the one HIPS file if all opened at the same time or opened/dragged into an open HIPS file.