![]() CARIS HPD Paper Chart Editor
CARIS HPD Paper Chart Editor
![]() CARIS Paper Chart Composer
CARIS Paper Chart Composer
Menu | File > New > Chart |
Create a new database or stand-alone paper chart.
This command is the first step of a three-part process for creating charts and panels. See the graphic below for an overview of the chart creation process.

Two types of charts can be created. See the table below.
Chart Type | Description |
|---|---|
Database charts | [CARIS HPD Paper Chart Editor only] Charts are stored in an HPD schema. Panels can be populated from the following sources: • HPD source features. This can be a database layer such as a workspace layer, a project layer or a filtered layer. This method provides a structured source-to-product workflow that can easily incorporate new or modified source features into panels. • External files. Features from either CARIS, HOB or S-57 files are imported into the database. The imported features are assigned the certification status of Under Construction. These features have no link to the source database. |
Stand-alone charts | A chart that is created as a PCC file. The chart is not connected to the database. Features are imported into a panel from CARIS, HOB or S-57 files. |
Related commands:
• • | • • |
Interface

Field | Description |
|---|---|
Title | Title of the chart. The chart title is the CTITL1 attribute |
Number | Chart number. The number is the CHTNUM attribute. |
Type | • Standalone creates a PCC file. • [CARIS HPD Paper Chart Editor only] Database creates a chart that is connected with a schema. |
Location | Location depends on whether a Standalone or Database chart was selected. • If Standalone is selected, this is the folder where the PCC chart is saved. • If Database is selected, Location defaults to the already selected. project. • If Standalone is switched to Database, a project will need to be selected. Click Browse to save the PCC file or to select a project for the database chart. |
Templates | Properties of n existing database or PCC chart can be a template for a new database or PCC chart. Panels in the existing chart are replicated in the new chart but panel data is not. • None: No template is applied. • Standalone: Use an existing PCC file as a template • Database: [CARIS HPD Paper Chart Editor only] Use an existing database chart as template Select one of the above options. |
Product | Select the chart to use as a template. For PCC charts: 1. Click Browse. The Open dialog box is displayed. 2. Select the PCC file. 3. Click Open. The file path and name of the file is shown in the Product field. For Database Charts: 1. Click Browse. The Select HPD Product dialog box is displayed. 2. Select the chart or use a filter to locate the chart. 3. Click OK. The chart is listed in the Product field. |
Procedure
1. Make sure that a workspace or external file is open.
2. Select the New Chart command.
The New Chart dialog box is displayed.
3. Complete the fields in dialog box (see above) and click OK.
A new layer for the chart is added to the Layers window.
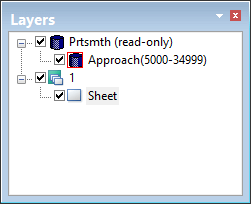
A Sheet View tab is added to the Display window.
Additional information for each layer can be entered in the Attributes window.
4. Select either a chart or sheet layer.
The Attributes window displays attributes associated with a chart or sheet. See below for more information on chart and sheet attributes.
A panel can now be added to the chart.
Chart Attributes
Attribute | Acronym | To update value... |
|---|---|---|
Chart Number Note: This value must be unique. | CHTNUM | Click the button to display a text dialog box. Edit the value, if required, and click OK. |
Date | CTDATE | Click the button to display a calender. Select a day to enter the date. The date is in YYYYMMDD format. |
Chart Type | CHTYPE | Select from the drop-down list: 0-INT Chart 1-Harbour Plans |
Chart Presentation Identifier | chprid | Select a portrayal from the list. |
Product Group | PRODGRP | Select a product group value from the list. The default is HPDProducts. |
International Chart Number | INTNUM | Type or edit the value. |
Sea Area Number | SEANUM | Type or edit the value. |
Name of Sea Area (Language 1) | SAREA1 | Click the button to display a text dialog box. Type or edit the value and click OK. |
Name of Sea Area (Language 2) | SAREA2 | |
Name of Region (Language 1) | NREGN1 | |
Name of Region (Language 2) | NREGN2 | |
Chart Title (Language 1) | CTITL1 | |
Chart Title (Language 2) | CTITL2 | |
Publication Country | PUBCON | |
Partner Country | PARCON | |
Publication Date | PUBDAT | |
Edition Number | EDNUMB | |
Edition Date | EDDATE | |
Latest Notice to Mariners | LTSTNM | |
User Name | USRNAM | |
Comments | CHTCOM | |
Chart Link | chtlnk | Click Browse to select a chart. |
Sheet Attributes
Attribute | Acronym | To update a value... |
|---|---|---|
Type of sheet | TSHEET | Select from the list: 0-Chart Insets 1-Harbour Plans |
Paper size | PPSIZE | Select from the list: standard page sizes such as letter or legal or choose Custom and define your own page size. |
Paper width | PWIDTH | Type page width in millimetres. |
Paper height | PHEIGH | Type page height in millimetres. |
Left margin | MARGNL | Type the margin width in millimetres. |
Right margin | MARGNR | |
Top margin | MARGNT | |
Bottom margin | MARGNB | |
Paper orientation | LAYOUT | Select from the list: 0-Portrait 1-Landscape |
Sheet Title (Language 1) | SHEET1 | Click the button to display a text editor dialog box. Type or edit the value and click OK. |
Sheet Title (Language 2) | SHEET2 | |
Comments | CMMNTS |