The 3D View command is used to enable or disable the 3D View, which provides a three-dimensional view of data.
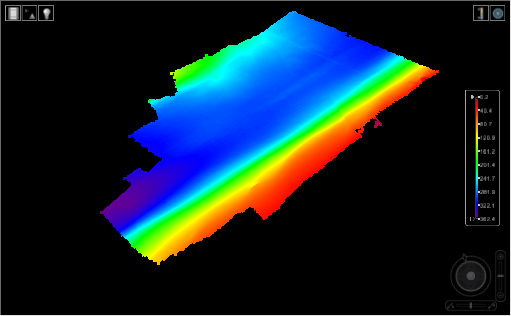
No data is displayed when the 3D View is first enabled. You choose the data to display by turning on layers in the Layers window. Any open layers can be viewed in 3D. If the data contains elevation values, these values will be represented in the display of the data.
Because draw order does not apply in the 3D View, changing the order of the layers in the Layers window will have no effect on the display. If the draw order is changed while the 3D View is enabled, this will be reflected in the display when the normal 2D Display window is selected. Other functionality normally available in the Layers window may also be disabled when the 3D View is the active display window. The Layers window will return to its normal behaviour when the 2D view is selected as the active view.
1. Turn on one or more layers.
The selected layers are displayed in the 3D View.
Moving your mouse over coverage data will cause a tooltip to appear, providing the name of the source and the value at the current location based on the selected layer. The coordinates of your current location are displayed in the status bar. Also displayed in the status bar is the elevation value for the coverage based on the camera depth.
If you have background images to accompany the data, they can also be displayed in the 3D View.
2. In the Layers window, click the image layer check box.
The selected image is added to the display.
When you select a layer in the Layers window, its properties are displayed in the Properties window. Although all properties are displayed, only those relevant to the 3D View will be enabled. Adjusting these properties changes the 3D view.
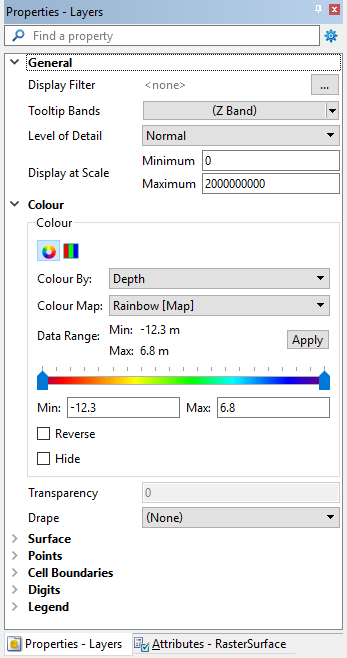
A brief description and instruction is provided for each property in the Description panel at the bottom of the window.
In some cases, visualization of point clouds in the 3D view can be improved by increasing the Point Cloud Cache setting in Tools > Options. This setting controls the cache size for point clouds being displayed.
A higher cache size requires additional RAM. If your computer does not have sufficient resources to support the higher cache size, changing this setting could slow down performance rather than improving it. |