Menu | Tools > Coverages > Modify > Extract > Using Geometry |
Extract data from an existing coverage to create a new coverage using a geometry to define the boundary for the extraction. The geometry can be in the form of area features on a feature layer, a selection of area features, a geometry file in WKT format or a WKT string of coordinates.
Interface
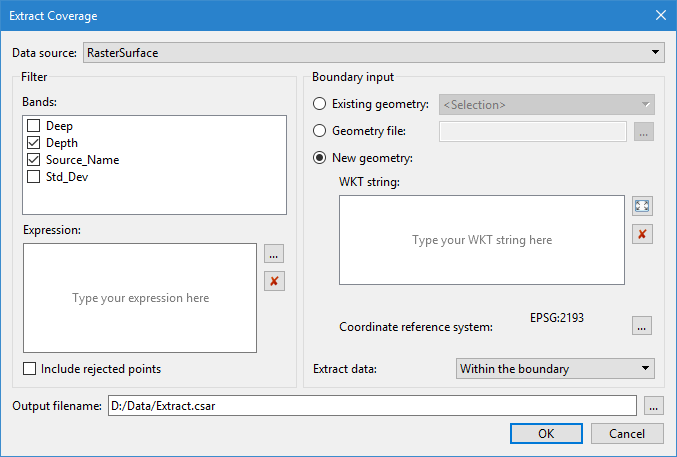
The Extract Coverage Using Geometry command uses the following dialog box.
Option | Description | |
|---|---|---|
Data source | The coverage to use as the data source for the extraction. The drop-down list will be populated with all coverages open in the application at the time the dialog box was launched. If a coverage was active at the time, that coverage will be selected as the source by default. | |
Filter | Bands | The bands to include in the output coverage. 1. Click the check box to select each band to be included. |
Expression | Optionally apply a filter to the coverage data being extracted. Only data that meets the filter criteria and the specified geometry will be extracted. The filter is specified in the form of a mathematical expression. The expression can be typed manually or the browse button (...) can be used to launch the Expression Builder dialog box, which provides an interface to create the filter expression. Refer to Filter Expressions for information on the fitler options. The red X button can be used to clear the current expression if needed. A confirmation message will be displayed if this button is clicked. | |
Include rejected points | Enable this option to include rejected points in the output coverage. | |
Boundary input | The geometry source identifying the boundary of the data to be extracted. Three options are provided. | |
Existing geometry | Define the boundary for the extraction using area features open in the application. The geometry can include all area features on a feature layer open in the application, or it can be limited to the features in a selection or a superselected feature. The drop-down list is populated with all feature layers in a supported format, as well as <Selection> and <Superselection> if area features were selected when the dialog box was opened. | |
Geometry file | Define the boundary for the extraction using a WKT file containing the coordinates of the area to be included. | |
New geometry | Manually define the boundary for the extraction either by: • typing or pasting coordinates of the inclusion area in the WKT string box, or • clicking the Current Extents button to populate the WKT string box with the coordinates of the current extents of the 2D View. The red X button can be used to clear the current string if needed. A confirmation message will be displayed if this button is clicked. 1. Click the button to enable the New geometry option. 2. Populate the WKT string box. | |
Coordinate Reference System: Select the input coordinate reference system (CRS) of the geometry specified in the WKT string box. 3. Click the browse button (...) to launch the CRS selection dialog box. Refer to Coordinate Reference System Selection for information on this tool. | ||
Extract Data | The type of extraction to be performed. • Within the boundary will extract only data that is within the specified geometry boundary. • Outside the boundary will extract only data that is outside the specified geometry boundary. | |
Output filename | The name and file location for the output coverage. | |
Procedure
1. [Optional] Select any relevant area feature objects.
2. Select the Extract Coverage Using Geometry command.
The Extract Coverage dialog box is displayed.
3. Select the Data source for the extraction.
4. Click the check box of each Band to include in the output coverage.
5. Selec the Boundary input method use to define the geometry of the extraction boundary.
6. Depending on the selected method, either:
• Select the relevant Existing geometry from the drop-down list.
• Navigate to the relevant Geometry file.
• Populate the WKT string box and select the CRS of the specified coordinates.
7. Specify whether to Extract data from Within the boundary or Outside the boundary.
8. Specify the name and file location for the Output coverage.
9. Click OK.
A new coverage is created using the data that meets all extraction criteria.