The File Monitor panel is used to configure the input source and processing settings that will be used for detecting raw data files and processing them for product creation and display in either the map viewer or through a connection to the Onboard service.
The configuration settings are saved as a file monitor with a user‑defined name. Up to 4 file monitors can be created to monitor more than one project at a time. Each file monitor can have a different input directory specified, use different filter criteria and/or use a different process model file for processing the raw data files.
Process model files are created in Process Designer. See the Process Designer documentation for information on creating these files. |
A status icon is assigned to the File Monitor panel and to each individual file monitor. Depending on the current mode, the status indicator for the File Monitor is displayed either beside the title for the panel or on the File Monitor button. This status indicator has two possible states:
• Check mark ( ): All configured and saved monitors are running.
• Stop ( ): One or more file monitors has been created but has not been started or failed to start successfully.
The status indicator for the individual file monitors is displayed in the name tab of each monitor. This status indicator also has two possible states:
• Check mark ( ): The monitor was successfully started and is running.
• Stop ( ): The monitor has not been started, or failed to start due to a problem with the settings.
Before configuring Control Centre, the directories that Onboard reads and writes to will need to be determined. If the data directories are on different operating systems, you may require permissions to be set up. See Data Sharing for more information.
The options in the File Monitor panel are described below. Note that fields with a red asterik are mandatory.
Option | Description |
|---|---|
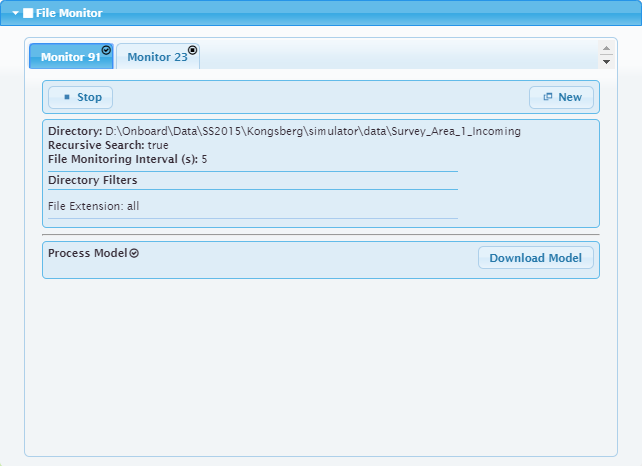
Start/Stop | Click to start processing files using the settings defined for the current file monitor. If all fields are complete and a valid license is present, the monitor will be started. If any mandatory fields are incomplete, or if a valid license cannot be found, a relevant error message will be displayed. When running, the status indicator of the monitor changes to a check mark and the Start button changes to a Stop button. Click the Stop button to stop the file monitor from processing. A message will be displayed asking you to confirm that you want to stop the monitor. Click Yes to proceed and stop the selected file monitor. |
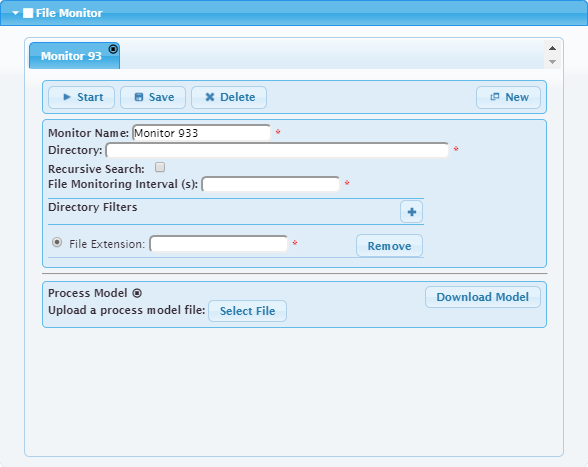
Save | Click to save the settings defined for the current file monitor. A message will be displayed indicating whether the save was successful or if any of the mandatory fields are incomplete. Settings are also saved automatically when the file monitor is started successfully. |
Delete | Click to permanently delete the current file monitor. |
New | Click to open a new monitor tab that can be used to define settings for a new file monitor. |
Monitor Name | The name to assign to the file monitor. This name will be displayed in the tab at the top of the file monitor panel. |
Directory | The directory in which Onboard will look for raw data source files waiting to be processed. The path to the directory must be entered manually. As a file is processed it is recorded in the services.db file found in C:\ProgramData\CARIS\Onboard\2.0\. This allows the Onboard service to determine which files in the monitor directory have and have not been processed. |
Recursive Search | Enable this option to have the Onboard service look for files in both the file monitor directory and any sub-folders in that directory. |
File Monitoring Interval (s) | The interval in seconds that Onboard uses to regularly check for completion of a new file that is being recorded by the acquisition system. As the file is recorded, the size of the file will continually change. If there is no change in the file size during the specified wait period, Onboard will consider the file to be complete. Once deemed complete, Onboard can begin processing the file. If you notice files being processed in Control Centre that are still logging data in the acquisition system, the File Monitoring Interval probably needs to be increased. |
Directory Filters | Define a filter to limit the files that are processed by the file monitor. The Onboard service will process only the files in the monitor directory that match the filter criteria. More than one filter type can be applied to a single file monitor and more than one instance can be added for of each type of filter, with different criteria for each instance. If no filters are specified, all files present in the monitor directory will be processed. The File Extension and Regular Expression filters can not be used at the same time. There are four types of filters available: • File Extension: Enter the file extension of the files to be processed. The extension can be entered in upper case or lower case (examples: • File Size: Specify a minimum and or maximum size for the files to be processed. Any files not within the specified sizes will not be processed. • Creation Time: Select a minimum and maximum creation date and time from the calendar tool displayed when either of the fields is selected. Only files with a creation date and time within the specified values will be processed. • Regular Expression: Define a custom filter by entering a regular expression, such as The Remove button can be used to delete a filter instance from the file monitor. |
Upload a process model file | The process model file to apply when processing jobs. The file will be validated during upload. If the file uploads successfully, the status indicator for the Process Model fields will change to a check mark. The Remove button can be used to delete the current file if a new file is to be uploaded. 1. Click Select File. 2. Navigate to the relevant file. 3. Click Open. If processing a coverage with uncertain final extents, it is important that the Extent option under the Create HIPS Grid and Create SIPS Mosaic processes in the process model be set to |
Download Model | Download a copy of the process model file currently uploaded for the file monitor. This will save a copy of the file to the local machine, allowing it to be examined and altered, if necessary. |
Procedure
1. Click New if a file monitor already exists.
2. Type a Monitor Name.
3. Type or paste the path to the monitor Directory.
4. Specify a File Monitoring Interval.
5. Specify filter criteria.
6. Define any other necessary settings.
7. Upload a process model file.
8. Click Save.
9. Click Start.
The file monitor is started. The Start button changes to a Stop button, and the fields in the panel become read-only or are collapsed altogether.
If you receive the following error and you have a valid CARIS Onboard license, contact Teledyne CARIS Customer Services for assistance. "There was a problem with the process model: Unable to find a valid Onboard license." |