Menu | File > Export > View |
Export the current view in the Display window to image files. You can export 2D and 3D views.
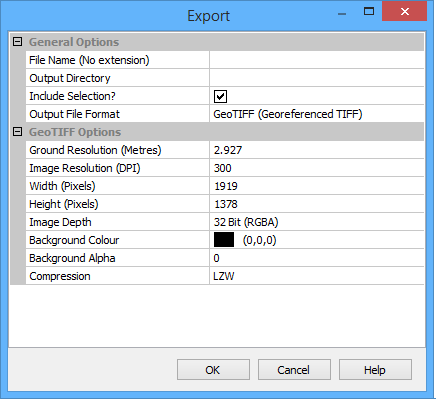
Interface
The Export View command uses the following dialog box:
The following table contains descriptions of the fields in this dialog box.
Format | Option | Description |
|---|---|---|
General | File Name | A name for the output file. Type in the box. Do not enter an extension. |
Output Directory | The folder for the output file. Click browse (...) and navigate to the folder. | |
Include Selection? | On: Selected features will be exported in the selection in superselection colours. Off: Selected features will be exported in their default colours. | |
Output File format | The image file format. The format options will change based on the file format chosen here. The available formats will differ based on whether you are exporting the 2D view or the 3D view. Select from the list • EPS (Encapsulated PostScript) • GeoTIFF (Georeferenced TIFF) • PDF (Portable Document Format) • PNG (Portable Network Graphics) • PS (PostScript) • PS (Legacy PostScript) • SVG (Scalable Vector Graphics) • TIFF (Tagged Image File Format) • KMZ (zipped | |
• EPS • SVG | Width /Height (mm) | The width and height of the image in the resulting file. Use the arrow buttons to increase or decrease the size, or manually type a size in the field. |
Image Export DPI (Quality) | Set the resolution used to export the view. The higher the resolution, the better the quality of the image when zoomed in, but the larger the size of the output file. If the output file is going to be used in digital form with the image being zoomed in tightly, a higher resolution is recommended. If the file will simply be printed, a smaller resolution may be adequate. | |
• GeoTIFF • TIFF • PNG | Ground Resolution (metres) * | Set the size of each pixel in ground units. For example, a pixel represents 100 metres on the ground. |
Image Resolution (DPI) * | Set the resolution used to export the view. The higher the resolution, the better the quality of the image when zoomed in, but the larger the size of the output file. As the DPI increases, the ground resolution value decreases. | |
Width/Height (Pixels) * | The width and height of the resulting image in pixels. These fields are updated by changes to the image resolution. | |
Image Depth | Set the number of values applied to each pixel in the image (one value for each colour, plus one for transparency if using 32-bit). If you want a transparency setting applied to the background colour, the 32 Bit (RGBA) option must be selected. | |
Background Colour | The colour displayed in the background of the exported image. The default is black. | |
• GeoTIFF • TIFF • PNG | Background Alpha | (This option is only available when the Image Depth is set to 32-bit RGBA). Set the degree of transparency applied to the background colour. The default setting is zero transparency. |
Compression (GeoTIFF and TIFF only) | Compress the resulting image file during export to decrease the file size. This option is only available when using a TIFF format. There are three loss less compression methods available. By default, LZW is used. You can also choose not to apply any image compression by selecting None. | |
• PS • PS (Legacy) | Geospatial (PDF only) | Select the check box to export the view to a geospatial PDF. |
Preserve Layers (PDF only) | Select the check box to print visible information to separate layers. | |
Paper size * | The page size of the exported file. | |
Width /Height (mm) * | The width and height of the resulting image in pixels. These fields are updated by changes to the image resolution. | |
Left/Right Top/Bottom Margins | Set the size of the area between the captured view and the left and right and top and bottom edges of the output image. The default is 5mm. Use the arrow buttons to adjust the size. | |
Data Orientation | Set the orientation of the image in the resulting file. Portrait is a vertical position; Landscape is a horizontal position. Landscape is selected by default. | |
Print Scale * | The scale at which the image will be printed (not the scale at which the view is captured). A higher number produces an image more zoomed out, a lower value an image more zoomed in. | |
Image Export DPI (Quality) | Set the resolution used to export the view. The higher the resolution, the better the quality of the image when zoomed in, but the larger the size of the output file. If the output file is going to be used in digital form with the image being zoomed in tightly, a higher resolution is recommended. If the file will simply be printed, a smaller resolution may be adequate. | |
Export text as (PS Legacy only) | The output format for text in the source data. Options include: • Real Text • Filled Polygons | |
Colour Export Mode (PS Legacy only) | The output format for colour data in the source data. Options include: • 1 single RGB file • 1 Single CMYK file • 4 Separate C, M, Y, K files | |
• KMZ | Width/Height (Pixels) | Set the width and height of the resulting image in pixels. Use the arrow buttons to increase or decrease the size, or manually type a size in the field. |
* Settings marked with an asterisk are related.
Procedure
1. Zoom and pan as required to display the data you want to export.
2. Select the Export View command.
3. Type a File Name and select an Output Directory.
4. Select an Output File Format.
The options on the lower part of the dialog box change to suit the selected format.
For all image formats except KMZ, resolution is determined by four related options: Ground Resolution, Image Resolution, Width, and Height. Adjusting any of these adjusts all the others.
5. Set the resolution and pixel size of the image.
6. Set any other necessary options.
7. Click OK.
The output file is saved.