Menu | File > Export > Selection > Shapefile |
Export a selection of features to the Shapefile format. For each feature object type found in the selection, the following set of files is created:
• .dbf: This file contains a table of the attribute values in the Shapefile.
• .shp: This file contains the actual feature geometries that were exported.
• .prj: This is a well-known text (WKT) format file containing the coordinate reference system (CRS) of the geometric data in the .shp file. Applications opening the resulting shapefile will reference this file to determine which CRS to apply when displaying the data.
• .shx: This file contains a spatial index of the data in the Shapefile and helps improve the speed at which the Shapefile can be searched.
Each set of files will be named according the feature acronym for which they were created. For example, if a Coverage object were selected, the resulting files would be named Coverage.shp, Coverage.shx, Coverage.dbf and Coverage.prj. A prefix can be specified for the filename if desired.
Attribute values in the source data will be retained in each resulting Shapefile, including the FOID values of the selected features. This data can then be used in other processes as needed.
Related commands:
Interface
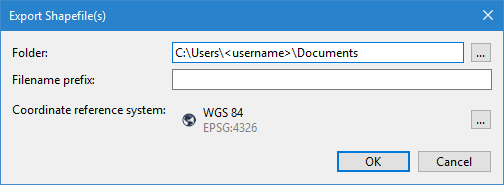
These Export Selection commands use the following dialog box.
Option | Description |
|---|---|
Folder | The folder in which to create the files generated by the export. 1. Click the browse (...) button. 2. Navigate to the relevant folder location. 3. Click Select Folder. |
Filename prefix | A text prefix to add to the filename of each resulting file. This helps reduce the possibility of overwriting an existing file and more easily identify the files associated with the shapefile. This setting is optional. 1. Type the desired text in the field. |
Coordinate Reference System | The CRS to apply to the data during export. 1. Click the browse (...) button to launch the Select Coordinate Reference System tool. See Coordinate Reference System Selection for information on this tool. 2. Select a CRS. 3. Click OK. |
Procedure
1. Select the feature layer in the Layers window.
2. Select the features in the Display window to be exported.
3. Select the Export Selection to Shapefile command.
The Export Shapefile(s) dialog box is displayed.
4. Select the output Folder.
5. [Optional] Enter a Filename prefix.
6. Select a CRS for the output.
7. Click OK.
The selected features are exported to a new Shapefile in the user-specified location.