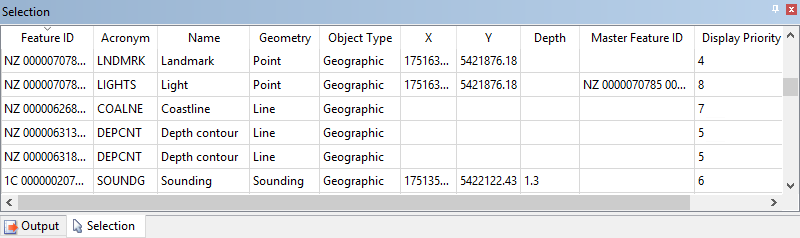
This window lists information about selected features.
A selection is a feature or group of features chosen with the mouse or with a menu command. These features are displayed in alphabetical order in the Selection window. One feature in the window will be highlighted, indicating that it is superselected.
A superselected feature is a subset of a selection of multiple features. When a number of features are selected, but the attributes or properties of only one feature can be viewed or acted upon, it is the superselected feature which will be affected. By default, the superselected feature is coloured light blue in the Display window and other features in the selection are coloured red.
The information in the Selection window depends on the type of features selected. For any fields that display coordinates or measurements, the format and units of these values are controlled by the Units settings in Tools > Options. For example, coordinates can be displayed as Geographic or Ground, length and area values can be projected or geodetic, and depth values can be in a number of units
You can change the column size by dragging the edge of the column heading to the left or right. Similarly, you can change the order of the columns by dragging an entire column heading to the left or right.
Right-clicking a column heading displays a pop-up menu with the following commands:
• List of column names: A column is visible if there is a check mark beside the name.
• More: Launch a dialog box to change the columns displayed and their order. See
• Reset: Restore default column settings.
If you right-click on a row in the table, a pop-up menu displays these commands:
• Centre on Selection/Centre on Superselection
• Remove Others from Selection
• Copy
• Delete Features (this command is only enabled if the Feature Editing module is installed and enabled)
Column Settings (More)
You can use the More command of the Selection window pop-up menu to set column display and width settings in the Choose Columns dialog box.
1. Right-click a heading in the Selection window and select More from the pop-up menu.
The Choose Columns dialog box is displayed.
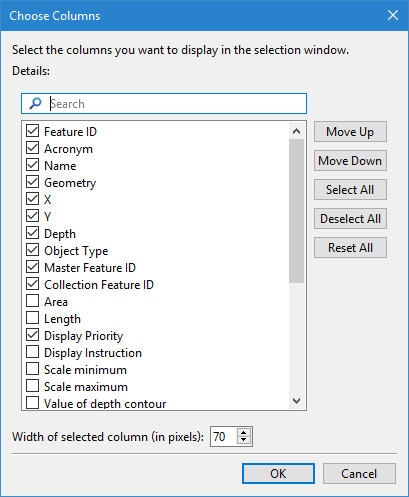
All available columns are listed. Those with a populated check box are included in the Selection window. The selected columns are displayed in the Selection window according to their order in this list.
1. To add or remove a column from the window, click the check box to either populate or clear the check box.
2. To select all columns for display, click the Select All button.
3. To deselect all columns and remove them from the display, click the Deselect All button.
4. To change the position of a column in the list, select the relevant column name and click either the Move Up or Move Down button to move the selected column to a new location.
The column order can also be changed in the Selection window by clicking and dragging each column to the desired location. |
You can also set the width of each individual column:
5. Select the column name in the list.
6. In the Width of selected column (in pixels) field, either type a width value or use the Up and Down Arrow buttons to select a width value.
7. To confirm your changes, click OK.
The column layout in the Selection window is changed.