When a contact is created, SIPS automatically captures the contact image from the waterfall view and stores it as a raster attribute of the contact feature object in the *.hips file.
Having this image embedded in the *.hips file means that any user opening the project will be able to view the contact image in the Image Preview window.
Each raster image is saved with a unique name in the following format. <linename>_<YYMMDD><HHMMSS>_<contact#>_<type>
This naming format is also followed when the image is exported, and the image name is displayed in the Attributes window for the related contact.
To view a saved contact image:
1. Open the project containing the contact.
2. Open the Image Preview window.
3. Select the contact in the Display window.
Its image will be displayed in the Image Preview.
Link External Images
External image files can also be linked to contacts, and can be viewed in the Image Preview.
To add an external image to a contact:
1. Select the contact.
2. Open the Attributes window.
3. Click Browse in the Contact Images field.
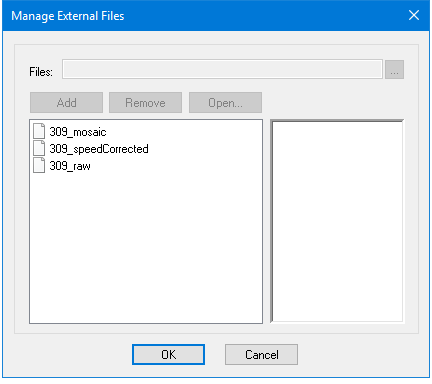
The Manage External Files dialog box is displayed.
4. Click Browse to locate the desired external file.
The location of external images is set in the External Files field in the Files and Folders tab of the Tools > Options dialog box.
5. Click Add to add the file to the list. Click OK.
The Contact images field in the Attribute window will list the new file, which can be opened and viewed in the Image Preview when the contact is selected again.
Change Contact Attributes
You can change attribute information that is currently associated with a selected contact.
The contact type cannot be changed. For example, a Point contact created as an underwater rock cannot be changed to a pile simply by changing the Point type property. Instead, remove the incorrect contact and recreate it as the correct type. |
1. Open the Attributes window.
2. Select a contact in the Selection window.
The attributes of the contact are displayed in the Attributes window. Fields that uniquely identify the contact are not editable and are highlighted in grey.
3. Type new information in the editable fields, or click Browse to select new values.
Different types of contacts have various attributes, such as the following:
Attribute | Description |
Line | Line identification number (used for point contacts) |
Created by | The name of the Current User logged into to the computer (as seen in Tools > Options). |
Creation date | Date the contact was created. |
Modified time | Date the contact was modified. |
Modified by | The name of the Current User logged into to the computer (as seen in Tools > Options). |
Profile distance | Location in relation to nadir. |
Rejected contact | Status of contact as defined in Catalogue Editor. 0 = not rejected, 1 = rejected. |
Remarks | Editable text entered by user |
Image Height and Width | Size of the area around the contact image (set in the Properties (in pixels) |
Target Height and width | Size of the contact in the waterfall view. Use the Measure Distance and Measure Shadow tools to determine these dimensions. |
Minimum profile number / Maximum profile number | If it’s a line contact, profile numbers show the starting and ending position of the line in the waterfall view. If a point contact both values will be the same. |
Value of sounding | An S-57 attribute for the specific type of contact. Contains the value of the measurement of a sounding relative to the chart datum. |
Contact images | Lists any embedded images, and any external raster images linked to the contact. External images are located in the folder set for the External Files variable in the Environment tab of the Tools > Options dialog box. |
Symbolization code | A CARIS Feature code used for symbology of contacts when they are exported to CARIS Map. |
Use Measure tools
4. To update the contact width information, choose the Measure Distance tool and press and hold <Ctrl> while dragging the cursor across the area of the contact to be measured.
Menu | Tools > Editors > Side Scan > Measure Distance |
Tool |
|
If you are measuring in the SIPS waterfall view, the value in the Image Width field will reflect the measurement as you are making it. If measuring in the Zoom view, the value will be updated when the mouse button is released.
5. To update the length information for the contact, select the Measure Distance tool and press <Alt> while dragging the cursor across the contact area.
Contact height can be determined using the Measure Shadow tool:
1. Select the Measure Shadow tool and press <Ctrl> while dragging the cursor across the contact area.
Click Update. If you do not click Update, the values will be lost when the contact is no longer selected.
Menu | Tools > Editors > Side Scan > Measure Shadow |
Tool |
|
See also (see also Measure Distance in Side Scan View and Measure Shadow in Side Scan View)

