Menu | File > Export > Points |
Export the values from HIPS project data to a point cloud in LAS format. HIPS data must be Merged before export.
Interface
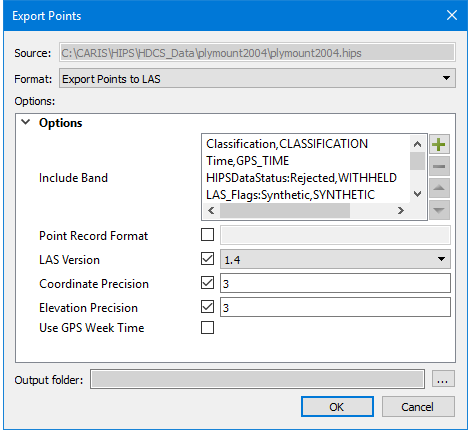
The Export Points to LAS command displays these options in the Export Points dialog box.
Option |
| Description |
Source | This field displays name and location of the selected HIPS project. This setting cannot be changed. | |
Format | The output format (LAS point cloud). | |
Options: | The options for export to LAS format are described below. As well, if you hover the mouse cursor over the name of an option, a brief description of the option is displayed in a screen tip. | |
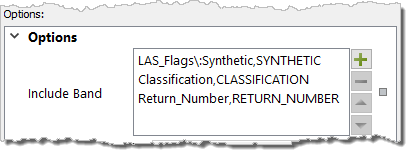
Include Band | Used to map the attribute bands of the surface to relevant attributes in the LAS output file. If this option is not used, only the Depth and Status bands will be exported to the LAS file. | |
Point Record Format | Select the check box and type the number of the point record format to use. | |
LAS Version | Enter the LAS version number to be using in the output. | |
Coordinate Precision | Enter the decimal precision of the coordinates used in the output. | |
Elevation Precision | Enter the decimal precision of the elevation values used in the output. | |
Output filename | The name and location for the output LAS file. 1. Click the browse button (...) to specify a name and location. | |
Procedure: Export to LAS
1. Select the parent layer of the coverage to export.
Select the Export Points command.
The Export Points dialog box is displayed.
2. Select LAS for the output Format.
The Include Band option can be used to map the attribute bands of the coverage to relevant attributes in the LAS output file. If this option is not used, only the Depth and Status bands will be exported to the LAS file.
3. Click the plus button ( ) for the Include Band option.
The Add Value dialog box is displayed.
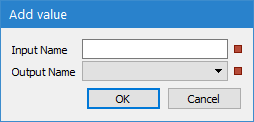
The Input Name field is used to identify the input attribute band that you want to map. This field must be populated manually and must follow these restrictions:
• Names are case-sensitive and must be entered exactly as they appear in the source.
• Names with either a colon (:) or a backslash (\) must have a backslash added as an escape character before the relevant character as these characters act as separators in the application. For example, a band named “LAS_Flags: Synthetic“ must be entered as “LAS_Flags\:Synthetic” in order for the export process to identify the entry as a single name. Refer to the CARIS Batch Reference Guide for further examples.
4. Type the name of the input band that you want to map.
5. Select the LAS attribute to which you want to map the attribute band values in the Output.
6. Click OK to return to the Export Points dialog box.
7. Repeat steps 4 to 7 for each attribute band you want mapped to the output file.
8. Define any other necessary Options.
9. Specify a name and location for the Output filename.
10. Click OK.
The data is exported to a new LAS file.