Menu | Tools > Coverages > TIN > Create TIN |
Tool |
|
Pop-up | coverage layer > Tools > Create TIN (Layers window) |
Pop-up | coverage band > Create TIN (Project window) |
Menu | Tools > Coverages > TIN > Create TIN |
Tool |
|
Pop-up | coverage layer > Tools > Create TIN (Layers window) |
Pop-up | coverage band > Create TIN (Project window) |
A Triangulated Irregular Network (TIN) is a triangulated surface constructed from input data containing 3D data points.
TINs can be created for raster surfaces, point clouds and feature layers containing features with a depth/height value. By default, data sources can contain up to 3 million points to be included in the TIN. Depending on the resources of the computer that you are using, the number of points that can be included in the TIN could be much greater than the current limit value. This value can be changed if needed. See Defining Maximum Points Per TIN for more information.
A TIN can be created for all data points in a source, or for the boundary of the data. You may choose to generate a boundary TIN if the source is a raster surface which will exceed the limit of points supported for a single TIN.
If the TIN is created from a raster band, the TIN will be constructed using values from the selected band.
If the TIN is created from a feature layer, the TIN will be constructed using the features listed in the elevationlookup.xml system file. This file can be found at:
C:\Program Files\CARIS\BASE Editor\<version>\modules\BASE Editor\support
The list of features can be modified to include any point, line or area feature with a depth or height attribute, if necessary.
TIN Layers
The new TIN will be added to the layers window as a separate data source and will be named according to the data source from which it was created. Each TIN contains two child layers:
• one for the TIN itself, named for the band or attribute from which it was created, and
• one named TIN Editor, which allows you to perform various edits on the TIN, including the creation of features. When edits are applied to a TIN, a tools file (.tls) is created/updated, recording the edits.
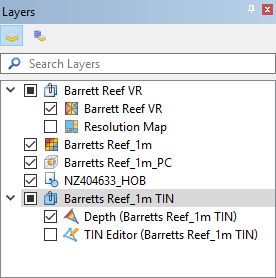
These layers are not saved when you save the project; you must recreate the TIN each time you open the data. If edits were previously applied to the TIN, they will be reimplemented using the .tls file when the TIN is recreated.
If the TIN will be cut, it is recommended to remove long edges.
Related commands:
Interface
The Create TIN command uses the following dialog box.
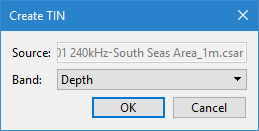
Option | Description |
Source | The name and location of the input file. The Source is defined by the coverage that was selected at the time the command was initiated. This field cannot be changed. |
Band | The band in the input coverage containing the values that will be used to calculate the TIN. |
Procedure
1. From the Layers window, select a data source containing elevation values.
2. Select the Create TIN command.
The Create TIN dialog box is displayed.
3. Select a Band from the drop-down list.
4. Click OK.
The TIN layer is created and added to the Layers window as a new data source.
5. Refresh the Display window to view the TIN.
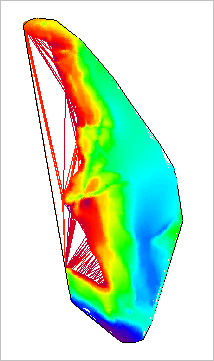
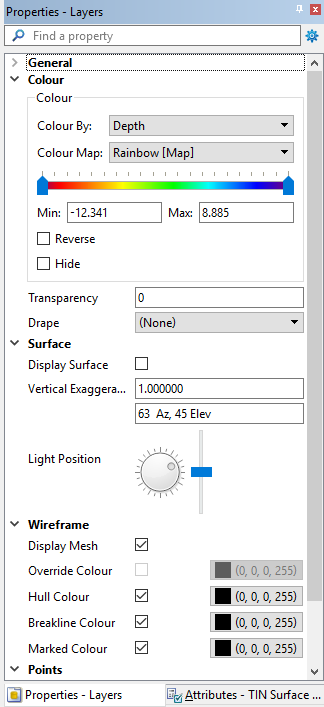
You can edit the appearance of the TIN using the Colour and Wireframe properties in the Properties window when the TIN attribute layer is selected.