Menu | Tools > 3D Flight Path > Export to Video |
Export a recorded 3D flight path to a video file that can be played using a standard media player.
Related commands:
• Load 3D Flight Path from File
Procedure
1. Record or open a flight path.
2. Select the Export to Video command.
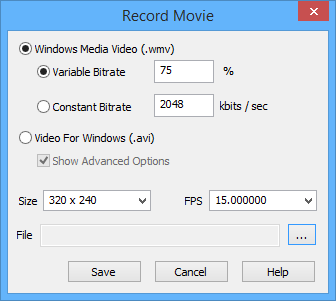
The Record Movie dialog box is displayed.
Option | Description |
Windows Media Video | ( • Variable Bitrate: Record the video using a fluctuating bitrate, which is based on a user-defined average quality level. During encoding, the bitrate will fluctuate to ensure the video is created with the highest possible quality while maintaining the specified average. Type the average quality level. • Constant Bitrate: Record the video using a user-defined number of kilo-bits per second. This option ensures that a constant bitrate is used during encoding, but may result in a lower quality video. Type the number of kilo-bits per second. |
Video for Windows | ( Show Advanced Options: • On: The Video Compression dialog box is displayed after you click Save. Here you can define compression settings for the video file. • Off: No advanced options are displayed. |
Size | The video display size. Choose 320x240 or 640x480. |
FPS | Frames per second. Select from the list. |
File | Click browse (...) to set the file name and location for the video. |
3. Select the format of the video file.
• Windows Media Video.
• Video for Windows
4. Set the File option.
5. Set any other necessary options.
6. Click Save.
If you chose Video for Windows and enabled Advanced Options, the Video Compression dialog box is displayed.
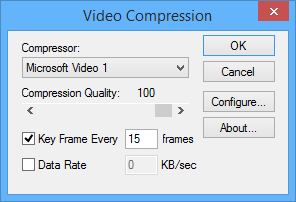
Option | Description |
Compressor | A compressor is code used to convert the data to AVI format. Different compressors provide different options and results. For example, the Full Frames (Uncompressed) option tends to generate large files and the AVI encoder only supports files up to 2 GB. If the resulting file were larger than 2 GB, an error message would be displayed and you would need to selected a different compressor. Some video compressors do not allow you to set the other options on this dialog box |
Compression Quality | Use the slider to adjust the quality from 0 to 100 percent. |
Key Frame | A key frame is a frame used to indicate the beginning or end of a change in the signal. Key frames at specific intervals may be required if the video will be streamed. On: No key frames will be created. Off: Key frames will be created at a specific interval. Type a value for the interval. |
Data Rate | The number of kilobits processed per second. On: Use a specific data rate. Enter a value in kilobits per second. Off: The default value is used. This may vary based on the compressor. |
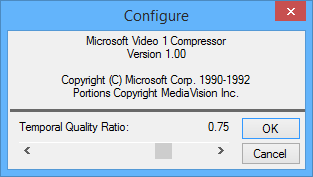
Configure | Configure the compressor. The configuration available is based on the selected compressor.
|
7. Set any necessary compression options.
8. Click OK.
The video is created.