Menu | Tools > Report > Publication |
Tool |
|
Menu | Tools > Report > Publication |
Tool |
|
The Publication tool formats data for printing to paper or to Portable Document Format (PDF). It is used to open template files (RPX files) created in the CARIS Publication Designer.
The Publication Designer is a separate application that can be opened through the Start menu or from an icon on the desktop. For more information on this application, see the CARIS Publication Designer User Guide.
CARIS Plot Composer can also be used to create publications using the display in BASE Editor. This utility is available for download from the Teledyne CARIS Customer Support Web site: http://support.caris.com/ |
A template contains object tags that act as place holders for data. When a template is opened in the Publication tool, these tags are used to populate the Publication objects list.
Sample template files are available for creating volume and shoal publications. These files can be found at:
C:\ProgramData\CARIS\BASE Editor\<version>\SampleData
For information on creating volume and shoal publications, see the CARIS Engineering Analysis Module documentation.
The object tags available for a template are controlled by the publication.dic dictionary file located at:
C:\Program Files\CARIS\BASE Editor\<version>\modules\BASE Editor\support
The available object tags are:
• Image objects
• XML files
• Text fields
• Point objects
• Scale bar
• Tree control
Entries can be added to the publication.dic file or changed to create custom text objects. The sample templates provided each contain a group of “User Strings” entries that can be used to define the custom objects. These entries can be altered rather than creating new entries, if desired. An example of a new entry could be “Users”, which calls to a drop-down list of user names, allowing a specific user account to be added to a publication.
If creating new text objects that require drop-down lists, you will also have to add new entries to the publication_text_object_lists.xml file. This file controls the lists available for text objects and the values for those lists.
The file can be found at:
C:\ProgramData\CARIS\BASE Editor\<version>\SampleData
The above image shows the two sample lists provided with the application. For each new list you want to add, change the “List Name” value to the appropriate name. The “Value Name” entries are used to add values to the drop-down list in the application. Change or add the appropriate values for the desired drop-down entries.
If the New Publication dialog box is open when changes are made to the above mentioned files, the changes will not take effect until the dialog box is reopened. |
Interface
The Publication command uses the following dialog box.
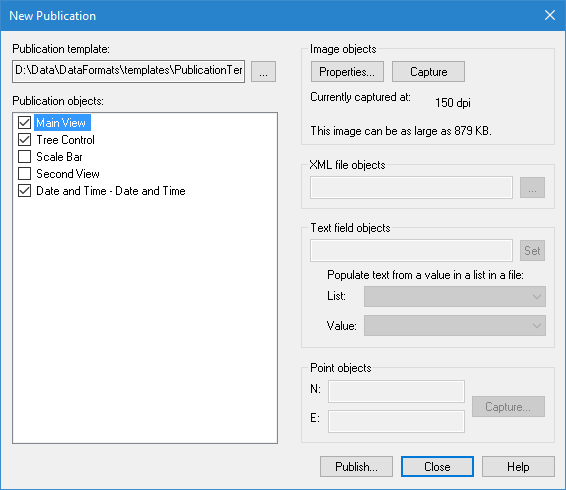
Option | Description |
Publication template | The template to use for the publication. 1. Click the browse button (...) to navigate to and select a template file. |
Publication objects | The publication objects contained in the selected template. Selecting an object in this list enables the relevant object fields on the right of dialog box, allowing settings to be defined for the selected publication object. Once the settings are defined, a check mark will be displayed beside the item in the Publication objects list. Objects with a check mark will be included in the publication. If there is sufficient information to include an option without defining additional properties, the check mark will be added automatically. |
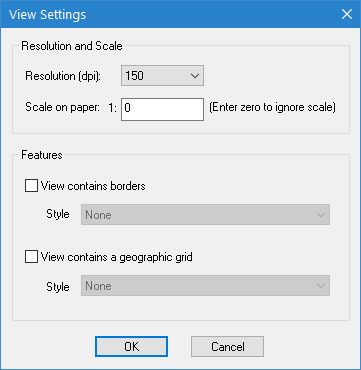
Image objects | Define the capture settings for the image object currently selected in the Publication objects list. 1. Select an image object from the Publication objects list. 2. Click the Properties button. The View Settings dialog box is displayed.
The default resolution for image objects is 150 dpi (dots per inch). 3. Select a Resolution from the drop-down list, if desired. 4. Type a Scale for displaying the image (or type 0 to ignore the scale). 5. [Optional] If borders and/or a geographic grid are turned on in Tools > Options and they are to be included in the image, click the respective check boxes and select a Style option for each. 6. Click OK to close the dialog box and return to the New Publication dialog box. 7. Use the Pan and Zoom tools to adjust the view as needed. 8. Click Capture to capture the current view using the specified settings. Only data visible in the Display window will be included in the image. The image object now has a check mark beside it. |
XML files | An XML file tag is used to include XML data in the publication, such as volume computation results. 1. Select an XML object from the Publication objects list. 2. Click the browse button (...) under XML file objects. 3. Browse for and select an XML file to include in your publication then click OK. A check mark beside the XML object indicates the XML file is set. |
Text Field | Text fields, such as “Shoal ID”, require you to enter an appropriate value when you create the publication. This value can be defined in two different ways: • the value can be entered manually in the Text field objects field, or • it can be defined using the List and Value drop-down lists. The drop-down lists are populated based on the lists set up in publication_text_object_lists.xml mentioned previously. The Text field objects field will be populated with the final selection from the Value list. 1. Select a text field object from the Publication objects list. 2. Use one of the following methods to define a value for the object: • Manually enter a value in the Text field objects field, or • Select a List option and a Value option. 3. Click Set. A check mark is displayed beside the text object to indicate that the field is populated with the value. |
Point | For fields that require coordinates, you can use the point capture functionality. This functionality captures the ground coordinates of a selected point of interest and copies them into the Point objects fields. 1. Select a point object from the Publication objects list. 2. Click the Capture button in the Point objects field set. The New Publication dialog box is hidden, the Display window is displayed and the style of the cursor changes to a set of crosshairs. Click the point in the Display window that you want to use as the coordinates in the publication. You are returned to the New Publication dialog box. The ground coordinates of the selected point are added to the clipboard fields. Copy the coordinates from these fields and paste them into the appropriate fields. Note that the BASE Editor dictionary does not currently have any entries that make use of the point object functionality. |
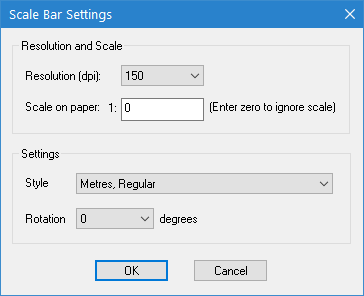
Scale bars | A scale bar object adds a scale bar to the display using the currently selected data. 1. Select a scale bar object in the Publication objects list and click Properties. The Scale Bar Settings dialog box is displayed. 2. Select the Resolution setting for the scale bar. 3. Type a value for the Scale on paper (or type 0 to ignore the scale). 4. Under Style, select the unit of measure to use for the scale bar. 5. Select a rotation angle for the scale bar from the Rotation list. 6. Click OK. The Capture button is now active. 7. Click Capture to commit the settings to memory. The scale bar object now has a check mark beside it in the Publication objects list. |
Tree controls | A Tree Control object takes a screen capture of the Layers window and adds it to the publication. This is a useful function as it allows the user to determine which data was being displayed at the time the publication was created. 1. Select a tree control object in the Publication objects list and click Properties under Image objects. The Generic Image Settings dialog box is displayed 2. Select a Resolution value and click OK. You are returned to the New Publication dialog box. 3. Click Capture to commit the settings to memory. The tree control now has a check mark beside it. |
Publish | Generate the PDF publication with the current publication object settings. |
The styles available for borders, geographic grids and scale bars are controlled by sample files provided with the application. By default, the sample files can be found in C:\Program Files\CARIS\BASE Editor\<version>\system. The styles in these files can be edited using CARIS Template Editor. Contact Teledyne CARIS Customer Services for more information on Template Editor. |
Procedure
1. Display the data that you wish to use in the publication.
2. Select the Publication command.
The New Publication dialog box is displayed.
3. Click the browse button (...) to select a Publication template.
4. In the dialog box that opens, navigate to and select a publication template file and click Open.
5. Select each necessary publication object and define the relevant properties to populate the object.
6. Click Publish.
An Export dialog box is displayed.
7. Define a name and location for the publication and click Save.
The PDF Export Settings dialog box is displayed.
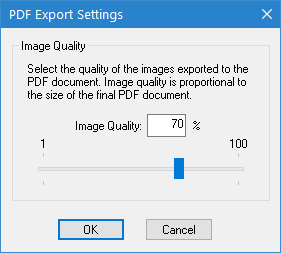
8. Use the slider bar to select the quality for the images in the resulting PDF and click OK.
A PDF is created for the new publication. The New Publication dialog box remains open, allowing additional publications to be created.
9. Click Close to close the dialog box.