Menu | Tools > BDB Server Database > Add Coverage |
Pop-up | coverage > Add Coverage to Database (Layers window) |
The Add Coverage to Database tool is used to load individual coverages into a database and associate them with a database object.
Before you can add a coverage you must have a connection to a database server (see Open Connection) and you must have the appropriate permissions. For a table of the permissions associated with each of the default user roles see the User Roles topic in the CARIS Bathy DataBASE Server Reference Guide.
Because this operation will add bathymetry to a database object, and this cannot be undone via the Undo command, the application will not allow this command to be run if there are any previous unsaved changes. If there are any unsaved changes, a message will be displayed prompting you to save your changes before continuing.
In order to add a coverage using this tool, it must be open in BASE Editor. You can add coverages opened from a local file, or coverages from another database that have been opened locally. For information on opening a database coverage locally, see Open Coverages from Database.
The coverage being added needs to be associated with a database object. The object can be generated automatically by the application based on the extents of the data, or it can be digitized manually. The type of feature object that can be created is controlled by the feature object acronyms present in the catalogue of the database; any feature acronym in the catalogue can be used.
The attributes of the database object can be populated through a combination of different methods, each of which is explained below.
• XML Attribute Files: If the coverage being added has been previously exported from a database, an object.xml file should have been created containing the metadata of the coverage. Metadata files are named according to the name of the coverage for which they were created (CoverageName.object.xml). This file allows for the easy transfer of data between databases. If the application finds an XML metadata file in the same location as the coverage, attributes for the database object will automatically be populated with the values that are equivalent to the attributes available in the metadata file.
Only XML attribute files created with BASE Editor 5.0 and later can be used for this purpose because a different format was used to create these files in previous versions. |
• Python Scripts: A python script with the coverage_assigned function can be used to map coverage metadata to object attributes. See Python Appendix LINK for more information about python scripts.
• Manual Attribute Population: Attribute values can be entered manually when creating the database object. If the database object is generated automatically, the Attributes dialog box will be displayed, prompting you to define attribute values for the object. If the database object is digitized manually, the attribute values can be entered in the Attributes window while digitize mode is enabled.
When the command is initiated to add a coverage, the application first checks to see if an object.xml file exists for the coverage being added. If one is found, attribute values will be populated according to the metadata present in the file. It then checks to see if the Feature Plugin option in Tools > Options is populated. If it is, attribute values will be populated according to the python script. If there are conflicts, the values from the python script will override the values from the object.xml file. Once you reach the the point in the process that the Attributes window or Attributes dialog box become available, any values populated by the first two methods will be visible. At this point you can manually override those values and/or populate any addition attributes as needed.
Read-only attributes are shaded in grey and are automatically populated by the system. These values cannot be changed using any of the attribute population methods. |
Regardless of the population method, attribute values can be edited afterwards by selecting the database object and enabling edit mode. See Edit for information on editing feature objects.
Related commands:
• Import Selected Objects to Database
Interface
The Add Coverage to Database command uses the following dialog box.
Option | Description |
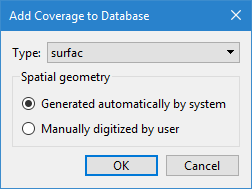
Feature type | The feature object acronym that will be used to create the database object. |
Spatial geometry | The method with which to create the database object. • Generated automatically by system: This option will automatically generate the database object according to the geometry of the source data and the selected Feature type. The Attributes dialog box will be displayed during the creation process to allow attribute values to be defined for the database object. See Attributes for more information on defining attribute values. • Manually digitized by user: This option allows the database object to be digitized manually. The same digitizing tools and options are available as when digitizing a local feature object. See Digitize for information on digitizing objects. |
Procedure
1. Connect to a database.
2. Open the coverage you want to add to the database.
3. Select the coverage in the Layers window.
4. Select the Add Coverage to Database command.
A sub-menu is displayed listing the BDB databases to which you are currently connected. 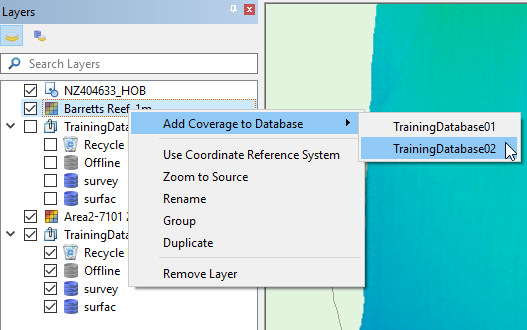
5. Select the database to which you want the coverage added.
The Add Coverage to Database dialog box is displayed.
6. Select a Feature type for the object.
7. Choose a Spatial geometry creation method.
8. Depending the generation method selected, either:
• Define any necessary attribute values in the Attributes dialog box and click OK.
• Define any necessary attribute values in the Attributes window and digitize the database object.
A message will be displayed in the Output window when the process is complete.