Menu | File >Import > Sensor Data |
Tool |
|
Menu | File >Import > Sensor Data |
Tool |
|
Sensor data can be imported to HIPS and SIPS format using the Import Sensor Data command. This command opens the Import Sensor Data dialog box so you can:
• select raw data files from the list of more than 40 data formats
• see which import formats have been recently used
• set options for specific data formats
• add an often-used format to a Favourites list
• set the location for the converted data files
• create a HIPS file, or save the imported data to an existing file, and
• create a surface from the imported data. Data can also be added to an existing surface during import
Each import format has a settings page, with default settings for the most commonly used settings. Some formats require a CRS to be set, since they only store projected coordinates. These default settings (and CRS where needed) are the only settings required to properly import the data.
Data can also be opened directly into HIPS using the File > Open command, or by dragging raw data files into the HIPS and SIPS interface. This applies to Kongsberg ALL, Kongsberg KMALL, Teledyne S7K, Teledyne PDS, Sonardyne SWF8 and Triton XTF formats.
Opening data this way will automatically process the raw data to create a new HIPS data folder (containing a HIPS file and line folders) and a surface. The automatically created surface will have four times the extent of the imported data. More data can to be added to the surface later.
Both are saved by default to the user's Windows \ Documents folder \ CARIS\ HIPS and SIPS location.
Survey data in ASCII format can also be converted using the Generic Data Parser. |
Interface
Data is imported using the Import Sensor Data dialog box.
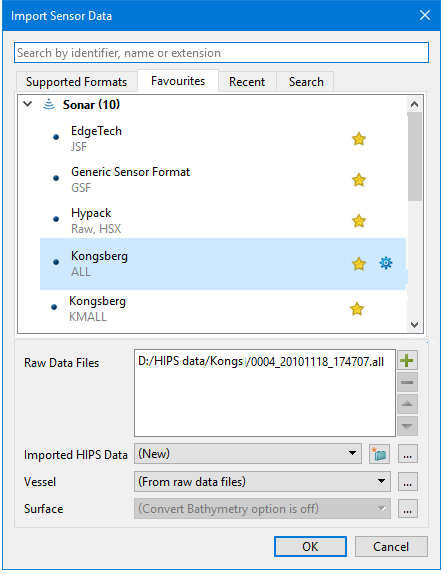
Field | Description |
Search | 1. Type in the Search box to find a format by name or extension. The results are displayed in the Search results tab. |
Tabbed pages | These pages list formats that can be imported. • Supported formats is a complete list • Favourites is a user-created list. • Recent lists To set options for a format click the gear to the right of the format name. |
Raw Data Files | 1. Click the If more than one data file is listed, the Remove |
Imported HIPS Data | Sets the location of the imported data. Default setting is (New). If a HIPS file is open, the field will also display the HIPS file name on the drop list. 1. If New is selected, click 2. If an existing HIPS file is selected, click the Browse button to set the file location from the Open dialog box. |
Vessel | A vessel file is no longer required for import, however, a vessel file can be later assigned to the data. 1. Choose the “From raw data files” option to include vessel configuration from the raw data during the import. 2. If the offsets are not available, but required for properly processing the data, you can create a HIPS Vessel File (HVF) after importing and use it from that point on. |
Surface | The Auto Create option is set by default so that a surface will be created. To turn off the creation of a surface, 1. Select None from the list. |
Procedure - Import Sensor Data
1. Select the Import Sensor Data command.
2. Select the data format from the Supported formats or from the Favourites or Recent list.
3. To change default settings for the format, click the blue gear button to view the options for the selected format.
4. Set or change any options. Click OK.
5. Select the Raw Data Files.
6. Create a new HIPS file or select an existing one.
7. Leave other options to default.
8. Click OK.
Procedure - drag and drop
1. Open HIPS and SIPS.
2. Open the folder containing raw data,
3. Select data to be imported and drag into the HIPS and SIPS interface.
The imported data will be displayed in the main Display window and listed in the Project, Active Track Lines and Layers window.

 button to select a file from the Open dialog box. Click again to add another file.
 is enabled. Click this button to remove an item from the list of files to be imported.
 to open the New HIPS File dialog box, to set the location of the HIPS file.