Menu | Tools > Bands > Compute Band |
Pop-up | coverage layer > Tools > Compute Band (Layers window) |
Create a new band in an existing coverage. An expression can be applied to source data to alter the values in the new band. This is useful if you need to apply a shift, but do not want to apply it to all bands in a coverage. See Filter Expressions for information on creating expressions.
A new band will be added to the input coverage, but is not displayed automatically. The Add Layer command can be used to display the layer and its data. See Layers Window for more information.
Computed bands can be removed from a coverage if they are no longer needed.
Related commands:
Interface
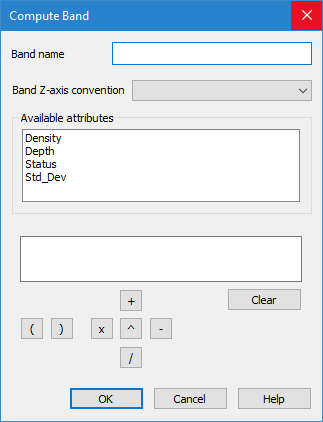
The Compute Band command uses the following dialog box.
The fields in this dialog box include:
Option | Description |
Band name | The name to assign to the new band. |
Band Z-axis convention | The Z-axis convention for the data in the new band. The options include: • Depth with Z-axis positive down: to be used if the data in the new band will contain depth values that are positive down. • Height with Z-axis positive up: to be used if the data in the new band will contain elevation values that are positive up. • Not applicable. Generic numbers: to be used if the data in the new band will represent generic, non-Z values (for example, Std_Dev). These values display as spikes and dips in the data. |
Available attributes | All attributes available in the selected coverage. These attributes are used as the source data for creating the new band. |
Expression field | Define the expression to use to create new values in the new band. 1. Double-click an attribute in the Available attributes list to add it to the expression field. If the selected attribute has a space in its name, you must place quotation marks around the attribute in the expression field (for example, “attribute name”). 2. Click the operator buttons (+, -, x, \, ^ or brackets) or manually type operators to add them to the expression field with the attribute name. 3. Type any necessary values for the expression operators. The Clear button can be used to delete the expression and start over. |
Procedure
1. Select a raster surface in the Layers window.
2. Select the Compute Band command.
The Compute Band dialog box is displayed.
3. Type a Name for the new band.
4. Select the Z-axis convention for the band.
5. Double-click the attribute to use as the data source for the new band.
6. Define an expression.
7. Click OK.
The new band is added to the coverage, populated with values from the source attribute that have been altered according to the user-specified expression.